Canon XF705 Instruction Manual - Page 169
ELECT] button, Auto white balance button
 |
View all Canon XF705 manuals
Add to My Manuals
Save this manual to your list of manuals |
Page 169 highlights
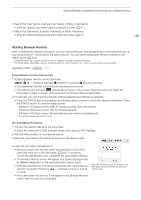
Browser Remote: Controlling the Camcorder from a Network Device 11 [REC] button Touch the button to start recording. While recording, the center of the button turns red. Touch the button again to stop recording. 12 Card selection and approximate remaining recording time The currently selected SD card is indicated with a Ð mark next to the icon. Remaining recording times are approximate and calculated based on the current video configuration used. 13 [SLOT SELECT] button Touch the button to select the other SD card when both card slots contain a card. 14 Current camcorder settings This panel displays an overview of the camcorder settings currently used. You can change camcorder settings with the controls in the detailed camcorder settings panel (18) on the right. [ND]: ND filter [Shutter]: Shutter speed [AE]: AE shift [WB]: White balance [Iris]: Aperture value [Gain]: Gain value 15 Full auto mode indicator (A 43) 16 Video format (A 51) 17 Time code (same as on the camcorder) 18 Detailed camcorder settings panel (A 169) Touch one of the tabs at the bottom to select the camcorder settings you wish to adjust: [White Balance]: [Exposure]: [Focus]: [Zoom]: White balance mode and related settings. Exposure related settings-aperture, shutter speed and gain. Focus related settings. Zoom operation. 169 The Main Remote Recording Screen: Detailed Camcorder Settings The following sections explain how to use the controls in the detailed camcorder settings panel. For detailed information and applicable restrictions about the functions themselves, please refer to each function's explanation. To change the white balance Touch the [White Balance] tab in the detailed camcorder settings panel. 1 4 1 Auto white balance button Touch [ ] to set the camcorder to auto white balance (AWB) mode. 2 2 Custom white balance buttons Touch [ÅA] or [ÅB]. 3 To register a custom white balance: Point the camcorder at a gray card or white object with no pattern so it fills the center of the monitoring/live view screen and touch [Å]. Use the same lighting conditions you plan to use when recording. During the procedure, the icon in the button will flash quickly. When it stops flashing, the procedure is completed and the custom white balance will be applied. 3 Preset white balance (¼/É) / Color temperature (È) Touch a button to apply the corresponding white balance settings as shown in the button.
-
 1
1 -
2
-
3
-
4
-
5
-
6
-
7
-
8
-
9
-
10
-
11
-
12
-
13
-
14
-
15
-
16
-
17
-
18
-
19
-
20
-
21
-
22
-
23
-
24
-
25
-
26
-
27
-
28
-
29
-
30
-
31
-
32
-
33
-
34
-
35
-
36
-
37
-
38
-
39
-
40
-
41
-
42
-
43
-
44
-
45
-
46
-
47
-
48
-
49
-
50
-
51
-
52
-
53
-
54
-
55
-
56
-
57
-
58
-
59
-
60
-
61
-
62
-
63
-
64
-
65
-
66
-
67
-
68
-
69
-
70
-
71
-
72
-
73
-
74
-
75
-
76
-
77
-
78
-
79
-
80
-
81
-
82
-
83
-
84
-
85
-
86
-
87
-
88
-
89
-
90
-
91
-
92
-
93
-
94
-
95
-
96
-
97
-
98
-
99
-
100
-
101
-
102
-
103
-
104
-
105
-
106
-
107
-
108
-
109
-
110
-
111
-
112
-
113
-
114
-
115
-
116
-
117
-
118
-
119
-
120
-
121
-
122
-
123
-
124
-
125
-
126
-
127
-
128
-
129
-
130
-
131
-
132
-
133
-
134
-
135
-
136
-
137
-
138
-
139
-
140
-
141
-
142
-
143
-
144
-
145
-
146
-
147
-
148
-
149
-
150
-
151
-
152
-
153
-
154
-
155
-
156
-
157
-
158
-
159
-
160
-
161
-
162
-
163
-
 164
164 -
 165
165 -
 166
166 -
 167
167 -
 168
168 -
 169
169 -
 170
170 -
 171
171 -
 172
172 -
 173
173 -
 174
174 -
175
-
176
-
177
-
178
-
179
-
180
-
181
-
182
-
183
-
184
-
185
-
186
-
187
-
188
-
189
-
190
-
191
-
192
-
193
-
194
-
195
-
196
-
197
-
198
-
199
-
200
-
201
-
202
-
203
-
204
-
205
-
206
-
207
-
208
-
209
-
210
-
211
-
212
-
213
-
214
-
215
-
216
-
217
-
218
-
219
-
220
-
221
-
222
-
223
-
224
-
225
-
226
-
227
-
228
-
229
-
230
-
231
-
232
-
233
-
234
 |
 |
