Dell PowerEdge R905 Hardware Owner's Manual (PDF) - Page 100
from the processor. Do not pry the heat sink from the processor.
 |
View all Dell PowerEdge R905 manuals
Add to My Manuals
Save this manual to your list of manuals |
Page 100 highlights
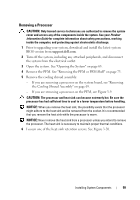
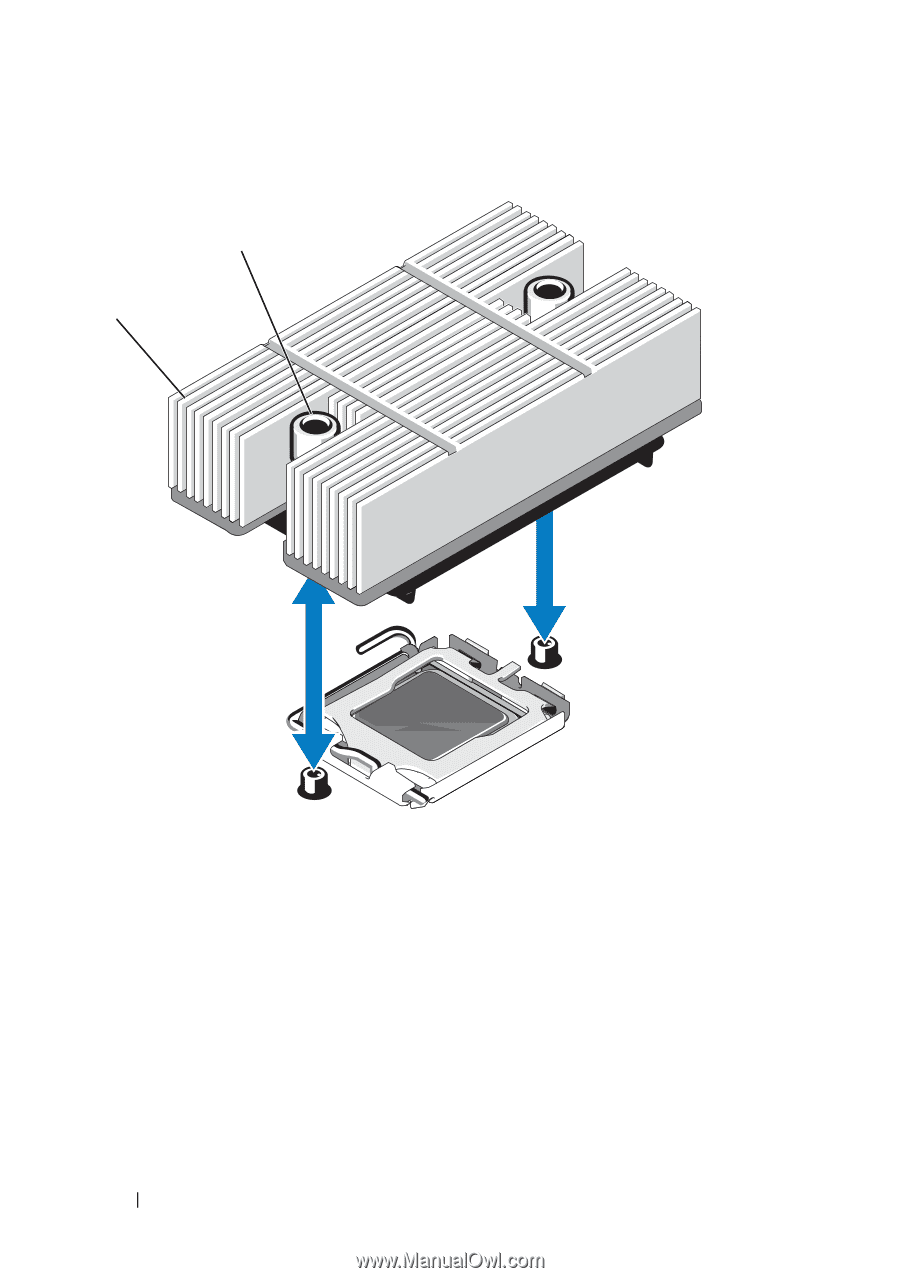
Figure 3-20. Removing and Installing the Heat Sink 2 1 1 heat sink 2 heat-sink retention screws (2) 7 Wait 30 seconds for the heat sink to loosen from the processor. 8 Loosen the second heat-sink retention screw. 9 If the heat sink does not separate from the processor, carefully rotate the heat sink in a clockwise, then counterclockwise, direction until it releases from the processor. Do not pry the heat sink from the processor. 10 Lift the heat sink off of the processor and set the heat sink upside down. 11 Use a clean lint-free cloth to remove any thermal grease from the surface of the processor shield. 100 Installing System Components
-
 1
1 -
2
-
3
-
4
-
5
-
6
-
7
-
8
-
9
-
10
-
11
-
12
-
13
-
14
-
15
-
16
-
17
-
18
-
19
-
20
-
21
-
22
-
23
-
24
-
25
-
26
-
27
-
28
-
29
-
30
-
31
-
32
-
33
-
34
-
35
-
36
-
37
-
38
-
39
-
40
-
41
-
42
-
43
-
44
-
45
-
46
-
47
-
48
-
49
-
50
-
51
-
52
-
53
-
54
-
55
-
56
-
57
-
58
-
59
-
60
-
61
-
62
-
63
-
64
-
65
-
66
-
67
-
68
-
69
-
70
-
71
-
72
-
73
-
74
-
75
-
76
-
77
-
78
-
79
-
80
-
81
-
82
-
83
-
84
-
85
-
86
-
87
-
88
-
89
-
90
-
91
-
92
-
93
-
94
-
 95
95 -
 96
96 -
 97
97 -
 98
98 -
 99
99 -
 100
100 -
 101
101 -
 102
102 -
 103
103 -
 104
104 -
 105
105 -
106
-
107
-
108
-
109
-
110
-
111
-
112
-
113
-
114
-
115
-
116
-
117
-
118
-
119
-
120
-
121
-
122
-
123
-
124
-
125
-
126
-
127
-
128
-
129
-
130
-
131
-
132
-
133
-
134
-
135
-
136
-
137
-
138
-
139
-
140
-
141
-
142
-
143
-
144
-
145
-
146
-
147
-
148
-
149
-
150
-
151
-
152
-
153
-
154
-
155
-
156
-
157
-
158
-
159
-
160
-
161
-
162
-
163
-
164
-
165
-
166
-
167
-
168
-
169
-
170
-
171
-
172
-
173
-
174
-
175
-
176
-
177
-
178
-
179
-
180
-
181
-
182
-
183
-
184
-
185
-
186
-
187
-
188
-
189
-
190
-
191
-
192
-
193
-
194
-
195
-
196
-
197
-
198
 |
 |
100
Installing System Components
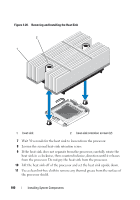
Figure 3-20.
Removing and Installing the Heat Sink
7
Wait 30 seconds for the heat sink to loosen from the processor.
8
Loosen the second heat-sink retention screw.
9
If the heat sink does not separate from the processor, carefully rotate the
heat sink in a clockwise, then counterclockwise, direction until it releases
from the processor. Do not pry the heat sink from the processor.
10
Lift the heat sink off of the processor and set the heat sink upside down.
11
Use a clean lint-free cloth to remove any thermal grease from the surface of
the processor shield.
1
heat sink
2
heat-sink retention screws (2)
2
1