Dell PowerEdge R905 Hardware Owner's Manual (PDF) - Page 71
Power Supplies, Removing a Power Supply - cable management arm
 |
View all Dell PowerEdge R905 manuals
Add to My Manuals
Save this manual to your list of manuals |
Page 71 highlights
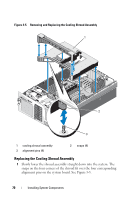
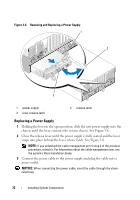
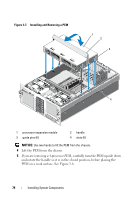
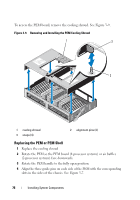
2 Gently press down on the shroud assembly until it is fully seated. The upper surface of the shroud should be flush with the fan bays when the shroud assembly is correctly installed. Power Supplies Your system supports two power supplies. The second power supply serves as a redundant, hot-plug power source. NOTICE: The system is only in the redundant mode when two power supplies are installed and both power supplies are connected to an AC power source. If some third-party components (such as PCI cards) not tested or supported by Dell are installed, the power supplies may not be redundant at all input voltages. NOTICE: Operating the system with only one power supply installed for extended periods of time can cause the system to overheat. Removing a Power Supply 1 Disconnect the power cable from the power source and the power supply you intend to remove and remove the cables from the cable strain-relief loop. 2 Press the lever release latch, then open the release lever and slide the power supply out of the chassis. See Figure 3-6. NOTE: You may have to unlatch and lift the cable management arm if it interferes with power-supply removal. For information about the cable management arm, see the system's Rack Installation Guide. Installing System Components 71
-
 1
1 -
2
-
3
-
4
-
5
-
6
-
7
-
8
-
9
-
10
-
11
-
12
-
13
-
14
-
15
-
16
-
17
-
18
-
19
-
20
-
21
-
22
-
23
-
24
-
25
-
26
-
27
-
28
-
29
-
30
-
31
-
32
-
33
-
34
-
35
-
36
-
37
-
38
-
39
-
40
-
41
-
42
-
43
-
44
-
45
-
46
-
47
-
48
-
49
-
50
-
51
-
52
-
53
-
54
-
55
-
56
-
57
-
58
-
59
-
60
-
61
-
62
-
63
-
64
-
65
-
 66
66 -
 67
67 -
 68
68 -
 69
69 -
 70
70 -
 71
71 -
 72
72 -
 73
73 -
 74
74 -
 75
75 -
 76
76 -
77
-
78
-
79
-
80
-
81
-
82
-
83
-
84
-
85
-
86
-
87
-
88
-
89
-
90
-
91
-
92
-
93
-
94
-
95
-
96
-
97
-
98
-
99
-
100
-
101
-
102
-
103
-
104
-
105
-
106
-
107
-
108
-
109
-
110
-
111
-
112
-
113
-
114
-
115
-
116
-
117
-
118
-
119
-
120
-
121
-
122
-
123
-
124
-
125
-
126
-
127
-
128
-
129
-
130
-
131
-
132
-
133
-
134
-
135
-
136
-
137
-
138
-
139
-
140
-
141
-
142
-
143
-
144
-
145
-
146
-
147
-
148
-
149
-
150
-
151
-
152
-
153
-
154
-
155
-
156
-
157
-
158
-
159
-
160
-
161
-
162
-
163
-
164
-
165
-
166
-
167
-
168
-
169
-
170
-
171
-
172
-
173
-
174
-
175
-
176
-
177
-
178
-
179
-
180
-
181
-
182
-
183
-
184
-
185
-
186
-
187
-
188
-
189
-
190
-
191
-
192
-
193
-
194
-
195
-
196
-
197
-
198
 |
 |