Dell PowerEdge R905 Hardware Owner's Manual (PDF) - Page 68
Replacing a Cooling Fan, into place. See
 |
View all Dell PowerEdge R905 manuals
Add to My Manuals
Save this manual to your list of manuals |
Page 68 highlights
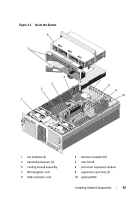
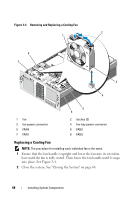
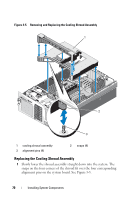
Figure 3-4. Removing and Replacing a Cooling Fan 2 1 8 7 3 4 5 6 1 fan 3 fan power connector 5 FAN4 7 FAN1 2 latches (2) 4 fan-bay power connector 6 FAN2 8 FAN3 Replacing a Cooling Fan NOTE: The procedure for installing each individual fan is the same. 1 Ensure that the fan handle is upright and lower the fan into its retention base until the fan is fully seated. Then lower the fan handle until it snaps into place. See Figure 3-4. 2 Close the system. See "Closing the System" on page 66. 68 Installing System Components
-
 1
1 -
2
-
3
-
4
-
5
-
6
-
7
-
8
-
9
-
10
-
11
-
12
-
13
-
14
-
15
-
16
-
17
-
18
-
19
-
20
-
21
-
22
-
23
-
24
-
25
-
26
-
27
-
28
-
29
-
30
-
31
-
32
-
33
-
34
-
35
-
36
-
37
-
38
-
39
-
40
-
41
-
42
-
43
-
44
-
45
-
46
-
47
-
48
-
49
-
50
-
51
-
52
-
53
-
54
-
55
-
56
-
57
-
58
-
59
-
60
-
61
-
62
-
 63
63 -
 64
64 -
 65
65 -
 66
66 -
 67
67 -
 68
68 -
 69
69 -
 70
70 -
 71
71 -
 72
72 -
 73
73 -
74
-
75
-
76
-
77
-
78
-
79
-
80
-
81
-
82
-
83
-
84
-
85
-
86
-
87
-
88
-
89
-
90
-
91
-
92
-
93
-
94
-
95
-
96
-
97
-
98
-
99
-
100
-
101
-
102
-
103
-
104
-
105
-
106
-
107
-
108
-
109
-
110
-
111
-
112
-
113
-
114
-
115
-
116
-
117
-
118
-
119
-
120
-
121
-
122
-
123
-
124
-
125
-
126
-
127
-
128
-
129
-
130
-
131
-
132
-
133
-
134
-
135
-
136
-
137
-
138
-
139
-
140
-
141
-
142
-
143
-
144
-
145
-
146
-
147
-
148
-
149
-
150
-
151
-
152
-
153
-
154
-
155
-
156
-
157
-
158
-
159
-
160
-
161
-
162
-
163
-
164
-
165
-
166
-
167
-
168
-
169
-
170
-
171
-
172
-
173
-
174
-
175
-
176
-
177
-
178
-
179
-
180
-
181
-
182
-
183
-
184
-
185
-
186
-
187
-
188
-
189
-
190
-
191
-
192
-
193
-
194
-
195
-
196
-
197
-
198
 |
 |

68
Installing System Components
Figure 3-4.
Removing and Replacing a Cooling Fan
Replacing a Cooling Fan
NOTE:
The procedure for installing each individual fan is the same.
1
Ensure that the fan handle is upright and lower the fan into its retention
base until the fan is fully seated. Then lower the fan handle until it snaps
into place. See Figure 3-4.
2
Close the system. See "Closing the System" on page 66.
1
fan
2
latches (2)
3
fan power connector
4
fan-bay power connector
5
FAN4
6
FAN2
7
FAN1
8
FAN3
1
2
3
4
8
6
5
7