Dell PowerEdge R905 Hardware Owner's Manual (PDF) - Page 82
Replacing the Riser Board,
 |
View all Dell PowerEdge R905 manuals
Add to My Manuals
Save this manual to your list of manuals |
Page 82 highlights
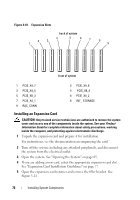
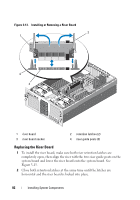
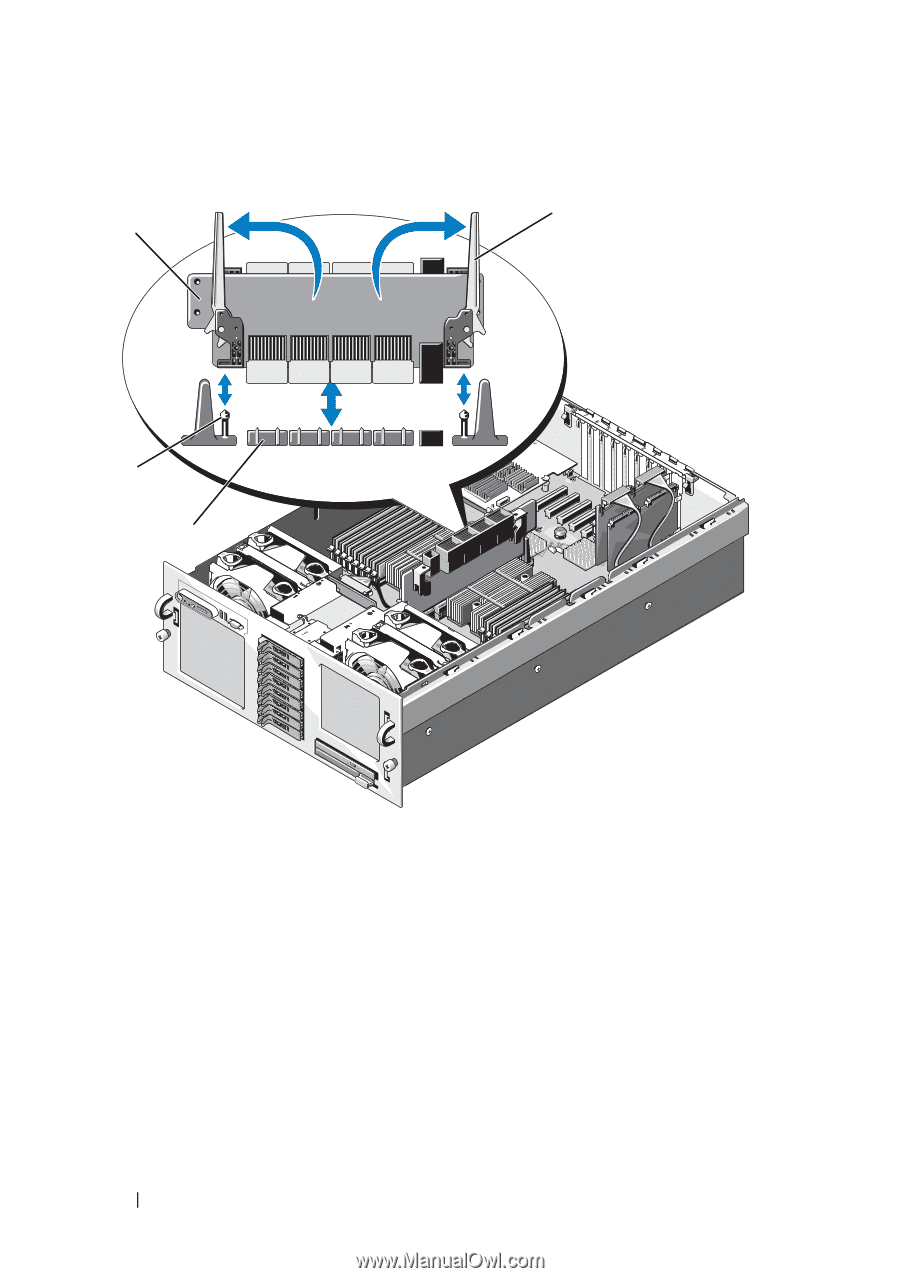
Figure 3-13. Installing or Removing a Riser Board 2 1 4 3 1 riser board 3 riser board socket 2 retention latches (2) 4 riser guide posts (2) Replacing the Riser Board 1 To install the riser board, make sure both riser retention latches are completely open, then align the riser with the two riser guide posts on the system board and lower the riser board onto the system board. See Figure 3-13. 2 Close both retention latches at the same time until the latches are horizontal and the riser board is locked into place. 82 Installing System Components
-
 1
1 -
2
-
3
-
4
-
5
-
6
-
7
-
8
-
9
-
10
-
11
-
12
-
13
-
14
-
15
-
16
-
17
-
18
-
19
-
20
-
21
-
22
-
23
-
24
-
25
-
26
-
27
-
28
-
29
-
30
-
31
-
32
-
33
-
34
-
35
-
36
-
37
-
38
-
39
-
40
-
41
-
42
-
43
-
44
-
45
-
46
-
47
-
48
-
49
-
50
-
51
-
52
-
53
-
54
-
55
-
56
-
57
-
58
-
59
-
60
-
61
-
62
-
63
-
64
-
65
-
66
-
67
-
68
-
69
-
70
-
71
-
72
-
73
-
74
-
75
-
76
-
 77
77 -
 78
78 -
 79
79 -
 80
80 -
 81
81 -
 82
82 -
 83
83 -
 84
84 -
 85
85 -
 86
86 -
 87
87 -
88
-
89
-
90
-
91
-
92
-
93
-
94
-
95
-
96
-
97
-
98
-
99
-
100
-
101
-
102
-
103
-
104
-
105
-
106
-
107
-
108
-
109
-
110
-
111
-
112
-
113
-
114
-
115
-
116
-
117
-
118
-
119
-
120
-
121
-
122
-
123
-
124
-
125
-
126
-
127
-
128
-
129
-
130
-
131
-
132
-
133
-
134
-
135
-
136
-
137
-
138
-
139
-
140
-
141
-
142
-
143
-
144
-
145
-
146
-
147
-
148
-
149
-
150
-
151
-
152
-
153
-
154
-
155
-
156
-
157
-
158
-
159
-
160
-
161
-
162
-
163
-
164
-
165
-
166
-
167
-
168
-
169
-
170
-
171
-
172
-
173
-
174
-
175
-
176
-
177
-
178
-
179
-
180
-
181
-
182
-
183
-
184
-
185
-
186
-
187
-
188
-
189
-
190
-
191
-
192
-
193
-
194
-
195
-
196
-
197
-
198
 |
 |
82
Installing System Components
Figure 3-13.
Installing or Removing a Riser Board
Replacing the Riser Board
1
To install the riser board, make sure both riser retention latches are
completely open, then align the riser with the two riser guide posts on the
system board and lower the riser board onto the system board. See
Figure 3-13.
2
Close both retention latches at the same time until the latches are
horizontal and the riser board is locked into place.
1
riser board
2
retention latches (2)
3
riser board socket
4
riser guide posts (2)
3
2
1
4