Dell PowerEdge R905 Hardware Owner's Manual (PDF) - Page 110
Replacing a Hard Drive in a Hard-Drive Carrier, Optional Front Bezel - rails
 |
View all Dell PowerEdge R905 manuals
Add to My Manuals
Save this manual to your list of manuals |
Page 110 highlights
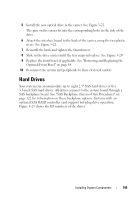
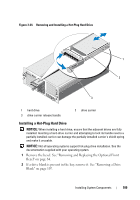
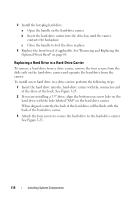
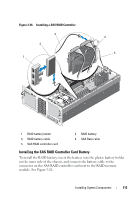
3 Install the hot-plug hard drive. a Open the handle on the hard-drive carrier. b Insert the hard-drive carrier into the drive bay until the carrier contacts the backplane. c Close the handle to lock the drive in place. 4 Replace the front bezel, if applicable. See "Removing and Replacing the Optional Front Bezel" on page 64. Replacing a Hard Drive in a Hard-Drive Carrier To remove a hard drive from a drive carrier, remove the four screws from the slide rails on the hard-drive carrier and separate the hard drive from the carrier. To install a new hard drive in a drive carrier, perform the following steps: 1 Insert the hard drive into the hard-drive carrier with the connector end of the drive at the back. See Figure 3-25. 2 If you are installing a 3.5" drive, align the bottom rear screw hole on the hard drive with the hole labeled "SAS" on the hard drive carrier. When aligned correctly, the back of the hard drive will be flush with the back of the hard-drive carrier. 3 Attach the four screws to secure the hard drive to the hard-drive carrier. See Figure 3-25. 110 Installing System Components
-
 1
1 -
2
-
3
-
4
-
5
-
6
-
7
-
8
-
9
-
10
-
11
-
12
-
13
-
14
-
15
-
16
-
17
-
18
-
19
-
20
-
21
-
22
-
23
-
24
-
25
-
26
-
27
-
28
-
29
-
30
-
31
-
32
-
33
-
34
-
35
-
36
-
37
-
38
-
39
-
40
-
41
-
42
-
43
-
44
-
45
-
46
-
47
-
48
-
49
-
50
-
51
-
52
-
53
-
54
-
55
-
56
-
57
-
58
-
59
-
60
-
61
-
62
-
63
-
64
-
65
-
66
-
67
-
68
-
69
-
70
-
71
-
72
-
73
-
74
-
75
-
76
-
77
-
78
-
79
-
80
-
81
-
82
-
83
-
84
-
85
-
86
-
87
-
88
-
89
-
90
-
91
-
92
-
93
-
94
-
95
-
96
-
97
-
98
-
99
-
100
-
101
-
102
-
103
-
104
-
 105
105 -
 106
106 -
 107
107 -
 108
108 -
 109
109 -
 110
110 -
 111
111 -
 112
112 -
 113
113 -
 114
114 -
 115
115 -
116
-
117
-
118
-
119
-
120
-
121
-
122
-
123
-
124
-
125
-
126
-
127
-
128
-
129
-
130
-
131
-
132
-
133
-
134
-
135
-
136
-
137
-
138
-
139
-
140
-
141
-
142
-
143
-
144
-
145
-
146
-
147
-
148
-
149
-
150
-
151
-
152
-
153
-
154
-
155
-
156
-
157
-
158
-
159
-
160
-
161
-
162
-
163
-
164
-
165
-
166
-
167
-
168
-
169
-
170
-
171
-
172
-
173
-
174
-
175
-
176
-
177
-
178
-
179
-
180
-
181
-
182
-
183
-
184
-
185
-
186
-
187
-
188
-
189
-
190
-
191
-
192
-
193
-
194
-
195
-
196
-
197
-
198
 |
 |