Dell PowerEdge R905 Hardware Owner's Manual (PDF) - Page 105
Hard Drives
 |
View all Dell PowerEdge R905 manuals
Add to My Manuals
Save this manual to your list of manuals |
Page 105 highlights
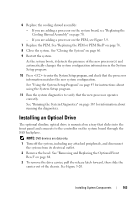
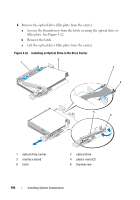
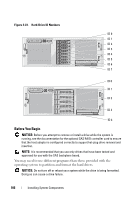
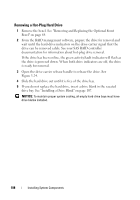
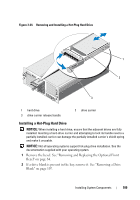
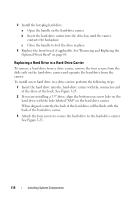
5 Install the new optical drive in the carrier. See Figure 3-22. The pins on the carrier fit into the corresponding holes in the side of the drive. 6 Attach the interface board to the back of the carrier, using the two plastic rivets. See Figure 3-22. 7 Reinstall the latch and tighten the thumbscrew. 8 Slide in the drive carrier until the tray snaps into place. See Figure 3-20 9 Replace the front bezel, if applicable. See "Removing and Replacing the Optional Front Bezel" on page 64. 10 Reconnect the system and peripherals to their electrical outlets. Hard Drives Your system can accommodate up to eight 2.5" SAS hard drives or five 3.5-inch SAS hard drives. All drives connect to the system board through a SAS backplane board. See "SAS Backplane (Service-Only Procedure)" on page 122 for information on these backplane options. Systems with an optional SAS RAID controller card support hot-plug drive operation. Figure 3-23 shows the ID numbers of the drives. Installing System Components 105
-
 1
1 -
2
-
3
-
4
-
5
-
6
-
7
-
8
-
9
-
10
-
11
-
12
-
13
-
14
-
15
-
16
-
17
-
18
-
19
-
20
-
21
-
22
-
23
-
24
-
25
-
26
-
27
-
28
-
29
-
30
-
31
-
32
-
33
-
34
-
35
-
36
-
37
-
38
-
39
-
40
-
41
-
42
-
43
-
44
-
45
-
46
-
47
-
48
-
49
-
50
-
51
-
52
-
53
-
54
-
55
-
56
-
57
-
58
-
59
-
60
-
61
-
62
-
63
-
64
-
65
-
66
-
67
-
68
-
69
-
70
-
71
-
72
-
73
-
74
-
75
-
76
-
77
-
78
-
79
-
80
-
81
-
82
-
83
-
84
-
85
-
86
-
87
-
88
-
89
-
90
-
91
-
92
-
93
-
94
-
95
-
96
-
97
-
98
-
99
-
 100
100 -
 101
101 -
 102
102 -
 103
103 -
 104
104 -
 105
105 -
 106
106 -
 107
107 -
 108
108 -
 109
109 -
 110
110 -
111
-
112
-
113
-
114
-
115
-
116
-
117
-
118
-
119
-
120
-
121
-
122
-
123
-
124
-
125
-
126
-
127
-
128
-
129
-
130
-
131
-
132
-
133
-
134
-
135
-
136
-
137
-
138
-
139
-
140
-
141
-
142
-
143
-
144
-
145
-
146
-
147
-
148
-
149
-
150
-
151
-
152
-
153
-
154
-
155
-
156
-
157
-
158
-
159
-
160
-
161
-
162
-
163
-
164
-
165
-
166
-
167
-
168
-
169
-
170
-
171
-
172
-
173
-
174
-
175
-
176
-
177
-
178
-
179
-
180
-
181
-
182
-
183
-
184
-
185
-
186
-
187
-
188
-
189
-
190
-
191
-
192
-
193
-
194
-
195
-
196
-
197
-
198
 |
 |