Dell PowerEdge R905 Hardware Owner's Manual (PDF) - Page 136
Reinstall the NIC daughter card. See Installing the NIC Daughter Card
 |
View all Dell PowerEdge R905 manuals
Add to My Manuals
Save this manual to your list of manuals |
Page 136 highlights
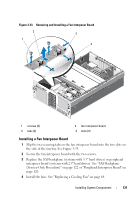
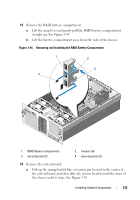
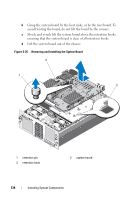
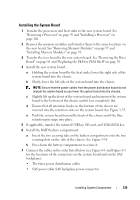
• Chassis intrusion switch cable • SATA interface cable 8 Install all expansion cards. See "Installing an Expansion Card" on page 78. 9 Reinstall the SAS controller card. See "Installing a SAS Controller Card" on page 112. 10 If applicable, reconnect the RAID battery cable to the SAS controller card. 11 If applicable, reinstall and connect the RAC card. See "Installing an Optional RAC Card" on page 83. 12 Reinstall the NIC daughter card. See "Installing the NIC Daughter Card" on page 89. 13 Install the optical drive carrier. Slide the drive carrier into its drive bay and press in the release latch. See Figure 3-20. 14 Install the SAS hard drives in their original locations. See "Installing a HotPlug Hard Drive" on page 109. 15 Replace the riser board. 16 Replace the cooling shroud assembly. See "Replacing the Cooling Shroud Assembly" on page 70. 17 Replace the PEM. 18 Close the system. See "Closing the System" on page 66. 19 Reconnect the system to its electrical outlet and turn the system on, including any attached peripherals. 20 Replace the bezel. See "Removing and Replacing the Optional Front Bezel" on page 64. 136 Installing System Components
-
 1
1 -
2
-
3
-
4
-
5
-
6
-
7
-
8
-
9
-
10
-
11
-
12
-
13
-
14
-
15
-
16
-
17
-
18
-
19
-
20
-
21
-
22
-
23
-
24
-
25
-
26
-
27
-
28
-
29
-
30
-
31
-
32
-
33
-
34
-
35
-
36
-
37
-
38
-
39
-
40
-
41
-
42
-
43
-
44
-
45
-
46
-
47
-
48
-
49
-
50
-
51
-
52
-
53
-
54
-
55
-
56
-
57
-
58
-
59
-
60
-
61
-
62
-
63
-
64
-
65
-
66
-
67
-
68
-
69
-
70
-
71
-
72
-
73
-
74
-
75
-
76
-
77
-
78
-
79
-
80
-
81
-
82
-
83
-
84
-
85
-
86
-
87
-
88
-
89
-
90
-
91
-
92
-
93
-
94
-
95
-
96
-
97
-
98
-
99
-
100
-
101
-
102
-
103
-
104
-
105
-
106
-
107
-
108
-
109
-
110
-
111
-
112
-
113
-
114
-
115
-
116
-
117
-
118
-
119
-
120
-
121
-
122
-
123
-
124
-
125
-
126
-
127
-
128
-
129
-
130
-
 131
131 -
 132
132 -
 133
133 -
 134
134 -
 135
135 -
 136
136 -
 137
137 -
 138
138 -
 139
139 -
 140
140 -
 141
141 -
142
-
143
-
144
-
145
-
146
-
147
-
148
-
149
-
150
-
151
-
152
-
153
-
154
-
155
-
156
-
157
-
158
-
159
-
160
-
161
-
162
-
163
-
164
-
165
-
166
-
167
-
168
-
169
-
170
-
171
-
172
-
173
-
174
-
175
-
176
-
177
-
178
-
179
-
180
-
181
-
182
-
183
-
184
-
185
-
186
-
187
-
188
-
189
-
190
-
191
-
192
-
193
-
194
-
195
-
196
-
197
-
198
 |
 |