HP 3000dtn HP Business Inkjet 3000 series printers - (English) User Guide - Page 20
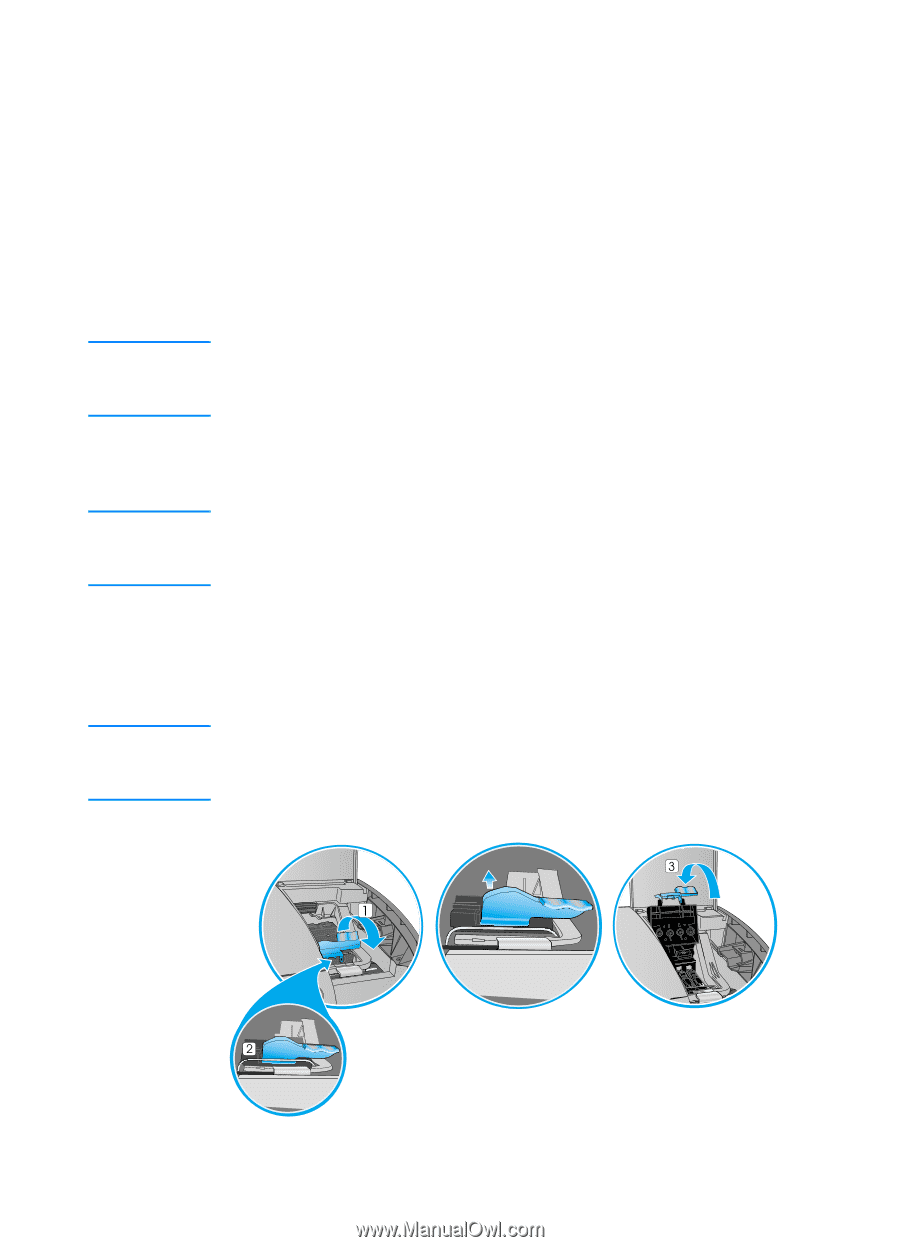
Step 4: Install the ink cartridges, Step 5: Install the printheads, To open the latch
 |
View all HP 3000dtn manuals
Add to My Manuals
Save this manual to your list of manuals |
Page 20 highlights
Note Step 4: Install the ink cartridges 1 Make sure the printer is turned on. 2 Lift the ink cartridge cover. 3 Remove each ink cartridge from its package. 4 Align the colored arrows, and then insert each ink cartridge into its color-coded slot. 5 To ensure proper contact, press firmly on the cartridges until they snap into place. When replacing ink cartridges, install the new ink cartridges right away. Ink cartridges should not be removed from the printer for long periods of time. Step 5: Install the printheads CAUTION Before you lift the printhead cover, make sure that the printer is plugged in and turned on. Otherwise, you cannot install the printheads. 1 Lift the printhead cover. 2 To open the latch, lift it from the rear (item 1 in the graphic) and then pull it forward and down to release the hook from the metal catch (item 2 in the graphic). CAUTION Do not attempt to force open the printhead latch. The printhead carriage will move to the left when the printer is turned on, enabling you to open the latch. 2-6 ENWW
-
 1
1 -
2
-
3
-
4
-
5
-
6
-
7
-
8
-
9
-
10
-
11
-
12
-
13
-
14
-
 15
15 -
 16
16 -
 17
17 -
 18
18 -
 19
19 -
 20
20 -
 21
21 -
 22
22 -
 23
23 -
 24
24 -
 25
25 -
26
-
27
-
28
-
29
-
30
-
31
-
32
-
33
-
34
-
35
-
36
-
37
-
38
-
39
-
40
-
41
-
42
-
43
-
44
-
45
-
46
-
47
-
48
-
49
-
50
-
51
-
52
-
53
-
54
-
55
-
56
-
57
-
58
-
59
-
60
-
61
-
62
-
63
-
64
-
65
-
66
-
67
-
68
-
69
-
70
-
71
-
72
-
73
-
74
-
75
-
76
-
77
-
78
-
79
-
80
-
81
-
82
-
83
-
84
-
85
-
86
-
87
-
88
-
89
-
90
-
91
-
92
-
93
-
94
-
95
-
96
-
97
-
98
-
99
-
100
-
101
-
102
-
103
-
104
-
105
-
106
-
107
-
108
-
109
-
110
-
111
-
112
-
113
-
114
-
115
-
116
-
117
-
118
-
119
-
120
-
121
-
122
-
123
-
124
-
125
-
126
-
127
-
128
-
129
-
130
-
131
-
132
-
133
-
134
-
135
-
136
-
137
-
138
-
139
-
140
-
141
-
142
-
143
-
144
-
145
-
146
-
147
-
148
-
149
-
150
-
151
-
152
-
153
-
154
-
155
-
156
-
157
-
158
-
159
-
160
-
161
-
162
-
163
-
164
-
165
-
166
-
167
-
168
-
169
-
170
-
171
-
172
-
173
-
174
-
175
-
176
-
177
-
178
-
179
-
180
-
181
-
182
-
183
-
184
-
185
-
186
-
187
-
188
-
189
-
190
-
191
-
192
-
193
-
194
-
195
-
196
-
197
-
198
 |
 |