HP 3000dtn HP Business Inkjet 3000 series printers - (English) User Guide - Page 41
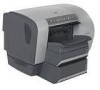
To install memory and font DIMMs, To remove the DIMM cover from the back of the printer, insert
 |
View all HP 3000dtn manuals
Add to My Manuals
Save this manual to your list of manuals |
Page 41 highlights
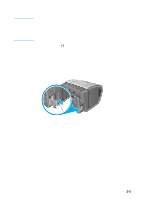
To install memory and font DIMMs CAUTION DIMMs contain electronic components that can be damaged by static electricity. To prevent buildup of static electricity, maintain frequent contact with any bare sheet metal surface on the printer. If possible, wear a grounding wrist strap (or similar device). Handle DIMMs carefully at all times. Avoid touching electronic components or circuit paths. 1 If you have not already done so, print a Configuration page to find out how much memory is installed in the printer before adding more memory. See "Printing a Configuration page." 2 Press and hold (power button) to turn off the printer. 3 Unplug the power cord and disconnect any cables. 4 To remove the DIMM cover from the back of the printer, insert a flathead screwdriver into the top slot. Gently push down on the screwdriver's handle with one hand, grasp the cover with the other hand, and remove the cover. 5 Remove the DIMM from the antistatic package, and then align the DIMM with an empty DIMM slot. 6 On the DIMM slot, push the DIMM locks outward to release the locks. 7 Insert the DIMM into the slot (item 1 in the graphic) and press it into the printer until it snaps into the slot (item 2 in the graphic). ENWW 3-9
-
 1
1 -
2
-
3
-
4
-
5
-
6
-
7
-
8
-
9
-
10
-
11
-
12
-
13
-
14
-
15
-
16
-
17
-
18
-
19
-
20
-
21
-
22
-
23
-
24
-
25
-
26
-
27
-
28
-
29
-
30
-
31
-
32
-
33
-
34
-
35
-
 36
36 -
 37
37 -
 38
38 -
 39
39 -
 40
40 -
 41
41 -
 42
42 -
 43
43 -
 44
44 -
 45
45 -
 46
46 -
47
-
48
-
49
-
50
-
51
-
52
-
53
-
54
-
55
-
56
-
57
-
58
-
59
-
60
-
61
-
62
-
63
-
64
-
65
-
66
-
67
-
68
-
69
-
70
-
71
-
72
-
73
-
74
-
75
-
76
-
77
-
78
-
79
-
80
-
81
-
82
-
83
-
84
-
85
-
86
-
87
-
88
-
89
-
90
-
91
-
92
-
93
-
94
-
95
-
96
-
97
-
98
-
99
-
100
-
101
-
102
-
103
-
104
-
105
-
106
-
107
-
108
-
109
-
110
-
111
-
112
-
113
-
114
-
115
-
116
-
117
-
118
-
119
-
120
-
121
-
122
-
123
-
124
-
125
-
126
-
127
-
128
-
129
-
130
-
131
-
132
-
133
-
134
-
135
-
136
-
137
-
138
-
139
-
140
-
141
-
142
-
143
-
144
-
145
-
146
-
147
-
148
-
149
-
150
-
151
-
152
-
153
-
154
-
155
-
156
-
157
-
158
-
159
-
160
-
161
-
162
-
163
-
164
-
165
-
166
-
167
-
168
-
169
-
170
-
171
-
172
-
173
-
174
-
175
-
176
-
177
-
178
-
179
-
180
-
181
-
182
-
183
-
184
-
185
-
186
-
187
-
188
-
189
-
190
-
191
-
192
-
193
-
194
-
195
-
196
-
197
-
198
 |
 |