HP xw8600 HP xw8600 Workstation Service and Technical Reference Guide - Page 109
snapping the rails into place as shown in the following - hard drive rail
 |
View all HP xw8600 manuals
Add to My Manuals
Save this manual to your list of manuals |
Page 109 highlights
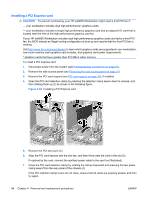
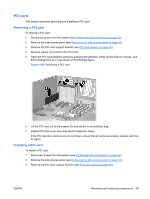
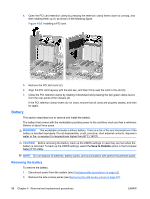
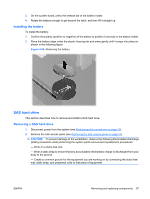
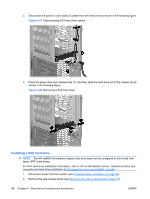
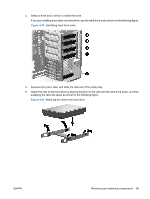
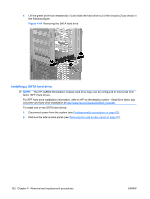
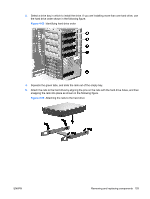
3. Select a drive bay in which to install the drive. If you are installing more than one hard drive, use the hard drive order shown in the following figure. Figure 4-59 Identifying hard drive order 4. Squeeze the green tabs, and slide the rails out of the empty bay. 5. Attach the rails to the hard drive by aligning the pins on the rails with the hard drive holes, and then snapping the rails into place as shown in the following figure. Figure 4-60 Attaching the rails to the hard drive ENWW Removing and replacing components 99
-
 1
1 -
2
-
3
-
4
-
5
-
6
-
7
-
8
-
9
-
10
-
11
-
12
-
13
-
14
-
15
-
16
-
17
-
18
-
19
-
20
-
21
-
22
-
23
-
24
-
25
-
26
-
27
-
28
-
29
-
30
-
31
-
32
-
33
-
34
-
35
-
36
-
37
-
38
-
39
-
40
-
41
-
42
-
43
-
44
-
45
-
46
-
47
-
48
-
49
-
50
-
51
-
52
-
53
-
54
-
55
-
56
-
57
-
58
-
59
-
60
-
61
-
62
-
63
-
64
-
65
-
66
-
67
-
68
-
69
-
70
-
71
-
72
-
73
-
74
-
75
-
76
-
77
-
78
-
79
-
80
-
81
-
82
-
83
-
84
-
85
-
86
-
87
-
88
-
89
-
90
-
91
-
92
-
93
-
94
-
95
-
96
-
97
-
98
-
99
-
100
-
101
-
102
-
103
-
 104
104 -
 105
105 -
 106
106 -
 107
107 -
 108
108 -
 109
109 -
 110
110 -
 111
111 -
 112
112 -
 113
113 -
 114
114 -
115
-
116
-
117
-
118
-
119
-
120
-
121
-
122
-
123
-
124
-
125
-
126
-
127
-
128
-
129
-
130
-
131
-
132
-
133
-
134
-
135
-
136
-
137
-
138
-
139
-
140
-
141
-
142
-
143
-
144
-
145
-
146
-
147
-
148
-
149
-
150
-
151
-
152
-
153
-
154
-
155
-
156
-
157
-
158
-
159
-
160
-
161
-
162
-
163
-
164
-
165
-
166
-
167
-
168
-
169
-
170
-
171
-
172
-
173
-
174
-
175
-
176
-
177
-
178
-
179
-
180
 |
 |
3.
Select a drive bay in which to install the drive.
If you are installing more than one hard drive, use the hard drive order shown in the following figure.
Figure 4-59
Identifying hard drive order
4.
Squeeze the green tabs, and slide the rails out of the empty bay.
5.
Attach the rails to the hard drive by aligning the pins on the rails with the hard drive holes, and then
snapping the rails into place as shown in the following figure.
Figure 4-60
Attaching the rails to the hard drive
ENWW
Removing and replacing components
99