HP xw8600 HP xw8600 Workstation Service and Technical Reference Guide - Page 117
Installing the processor heatsink,
 |
View all HP xw8600 manuals
Add to My Manuals
Save this manual to your list of manuals |
Page 117 highlights
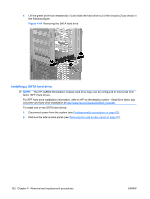
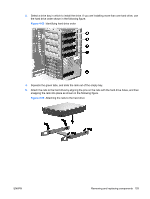
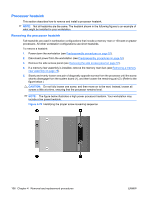
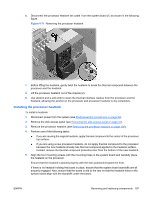
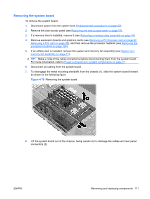
6. Disconnect the processor heatsink fan cable from the system board (1) as shown in the following figure. Figure 4-71 Removing the processor heatsink 7. Before lifting the heatsink, gently twist the heatsink to break the thermal compound between the processor and the heatsink. 8. Lift the processor heatsink out of the chassis (2). 9. Use alcohol and a soft cloth to clean the thermal interface residue from the processor and the heatsink, allowing the alcohol on the processor and processor heatsink to dry completely. Installing the processor heatsink To install a heatsink: 1. Disconnect power from the system (see Predisassembly procedures on page 52). 2. Remove the side access panel (see Removing the side access panel on page 57). 3. Remove the processor heatsink (see Removing the processor heatsink on page 106). 4. Perform one of the following tasks: ● If you are reusing the original heatsink, apply thermal compound to the center of the processor top surface. ● If you are using a new processor heatsink, do not apply thermal compound to the processor because the new heatsink already has thermal compound applied to the heatsink surface. Instead, remove the thermal compound protective liner from the bottom of the new heatsink. 5. Align the four mounting screws with the mounting holes in the system board and carefully place the heatsink on the processor. Ensure that the heatsink is placed properly with the fans positioned toward the front. If there is no heatsink holding the board in place, ensure that the system board standoffs are all properly engaged. Also, ensure that the board is slid to the rear so that the heatsink holes in the system board align with the standoffs under the board. ENWW Removing and replacing components 107
-
 1
1 -
2
-
3
-
4
-
5
-
6
-
7
-
8
-
9
-
10
-
11
-
12
-
13
-
14
-
15
-
16
-
17
-
18
-
19
-
20
-
21
-
22
-
23
-
24
-
25
-
26
-
27
-
28
-
29
-
30
-
31
-
32
-
33
-
34
-
35
-
36
-
37
-
38
-
39
-
40
-
41
-
42
-
43
-
44
-
45
-
46
-
47
-
48
-
49
-
50
-
51
-
52
-
53
-
54
-
55
-
56
-
57
-
58
-
59
-
60
-
61
-
62
-
63
-
64
-
65
-
66
-
67
-
68
-
69
-
70
-
71
-
72
-
73
-
74
-
75
-
76
-
77
-
78
-
79
-
80
-
81
-
82
-
83
-
84
-
85
-
86
-
87
-
88
-
89
-
90
-
91
-
92
-
93
-
94
-
95
-
96
-
97
-
98
-
99
-
100
-
101
-
102
-
103
-
104
-
105
-
106
-
107
-
108
-
109
-
110
-
111
-
 112
112 -
 113
113 -
 114
114 -
 115
115 -
 116
116 -
 117
117 -
 118
118 -
 119
119 -
 120
120 -
 121
121 -
 122
122 -
123
-
124
-
125
-
126
-
127
-
128
-
129
-
130
-
131
-
132
-
133
-
134
-
135
-
136
-
137
-
138
-
139
-
140
-
141
-
142
-
143
-
144
-
145
-
146
-
147
-
148
-
149
-
150
-
151
-
152
-
153
-
154
-
155
-
156
-
157
-
158
-
159
-
160
-
161
-
162
-
163
-
164
-
165
-
166
-
167
-
168
-
169
-
170
-
171
-
172
-
173
-
174
-
175
-
176
-
177
-
178
-
179
-
180
 |
 |
