HP xw8600 HP xw8600 Workstation Service and Technical Reference Guide - Page 110
system board to the SAS hard drive.
 |
View all HP xw8600 manuals
Add to My Manuals
Save this manual to your list of manuals |
Page 110 highlights
6. Attach a SAS-to-SATA cable adapter to the connector on the SAS hard drive as shown in the following figure. Figure 4-61 Attaching the SAS-to-SATA adapter 7. Push the drive into the selected bay until it snaps into place (1) as shown in the following figure. Figure 4-62 Installing the SAS hard drive 8. Attach a power cable (2) to the drive, and attach a data cable (3) from a SAS connector on the system board to the SAS hard drive. Use lower-numbered SAS connectors first on the system board. To identify SAS connectors, refer to the workstation service label on the side access cover. 9. Replace the side access cover. 100 Chapter 4 Removal and replacement procedures ENWW
-
 1
1 -
2
-
3
-
4
-
5
-
6
-
7
-
8
-
9
-
10
-
11
-
12
-
13
-
14
-
15
-
16
-
17
-
18
-
19
-
20
-
21
-
22
-
23
-
24
-
25
-
26
-
27
-
28
-
29
-
30
-
31
-
32
-
33
-
34
-
35
-
36
-
37
-
38
-
39
-
40
-
41
-
42
-
43
-
44
-
45
-
46
-
47
-
48
-
49
-
50
-
51
-
52
-
53
-
54
-
55
-
56
-
57
-
58
-
59
-
60
-
61
-
62
-
63
-
64
-
65
-
66
-
67
-
68
-
69
-
70
-
71
-
72
-
73
-
74
-
75
-
76
-
77
-
78
-
79
-
80
-
81
-
82
-
83
-
84
-
85
-
86
-
87
-
88
-
89
-
90
-
91
-
92
-
93
-
94
-
95
-
96
-
97
-
98
-
99
-
100
-
101
-
102
-
103
-
104
-
 105
105 -
 106
106 -
 107
107 -
 108
108 -
 109
109 -
 110
110 -
 111
111 -
 112
112 -
 113
113 -
 114
114 -
 115
115 -
116
-
117
-
118
-
119
-
120
-
121
-
122
-
123
-
124
-
125
-
126
-
127
-
128
-
129
-
130
-
131
-
132
-
133
-
134
-
135
-
136
-
137
-
138
-
139
-
140
-
141
-
142
-
143
-
144
-
145
-
146
-
147
-
148
-
149
-
150
-
151
-
152
-
153
-
154
-
155
-
156
-
157
-
158
-
159
-
160
-
161
-
162
-
163
-
164
-
165
-
166
-
167
-
168
-
169
-
170
-
171
-
172
-
173
-
174
-
175
-
176
-
177
-
178
-
179
-
180
 |
 |
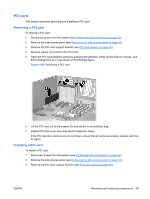
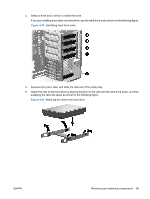
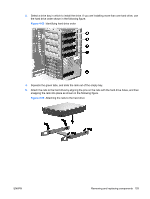
6.
Attach a SAS-to-SATA cable adapter to the connector on the SAS hard drive as shown in the
following figure.
Figure 4-61
Attaching the SAS-to-SATA adapter
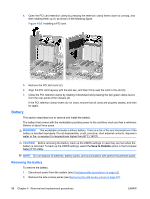
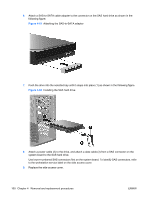
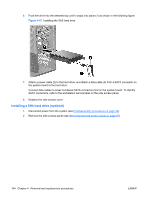
7.
Push the drive into the selected bay until it snaps into place (1) as shown in the following figure.
Figure 4-62
Installing the SAS hard drive
8.
Attach a power cable (2) to the drive, and attach a data cable (3) from a SAS connector on the
system board to the SAS hard drive.
Use lower-numbered SAS connectors first on the system board. To identify SAS connectors, refer
to the workstation service label on the side access cover.
9.
Replace the side access cover.
100
Chapter 4
Removal and replacement procedures
ENWW