Panasonic KX-NT400 Operating Instructions - Page 117
IP Camera Selection Buttons Settings, Portal Settings, Details for IP Camera Selection
 |
View all Panasonic KX-NT400 manuals
Add to My Manuals
Save this manual to your list of manuals |
Page 117 highlights
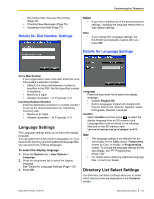
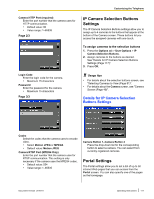
Camera HTTP Port (required) Enter the port number that the camera uses for HTTP communication. • Default value: 80 • Value range: 1-65535 Page 2/3 Login Code Enter the login code for the camera. • Maximum 15 characters Password Enter the password for the camera. • Maximum 15 characters Page 3/3 Customizing the Telephone IP Camera Selection Buttons Settings The IP Camera Selection Buttons settings allow you to assign up to 4 cameras to the buttons that appear at the bottom of the Camera screen. These buttons let you access the assigned cameras with one touch. To assign cameras to the selection buttons 1. Press the Options tab > User Options > IP Camera Selection Buttons. 2. Assign cameras to the buttons as desired. See "Details for IP Camera Selection Buttons Settings (Page 117)". 3. Press OK. Usage tips • For details about the selection buttons screen, see "Selecting Cameras to View (Page 81)". • For details about the Camera screen, see "Camera Screen (Page 49)". Details for IP Camera Selection Buttons Settings Codec Select the codec that the camera uses to encode video. • Select Motion JPEG or MPEG4. • Default value: Motion JPEG Camera RTSP Port (MPEG4 Only) Enter the port number that the camera uses for RTSP communication. This setting is only necessary if the camera uses the MPEG4 codec. • Default value: 554 • Value range: 1-65535 Camera Button 1-Camera Button 4 Press the drop-down list for the corresponding button to select a camera. You can select from currently registered cameras. Portal Settings The Portal settings allow you to set a list of up to 50 intranet Web pages that you can access from the Portal screen. You can also specify one of the pages as the homepage. Document Version 2010-01 Operating Instructions 117
-
 1
1 -
2
-
3
-
4
-
5
-
6
-
7
-
8
-
9
-
10
-
11
-
12
-
13
-
14
-
15
-
16
-
17
-
18
-
19
-
20
-
21
-
22
-
23
-
24
-
25
-
26
-
27
-
28
-
29
-
30
-
31
-
32
-
33
-
34
-
35
-
36
-
37
-
38
-
39
-
40
-
41
-
42
-
43
-
44
-
45
-
46
-
47
-
48
-
49
-
50
-
51
-
52
-
53
-
54
-
55
-
56
-
57
-
58
-
59
-
60
-
61
-
62
-
63
-
64
-
65
-
66
-
67
-
68
-
69
-
70
-
71
-
72
-
73
-
74
-
75
-
76
-
77
-
78
-
79
-
80
-
81
-
82
-
83
-
84
-
85
-
86
-
87
-
88
-
89
-
90
-
91
-
92
-
93
-
94
-
95
-
96
-
97
-
98
-
99
-
100
-
101
-
102
-
103
-
104
-
105
-
106
-
107
-
108
-
109
-
110
-
111
-
 112
112 -
 113
113 -
 114
114 -
 115
115 -
 116
116 -
 117
117 -
 118
118 -
 119
119 -
 120
120 -
 121
121 -
 122
122 -
123
-
124
-
125
-
126
-
127
-
128
-
129
-
130
-
131
-
132
-
133
-
134
-
135
-
136
-
137
-
138
-
139
-
140
-
141
-
142
-
143
-
144
-
145
-
146
-
147
-
148
-
149
-
150
-
151
-
152
-
153
-
154
-
155
-
156
-
157
-
158
-
159
-
160
-
161
-
162
-
163
-
164
-
165
-
166
-
167
-
168
-
169
-
170
-
171
-
172
-
173
-
174
-
175
-
176
-
177
-
178
-
179
-
180
-
181
-
182
-
183
-
184
-
185
-
186
-
187
-
188
-
189
-
190
-
191
-
192
-
193
-
194
-
195
-
196
-
197
-
198
-
199
-
200
-
201
-
202
-
203
-
204
-
205
-
206
 |
 |
