Panasonic KX-NT400 Operating Instructions - Page 134
Programming Input Table
 |
View all Panasonic KX-NT400 manuals
Add to My Manuals
Save this manual to your list of manuals |
Page 134 highlights
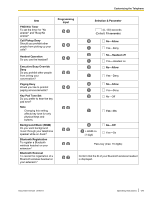
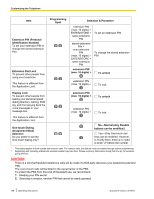
Customizing the Telephone 3. Select the page number of the flexible button you want to customize. 4. Press the flexible button you want to customize. 5. Using the dial keys, enter the programming input. See "Programming Input Table (Page 134)". 6. Press (ENTER). 7. Using the dial keys, enter a name for the button. For details on entering characters with the dial keys, see "Entering Characters (Page 145)". 8. To continue programming, repeat the procedure from step 4. -or- To exit, press EXIT. Usage tips • In step 5 in the procedure above, you can also use the Navigator key to scroll through the programmable features and to select parameters. • You can exit the programming procedure at any time by lifting the handset. • You can also customize the flexible buttons on the Calls screen or the Feature Key screen (in Call List mode). For details, see "Calls Screen in Line Buttons Mode (Page 37)" and "Feature Key Screen (Page 55)". Programming Input Table The following table explains the features that you can assign to flexible buttons and the input for programming them. 134 Operating Instructions Document Version 2010-01
-
 1
1 -
2
-
3
-
4
-
5
-
6
-
7
-
8
-
9
-
10
-
11
-
12
-
13
-
14
-
15
-
16
-
17
-
18
-
19
-
20
-
21
-
22
-
23
-
24
-
25
-
26
-
27
-
28
-
29
-
30
-
31
-
32
-
33
-
34
-
35
-
36
-
37
-
38
-
39
-
40
-
41
-
42
-
43
-
44
-
45
-
46
-
47
-
48
-
49
-
50
-
51
-
52
-
53
-
54
-
55
-
56
-
57
-
58
-
59
-
60
-
61
-
62
-
63
-
64
-
65
-
66
-
67
-
68
-
69
-
70
-
71
-
72
-
73
-
74
-
75
-
76
-
77
-
78
-
79
-
80
-
81
-
82
-
83
-
84
-
85
-
86
-
87
-
88
-
89
-
90
-
91
-
92
-
93
-
94
-
95
-
96
-
97
-
98
-
99
-
100
-
101
-
102
-
103
-
104
-
105
-
106
-
107
-
108
-
109
-
110
-
111
-
112
-
113
-
114
-
115
-
116
-
117
-
118
-
119
-
120
-
121
-
122
-
123
-
124
-
125
-
126
-
127
-
128
-
 129
129 -
 130
130 -
 131
131 -
 132
132 -
 133
133 -
 134
134 -
 135
135 -
 136
136 -
 137
137 -
 138
138 -
 139
139 -
140
-
141
-
142
-
143
-
144
-
145
-
146
-
147
-
148
-
149
-
150
-
151
-
152
-
153
-
154
-
155
-
156
-
157
-
158
-
159
-
160
-
161
-
162
-
163
-
164
-
165
-
166
-
167
-
168
-
169
-
170
-
171
-
172
-
173
-
174
-
175
-
176
-
177
-
178
-
179
-
180
-
181
-
182
-
183
-
184
-
185
-
186
-
187
-
188
-
189
-
190
-
191
-
192
-
193
-
194
-
195
-
196
-
197
-
198
-
199
-
200
-
201
-
202
-
203
-
204
-
205
-
206
 |
 |
