Panasonic KX-NT400 Operating Instructions - Page 150
Wall Mounting, Before Mounting on a Wall, Mounting the KX-NT400
 |
View all Panasonic KX-NT400 manuals
Add to My Manuals
Save this manual to your list of manuals |
Page 150 highlights
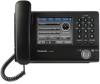
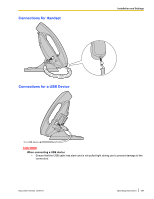
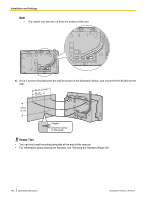
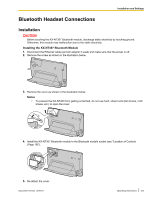
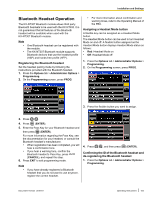
Installation and Settings Wall Mounting Before Mounting on a Wall To mount the KX-NT400, it is necessary to set the angle of the base flat. CAUTION Place a soft cloth under the KX-NT400 when you put its face down to protect the LCD and to prevent the KX-NT400 from getting scratched. Notice • The angle of the base is set to flat when the product is shipped. 1. Set the operation board angle to its lowest level. See "To lower: (Page 24)". 2. As shown in the following illustration, put the KX-NT400 face down, hold up the tab to disengage the lock (A), hold down the angle adjustment button (B), and then push the base down until the angle of the base is flat (C). B A C Mounting the KX-NT400 WARNING • Make sure that the wall that the unit will be attached to is strong enough to support the unit (approx. 1.25 kg [2.76 lb]). If not, it is necessary for the wall to be reinforced. • Only use the wall mounting equipment (screws, washers, wall mounting adaptor) included with the KX-NT400. • When driving the screws into the wall, be careful to avoid touching any metal laths, wire laths or metal plates in the wall. • When this product is no longer in use, make sure to detach it from the wall. CAUTION • Make sure the cables are securely fastened to the wall. 150 Operating Instructions Document Version 2010-01
-
 1
1 -
2
-
3
-
4
-
5
-
6
-
7
-
8
-
9
-
10
-
11
-
12
-
13
-
14
-
15
-
16
-
17
-
18
-
19
-
20
-
21
-
22
-
23
-
24
-
25
-
26
-
27
-
28
-
29
-
30
-
31
-
32
-
33
-
34
-
35
-
36
-
37
-
38
-
39
-
40
-
41
-
42
-
43
-
44
-
45
-
46
-
47
-
48
-
49
-
50
-
51
-
52
-
53
-
54
-
55
-
56
-
57
-
58
-
59
-
60
-
61
-
62
-
63
-
64
-
65
-
66
-
67
-
68
-
69
-
70
-
71
-
72
-
73
-
74
-
75
-
76
-
77
-
78
-
79
-
80
-
81
-
82
-
83
-
84
-
85
-
86
-
87
-
88
-
89
-
90
-
91
-
92
-
93
-
94
-
95
-
96
-
97
-
98
-
99
-
100
-
101
-
102
-
103
-
104
-
105
-
106
-
107
-
108
-
109
-
110
-
111
-
112
-
113
-
114
-
115
-
116
-
117
-
118
-
119
-
120
-
121
-
122
-
123
-
124
-
125
-
126
-
127
-
128
-
129
-
130
-
131
-
132
-
133
-
134
-
135
-
136
-
137
-
138
-
139
-
140
-
141
-
142
-
143
-
144
-
 145
145 -
 146
146 -
 147
147 -
 148
148 -
 149
149 -
 150
150 -
 151
151 -
 152
152 -
 153
153 -
 154
154 -
 155
155 -
156
-
157
-
158
-
159
-
160
-
161
-
162
-
163
-
164
-
165
-
166
-
167
-
168
-
169
-
170
-
171
-
172
-
173
-
174
-
175
-
176
-
177
-
178
-
179
-
180
-
181
-
182
-
183
-
184
-
185
-
186
-
187
-
188
-
189
-
190
-
191
-
192
-
193
-
194
-
195
-
196
-
197
-
198
-
199
-
200
-
201
-
202
-
203
-
204
-
205
-
206
 |
 |
