Panasonic KX-NT400 Operating Instructions - Page 79
Call Forwarding/Do Not Disturb, Simple Call Forwarding Settings
 |
View all Panasonic KX-NT400 manuals
Add to My Manuals
Save this manual to your list of manuals |
Page 79 highlights
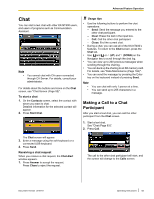
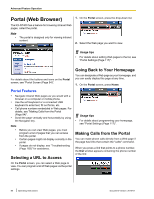
Basic Feature Operation can also change the presence settings via the Options screen. For details, see "Presence Settings (Page 118)". • You can assign Call Forwarding/Do Not Disturb settings to a presence status. For details, see "Presence Setting Example 1 (Page 119)". • You can assign a feature number to be executed when you select a presence status. For details, see "Presence Setting Example 2 (Page 119)". • Your presence status is stored on the PBX as an absent message. Note • Depending on the regional setting (suffix code) of the connected PBX, if you set the language to Russian or Ukrainian, your presence status might appear garbled. Call Forwarding/Do Not Disturb You can have incoming calls automatically forwarded to another destination. You can also have incoming calls rejected (Do Not Disturb). Simple Call Forwarding Settings You can set one forwarding destination for external and internal calls. 1. On the HOME screen, press the second drop-down list. Document Version 2010-01 If call forwarding or Do Not Disturb is already set, the Advanced window appears. See "Advanced Call Forwarding/Do Not Disturb Settings (Page 80)". 2. On the FWD/DND Settings window, select one of the text fields. 3. Enter a forwarding destination. 4. Select the radio button of the destination you want to forward calls to. 5. Press OK. Usage tips • On the FWD/DND Settings window, the numbers you set for Phone 1 and Phone 2 are saved. These settings will be available the next time you set a forwarding destination. Other is used for a temporary forwarding destination. Every time you set a forwarding destination, Other will be blank. • You can set your cellular phone as the forward destination. Operating Instructions 79
-
 1
1 -
2
-
3
-
4
-
5
-
6
-
7
-
8
-
9
-
10
-
11
-
12
-
13
-
14
-
15
-
16
-
17
-
18
-
19
-
20
-
21
-
22
-
23
-
24
-
25
-
26
-
27
-
28
-
29
-
30
-
31
-
32
-
33
-
34
-
35
-
36
-
37
-
38
-
39
-
40
-
41
-
42
-
43
-
44
-
45
-
46
-
47
-
48
-
49
-
50
-
51
-
52
-
53
-
54
-
55
-
56
-
57
-
58
-
59
-
60
-
61
-
62
-
63
-
64
-
65
-
66
-
67
-
68
-
69
-
70
-
71
-
72
-
73
-
 74
74 -
 75
75 -
 76
76 -
 77
77 -
 78
78 -
 79
79 -
 80
80 -
 81
81 -
 82
82 -
 83
83 -
 84
84 -
85
-
86
-
87
-
88
-
89
-
90
-
91
-
92
-
93
-
94
-
95
-
96
-
97
-
98
-
99
-
100
-
101
-
102
-
103
-
104
-
105
-
106
-
107
-
108
-
109
-
110
-
111
-
112
-
113
-
114
-
115
-
116
-
117
-
118
-
119
-
120
-
121
-
122
-
123
-
124
-
125
-
126
-
127
-
128
-
129
-
130
-
131
-
132
-
133
-
134
-
135
-
136
-
137
-
138
-
139
-
140
-
141
-
142
-
143
-
144
-
145
-
146
-
147
-
148
-
149
-
150
-
151
-
152
-
153
-
154
-
155
-
156
-
157
-
158
-
159
-
160
-
161
-
162
-
163
-
164
-
165
-
166
-
167
-
168
-
169
-
170
-
171
-
172
-
173
-
174
-
175
-
176
-
177
-
178
-
179
-
180
-
181
-
182
-
183
-
184
-
185
-
186
-
187
-
188
-
189
-
190
-
191
-
192
-
193
-
194
-
195
-
196
-
197
-
198
-
199
-
200
-
201
-
202
-
203
-
204
-
205
-
206
 |
 |
