Samsung SPH-A513 User Manual (user Manual) (ver.f4.1) (English) - Page 161
Send Email, New Email, Contacts, Address, Entry, Insert Symbol, Insert Emoticon, Insert Quick Text,
 |
View all Samsung SPH-A513 manuals
Add to My Manuals
Save this manual to your list of manuals |
Page 161 highlights
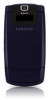
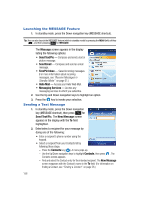
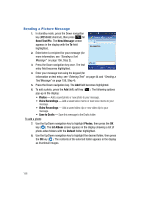
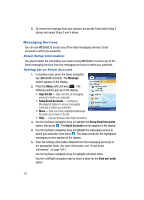
Send an Email Message Note: Multiple custom account support requires that your message service uses a standard POP3 or IMAP server. 1. In standby mode, press the Down navigation key (MESSAGE shortcut), then press for Send Email. The New Email screen appears in the display with the To field highlighted. 2. Enter/select a recipient for your message by doing one of the following: • Enter a recipient's phone number using the keypad. • Select a recipient from your Contacts list by following these steps: - Press the Contacts key ( ). The Address Entry screen appears in the display. - Use the Up/Down navigation keys to highlight Contacts, then press the OK key ( ). The Contacts screen appears in the display. - Find and select the Contact entry for the intended recipient. The New Email screen reappears with the Contact's name in the To field. (For information on finding a Contact, see "Finding a Contact" on page 56.) 3. Press the Down navigation key. The SUBJ field becomes highlighted. 4. Enter a subject for the message using the keypad. (For more information, see "Entering Text" on page 44.) 5. Press the Down navigation key. The message text entry field becomes highlighted. 6. Enter your message text using the keypad (for information on text entry, see "Entering Text" on page 44). For additional text entry options, press the Menu (left) soft key ( ). The following options pop-up in the display: • Insert Symbol - Adds punctuation marks to your text. • Insert Emoticon - Adds typewritten or graphic "smileys" to your text. • Insert Quick Text - Adds precomposed text to your message text. • Paste Link - Lets you copy and paste a URL into your message text. MESSAGE 161
-
 1
1 -
2
-
3
-
4
-
5
-
6
-
7
-
8
-
9
-
10
-
11
-
12
-
13
-
14
-
15
-
16
-
17
-
18
-
19
-
20
-
21
-
22
-
23
-
24
-
25
-
26
-
27
-
28
-
29
-
30
-
31
-
32
-
33
-
34
-
35
-
36
-
37
-
38
-
39
-
40
-
41
-
42
-
43
-
44
-
45
-
46
-
47
-
48
-
49
-
50
-
51
-
52
-
53
-
54
-
55
-
56
-
57
-
58
-
59
-
60
-
61
-
62
-
63
-
64
-
65
-
66
-
67
-
68
-
69
-
70
-
71
-
72
-
73
-
74
-
75
-
76
-
77
-
78
-
79
-
80
-
81
-
82
-
83
-
84
-
85
-
86
-
87
-
88
-
89
-
90
-
91
-
92
-
93
-
94
-
95
-
96
-
97
-
98
-
99
-
100
-
101
-
102
-
103
-
104
-
105
-
106
-
107
-
108
-
109
-
110
-
111
-
112
-
113
-
114
-
115
-
116
-
117
-
118
-
119
-
120
-
121
-
122
-
123
-
124
-
125
-
126
-
127
-
128
-
129
-
130
-
131
-
132
-
133
-
134
-
135
-
136
-
137
-
138
-
139
-
140
-
141
-
142
-
143
-
144
-
145
-
146
-
147
-
148
-
149
-
150
-
151
-
152
-
153
-
154
-
155
-
 156
156 -
 157
157 -
 158
158 -
 159
159 -
 160
160 -
 161
161 -
 162
162 -
 163
163 -
 164
164 -
 165
165 -
 166
166 -
167
-
168
-
169
-
170
-
171
-
172
-
173
-
174
-
175
-
176
-
177
-
178
-
179
-
180
-
181
-
182
-
183
-
184
-
185
-
186
-
187
-
188
-
189
-
190
-
191
-
192
-
193
-
194
-
195
-
196
-
197
 |
 |