Samsung SPH-A513 User Manual (user Manual) (ver.f4.1) (English) - Page 53
Select Ring, General, Family, Friends, Group Info, Group, Find by Voice, Voice Disabled
 |
View all Samsung SPH-A513 manuals
Add to My Manuals
Save this manual to your list of manuals |
Page 53 highlights
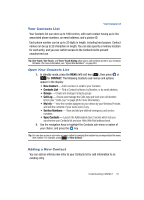
Adding a New Contact • Use the Up and Down navigation keys to highlight the field, then do one of the following: - Use the Left and Right navigation keys to select the desired rintone. (Each ringtone plays as its name appears in the field.) - Press the Select Ring (left) soft key ( ), then press for Ring Menu, use the Up and Down navigation keys to highlight the desired ringtone (each ringtone plays as its name is highlighted), and press to input your selection. Contact Group: This option lets you send messages to, and find, this Contact and other related contacts. (See "Groups" on page 57 for more information.) 9. To assign the new Contact to a Group: • Use the Up and Down navigation keys to highlight the field. • Use the Left and Right navigation keys to select a Group (General, Family, Friends, Work) or press the Group Info (left) soft key ( ) and select the New Group option to add a Group. Voice Function access: This option lets you permit or block Voice Command access to this Contact for voice dialing. 10. To permit Voice Command access to this Contact: • Use the Up and Down navigation keys to highlight the field. • Use the Left and Right navigation keys to select Find by Voice. 11. To block Voice Command access to this Contact: • Use the Up and Down navigation keys to highlight the field. • Use the Left and Right navigation keys to select Voice Disabled. Mailing Address: 12. To enter a mailing address date for this Contact: • Use the Up and Down navigation keys to highlight the field. • Enter a mailing address using the keypad. (For more information, see "Entering Text" on page 44.) Memo: 13. To enter additional Contact information in a memo: • Use the Up and Down navigation keys to highlight the field. • Enter memo text using the keypad. (For more information, see "Entering Text" on page 44.) 14. Press the key to save the Contacts entry. Understanding CONTACT 53
-
 1
1 -
2
-
3
-
4
-
5
-
6
-
7
-
8
-
9
-
10
-
11
-
12
-
13
-
14
-
15
-
16
-
17
-
18
-
19
-
20
-
21
-
22
-
23
-
24
-
25
-
26
-
27
-
28
-
29
-
30
-
31
-
32
-
33
-
34
-
35
-
36
-
37
-
38
-
39
-
40
-
41
-
42
-
43
-
44
-
45
-
46
-
47
-
 48
48 -
 49
49 -
 50
50 -
 51
51 -
 52
52 -
 53
53 -
 54
54 -
 55
55 -
 56
56 -
 57
57 -
 58
58 -
59
-
60
-
61
-
62
-
63
-
64
-
65
-
66
-
67
-
68
-
69
-
70
-
71
-
72
-
73
-
74
-
75
-
76
-
77
-
78
-
79
-
80
-
81
-
82
-
83
-
84
-
85
-
86
-
87
-
88
-
89
-
90
-
91
-
92
-
93
-
94
-
95
-
96
-
97
-
98
-
99
-
100
-
101
-
102
-
103
-
104
-
105
-
106
-
107
-
108
-
109
-
110
-
111
-
112
-
113
-
114
-
115
-
116
-
117
-
118
-
119
-
120
-
121
-
122
-
123
-
124
-
125
-
126
-
127
-
128
-
129
-
130
-
131
-
132
-
133
-
134
-
135
-
136
-
137
-
138
-
139
-
140
-
141
-
142
-
143
-
144
-
145
-
146
-
147
-
148
-
149
-
150
-
151
-
152
-
153
-
154
-
155
-
156
-
157
-
158
-
159
-
160
-
161
-
162
-
163
-
164
-
165
-
166
-
167
-
168
-
169
-
170
-
171
-
172
-
173
-
174
-
175
-
176
-
177
-
178
-
179
-
180
-
181
-
182
-
183
-
184
-
185
-
186
-
187
-
188
-
189
-
190
-
191
-
192
-
193
-
194
-
195
-
196
-
197
 |
 |
