Sony XDSPD2000 User Manual (XDS-PD1000 and XDS-PD2000 Operation Manual for Fir - Page 104
Buttons used to change settings, To change the settings of menu items, Example
 |
View all Sony XDSPD2000 manuals
Add to My Manuals
Save this manual to your list of manuals |
Page 104 highlights
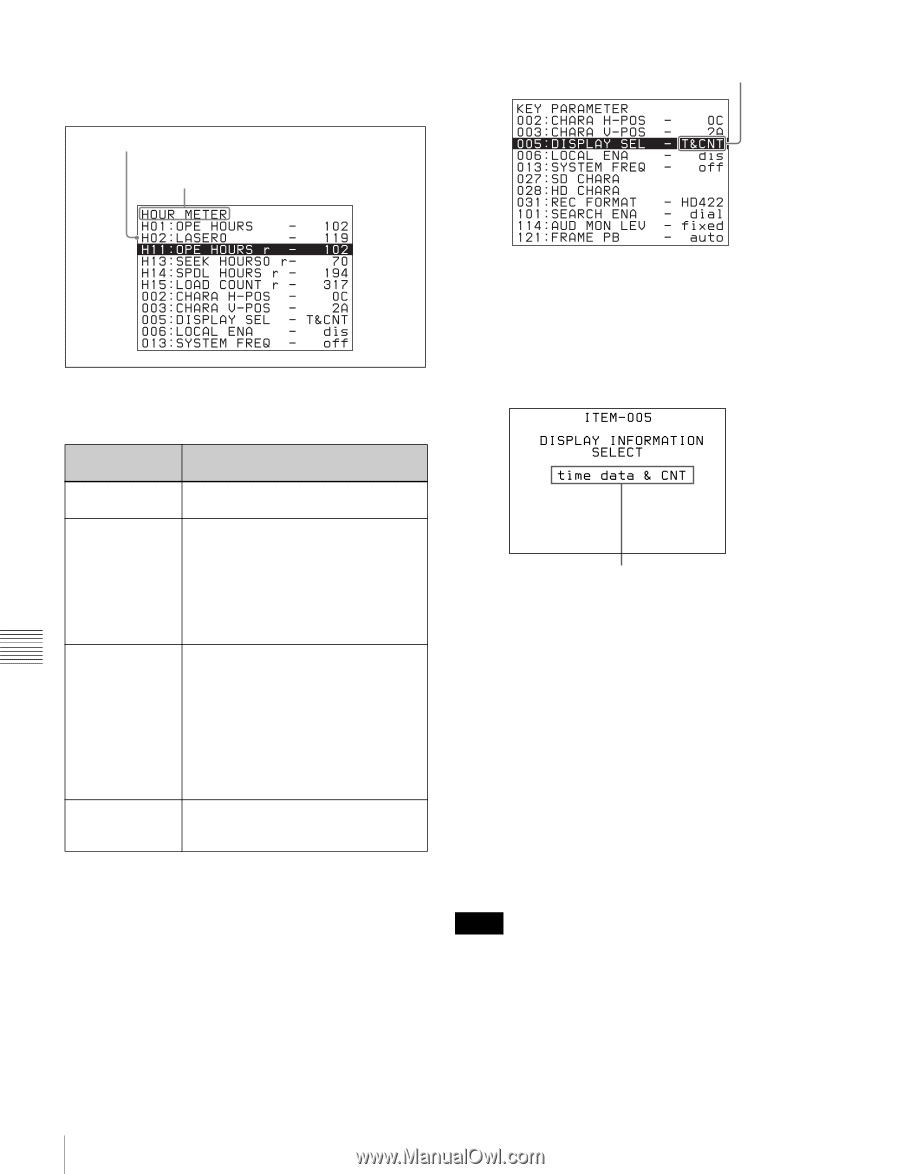
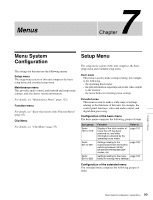
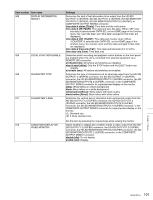
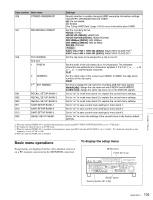
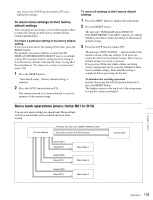
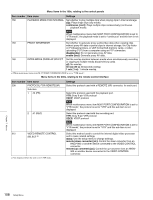
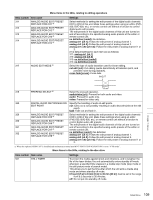
To display a setup menu, press the MENU button. The currently selected menu item is displayed in reverse video. Currently selected item Group name for the currently selected item Current setting Buttons used to change settings Use the following buttons to change setup menu settings. Menu control buttons Functions MENU button Displays and hides the setup and user interface menus. PUSH SET knob • When turned clockwise or counterclockwise, moves the reverse video to select the item to change. • When turned clockwise or counterclockwise, changes a menu item setting. • When pressed, answers "Yes" to a question. Function buttons F1 to F6 (The function to be displayed varies depending on the situations.) RETURN: Goes up one level. SELECT: Selects an item. UP: Skips back 100 or 50 items in the list of menu items. DOWN: Skips forward 100 or 50 items in the list of menu items. SAVE: Saves a new setting to memory. EXIT: Exits the current menu. -: Changes a setting. +: Changes a setting. RESET button • Returns the current setting to the factory default. • Answers "No" to a question. To change the settings of menu items Proceed as follows to change the settings of menu items. 1 Use the PUSH SET knob to select the required item. Example: Screen display when item 005 DISPLAY SEL is selected 2 Press the PUSH SET knob or the SELECT function button (F2). This displays the setting screen for the menu item selected in step 1. Example: Setting screen display when item 005 DISPLAY INFORMATION SELECT is selected Current setting 3 Use the PUSH SET knob or the +/- function button (F3 or F4) to change the setting. Turning the PUSH SET knob while holding down the SHIFT button increases the increment of adjustment. 4 To change other settings, press the PUSH SET knob or the RETURN function button (F1) to return to the previous screen, then repeat steps 1 to 3. 5 When you have completed the settings, press the SAVE function button (F5). The message "NOW SAVING..." appears on the video monitor screen, while the new settings are saved in memory. When the saving operation is completed, the video monitor screen returns to its normal indications. Notes • If you power off the unit before a save operation is completed, settings may be lost. Wait until the save is completed before powering off the unit. • If, instead of pressing the SAVE function button (F5), you press the MENU button, the new settings are not saved. The message "ABORT !" appears on the video monitor screen for about 0.5 seconds, and the system exits the menus. To change more than one setting, be Chapter 7 Menus 104 Setup Menu
-
 1
1 -
2
-
3
-
4
-
5
-
6
-
7
-
8
-
9
-
10
-
11
-
12
-
13
-
14
-
15
-
16
-
17
-
18
-
19
-
20
-
21
-
22
-
23
-
24
-
25
-
26
-
27
-
28
-
29
-
30
-
31
-
32
-
33
-
34
-
35
-
36
-
37
-
38
-
39
-
40
-
41
-
42
-
43
-
44
-
45
-
46
-
47
-
48
-
49
-
50
-
51
-
52
-
53
-
54
-
55
-
56
-
57
-
58
-
59
-
60
-
61
-
62
-
63
-
64
-
65
-
66
-
67
-
68
-
69
-
70
-
71
-
72
-
73
-
74
-
75
-
76
-
77
-
78
-
79
-
80
-
81
-
82
-
83
-
84
-
85
-
86
-
87
-
88
-
89
-
90
-
91
-
92
-
93
-
94
-
95
-
96
-
97
-
98
-
 99
99 -
 100
100 -
 101
101 -
 102
102 -
 103
103 -
 104
104 -
 105
105 -
 106
106 -
 107
107 -
 108
108 -
 109
109 -
110
-
111
-
112
-
113
-
114
-
115
-
116
-
117
-
118
-
119
-
120
-
121
-
122
-
123
-
124
-
125
-
126
-
127
-
128
-
129
-
130
-
131
-
132
-
133
-
134
-
135
-
136
-
137
-
138
-
139
-
140
-
141
-
142
-
143
-
144
-
145
-
146
-
147
-
148
-
149
-
150
-
151
-
152
-
153
-
154
-
155
-
156
-
157
-
158
-
159
-
160
-
161
 |
 |