Sony XDSPD2000 User Manual (XDS-PD1000 and XDS-PD2000 Operation Manual for Fir - Page 17
Disc control Memory card slots, Audio level adjustment CH-1/ALL CH
 |
View all Sony XDSPD2000 manuals
Add to My Manuals
Save this manual to your list of manuals |
Page 17 highlights
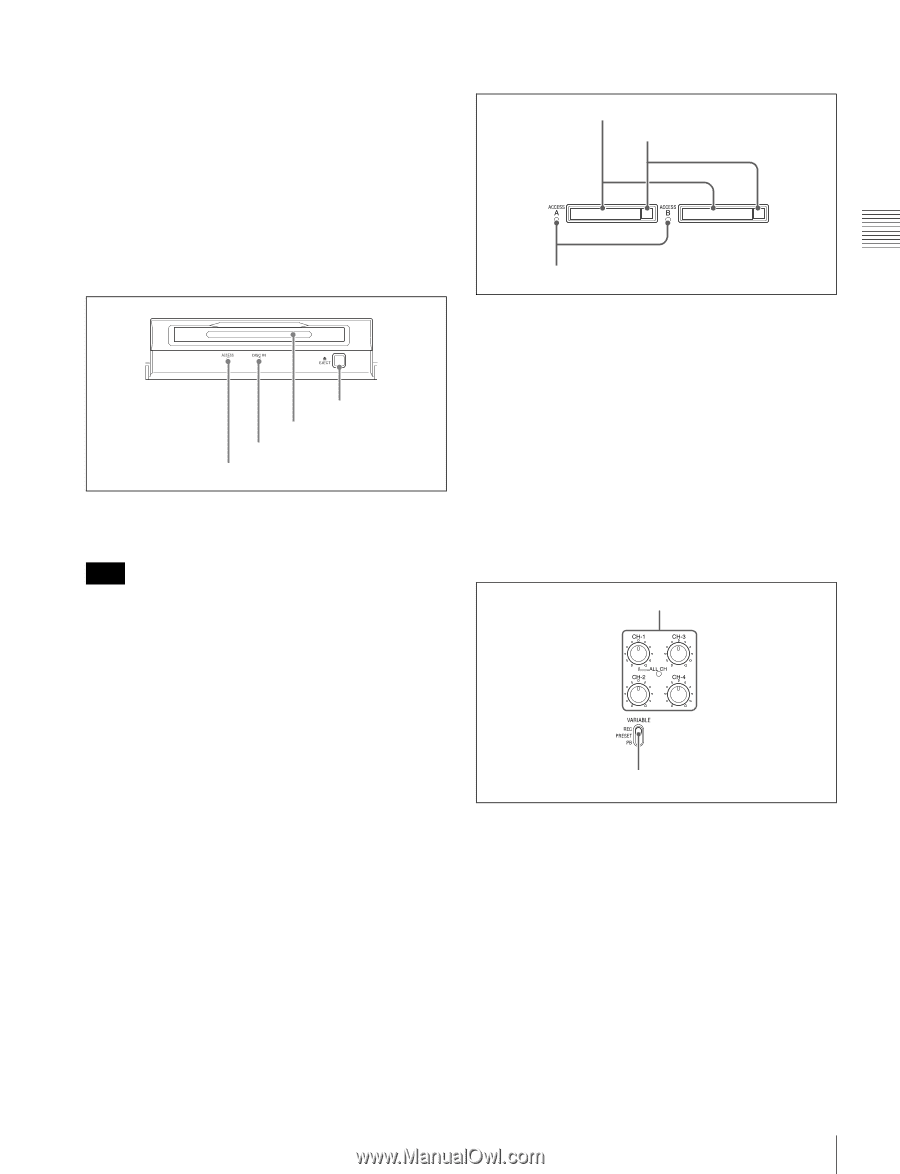
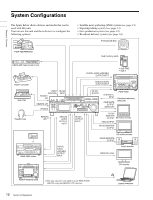
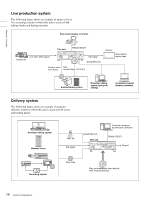
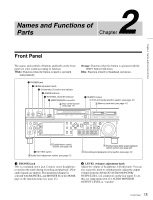
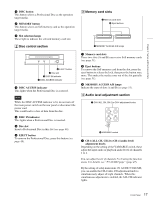
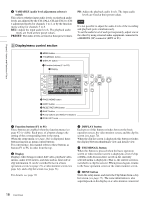
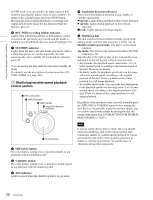
Chapter 2 Names and Functions of Parts d DISC button This button selects a Professional Disc as the operation target media. e MEMORY button This button selects an SxS memory card as the operation target media. f Slot selection lamps These light to indicate the selected memory card slot. 3 Memory card slots 1 Memory card slots 2 Eject buttons 2 Disc control section 3 MEMORY ACCESS A/B lamps 4 EJECT button 3 Disc slot 2 DISC IN indicator 1 DISC ACCESS indicator a DISC ACCESS indicator This lights when the Professional Disc is accessed. Note While the DISC ACCESS indicator is lit, do not turn off the main power switch on the rear panel or disconnect the power cord. This could lead to a loss of data from the disc. b DISC IN indicator This lights when a Professional Disc is inserted. c Disc slot Insert a Professional Disc in this slot (see page 49). d EJECT button To remove the Professional Disc, press this button (see page 49). a Memory card slots These two slots (A and B) can receive SxS memory cards (see page 51). b Eject buttons To remove the SxS memory card from the slot, press the eject button to release the lock, then press the button once more. This makes the media come out of the slot partially (see page 51). c MEMORY ACCESS A/B lamps Indicate the state of slots A and B (see page 51). 4 Audio level adjustment section 1 CH-1/ALL CH, CH-2 to CH-4 adjustment knobs 2 VARIABLE switch a CH-1/ALL CH, CH-2 to CH-4 (audio level) adjustment knobs Depending on the setting of the VARIABLE switch, these adjust the input audio or playback audio levels of channels 1 to 4. You can adjust levels of channels 5 to 8 using the function menu. For details, see "P3 AUDIO page" (page 47). By the setting of setup menu item 131 AUDIO VOLUME, you can enable the CH-1/ALL CH adjustment knob to simultaneously adjust all eight channels. When this simultaneous adjustment is enabled, the ALL CH indicator lights. 17 Front Panel
-
 1
1 -
2
-
3
-
4
-
5
-
6
-
7
-
8
-
9
-
10
-
11
-
 12
12 -
 13
13 -
 14
14 -
 15
15 -
 16
16 -
 17
17 -
 18
18 -
 19
19 -
 20
20 -
 21
21 -
 22
22 -
23
-
24
-
25
-
26
-
27
-
28
-
29
-
30
-
31
-
32
-
33
-
34
-
35
-
36
-
37
-
38
-
39
-
40
-
41
-
42
-
43
-
44
-
45
-
46
-
47
-
48
-
49
-
50
-
51
-
52
-
53
-
54
-
55
-
56
-
57
-
58
-
59
-
60
-
61
-
62
-
63
-
64
-
65
-
66
-
67
-
68
-
69
-
70
-
71
-
72
-
73
-
74
-
75
-
76
-
77
-
78
-
79
-
80
-
81
-
82
-
83
-
84
-
85
-
86
-
87
-
88
-
89
-
90
-
91
-
92
-
93
-
94
-
95
-
96
-
97
-
98
-
99
-
100
-
101
-
102
-
103
-
104
-
105
-
106
-
107
-
108
-
109
-
110
-
111
-
112
-
113
-
114
-
115
-
116
-
117
-
118
-
119
-
120
-
121
-
122
-
123
-
124
-
125
-
126
-
127
-
128
-
129
-
130
-
131
-
132
-
133
-
134
-
135
-
136
-
137
-
138
-
139
-
140
-
141
-
142
-
143
-
144
-
145
-
146
-
147
-
148
-
149
-
150
-
151
-
152
-
153
-
154
-
155
-
156
-
157
-
158
-
159
-
160
-
161
 |
 |