Sony XDSPD2000 User Manual (XDS-PD1000 and XDS-PD2000 Operation Manual for Fir - Page 82
To add sub clips to an existing EDL, Adding in clip list screens, Adding in the video monitor screen
 |
View all Sony XDSPD2000 manuals
Add to My Manuals
Save this manual to your list of manuals |
Page 82 highlights
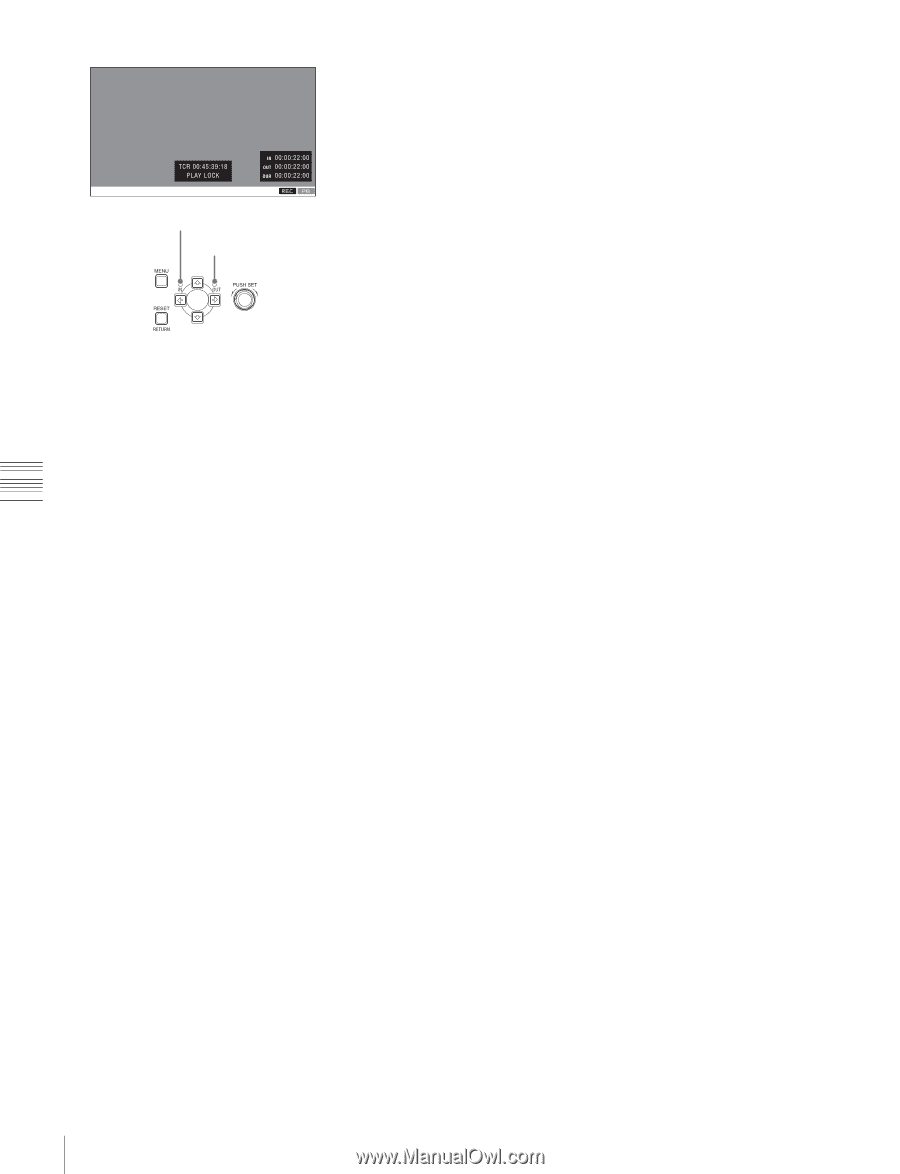
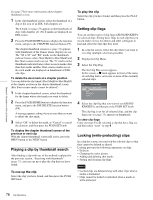
Chapter 5 Operations in Clip List Screens IN indicator OUT indicator 3 Cue the frame you want to specify for the OUT point. 4 Press and hold the , button, and then press the PUSH SET knob. The IN/OUT setting window appears on the bottom right. The time codes for the OUT point and duration (DUR) are displayed in the IN/OUT setting window, and the OUT indicator is lit. 5 Press the PAGE/HOME button to display the function menu, and press the CREATE NEW EDL (F3) button. The EDL creation starts. The name for the created EDL appears when the creation finishes. The created EDL becomes the current EDL. When the current EDL is specified, the current EDL icon appears in the status display area. 6 Select "OK", and then press the PUSH SET knob. To add sub clips to an existing EDL Sub clips can be added from the clip list display screens or the video monitor screen. The added clips are inserted at the end of the EDL. Sub clips are added to the current EDL. Consequently, an EDL must be selected as the current EDL in order to perform this operation. An EDL is made the current EDL automatically after it is created, as explained in "To create an EDL" above, allowing sub clips to be added immediately to the EDL. You can determine whether the current EDL is selected or not by checking whether the current EDL icon is displayed or not in the status display area. If the current EDL is not specified, you must select an existing EDL as the current EDL using the following procedure before you can add sub clips. 1 Select an EDL on a clip list display screen. 2 Display the P1 EDL page of the Clip F menu and press the SET CURT.EDL (F1) button. The selected EDL becomes the current EDL. When the current EDL is specified, the current EDL icon appears in the status display area. Adding in clip list screens See page 70 for information about screen operations. 1 On a clip list screen, select the clip to add as a sub clip (multiple selections possible). 2 Press and hold the SHIFT button and press the PUSH SET knob or display the P1 EDL page of the Clip F menu then press the ADD TO CURT.EDL (F4) button. The sub clip addition starts. When addition is finished, the screen displayed during execution disappears and returns to the clip list screen. Adding a sub clip simultaneously saves the EDL. The clip is added to the end of the current EDL. The current EDL remains selected. Adding in the video monitor screen When checking the image on the video monitor screen, a range to use as a sub clip can be specified and added to the current EDL. This operation is supported during playback (including when stopped) and when searching. During recording, the currently recording clip cannot be added as a sub clip to the current EDL, but IN/OUT points can still be set. 1 On the video monitor screen, cue the frame you want to specify for the IN point. 2 Press and hold the < button, and then press the PUSH SET knob. The IN/OUT setting window appears on the bottom right of the display. The timecode for the IN point is displayed in the IN/ OUT setting window, and the IN indicator is lit. 82 EDL Editing
-
 1
1 -
2
-
3
-
4
-
5
-
6
-
7
-
8
-
9
-
10
-
11
-
12
-
13
-
14
-
15
-
16
-
17
-
18
-
19
-
20
-
21
-
22
-
23
-
24
-
25
-
26
-
27
-
28
-
29
-
30
-
31
-
32
-
33
-
34
-
35
-
36
-
37
-
38
-
39
-
40
-
41
-
42
-
43
-
44
-
45
-
46
-
47
-
48
-
49
-
50
-
51
-
52
-
53
-
54
-
55
-
56
-
57
-
58
-
59
-
60
-
61
-
62
-
63
-
64
-
65
-
66
-
67
-
68
-
69
-
70
-
71
-
72
-
73
-
74
-
75
-
76
-
 77
77 -
 78
78 -
 79
79 -
 80
80 -
 81
81 -
 82
82 -
 83
83 -
 84
84 -
 85
85 -
 86
86 -
 87
87 -
88
-
89
-
90
-
91
-
92
-
93
-
94
-
95
-
96
-
97
-
98
-
99
-
100
-
101
-
102
-
103
-
104
-
105
-
106
-
107
-
108
-
109
-
110
-
111
-
112
-
113
-
114
-
115
-
116
-
117
-
118
-
119
-
120
-
121
-
122
-
123
-
124
-
125
-
126
-
127
-
128
-
129
-
130
-
131
-
132
-
133
-
134
-
135
-
136
-
137
-
138
-
139
-
140
-
141
-
142
-
143
-
144
-
145
-
146
-
147
-
148
-
149
-
150
-
151
-
152
-
153
-
154
-
155
-
156
-
157
-
158
-
159
-
160
-
161
 |
 |