Sony XDSPD2000 User Manual (XDS-PD1000 and XDS-PD2000 Operation Manual for Fir - Page 68
Chase copy, To check the clip with IN and OUT points set, To delete the IN/OUT points
 |
View all Sony XDSPD2000 manuals
Add to My Manuals
Save this manual to your list of manuals |
Page 68 highlights
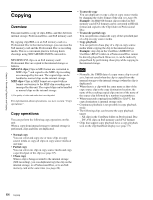
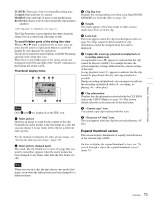
Chapter 4 Recording, Playback and Copying 3 Cue up to the frame where you want to set an OUT point. 4 Press the PUSH SET knob while holding down the , button. An IN/OUT setting window appears in the bottom right corner of the display. The OUT point timecode and the duration (DUR) are displayed in the IN/OUT setting window, and the OUT indicator lights. 5 Carry out step 5 and following of the procedure for "Copying clips to the internal storage" (page 65). To check the clip with IN and OUT points set 1 Press the < or , button. An IN/OUT setting window appears in the lower right of the display. 2 Press the NEXT or PREV button. The unit cues up the frame with the IN (or OUT) point set. To delete the IN/OUT points 1 Press the < button (or , button). The IN/OUT setting window appears in the bottom right corner of the display. 2 Press the RESET button. The IN (or OUT) indicator turns off. It is also possible to perform chase copy by carrying out the simultaneous recording operation. For the simultaneous recording, see page 53. 1 Carry out the procedure described in"Carrying out recording" (page 53) to start recording to the internal storage. 2 Press the THUMBNAIL button to display a clip list screen. 3 Select the clip that is being recorded. 4 Press the COPY button. The Clip Copy screen appears. 5 Press the START function button (F5). The copy processing for the selected clip starts. The copy icon lights in the status display area. 6 Select the copy destination media. DISC: Professional Disc MEMORY: SxS memory card INTERNAL: Internal storage The Clip Copy screen displays the progress of copy processing. Note One of the following operations deletes the IN/OUT points automatically. • Change the selection of media. • Remove the media. • Delete the clip in which IN/OUT points are set. • Format the media. Chase copy When a clip is being recorded to the internal storage, that clip can also be duplicated/copied on the internal storage, to a Professional Disc, or to an SxS memory card at the same time. If FTP connections are made between this unit and a computer (see page 93), it is also possible to perform chase copy of clips or files when they are being transferred from the computer. An example of Clip Copy screen display when copying from internal storage to Professional Disc To turn off the display of copy processing progress Press the DISP OFF function button (F6). To abort the copy processing Press the ABORT function button (F1), and then press the YES (F5) button. The data having already been copied to the destination media remains on that media. 7 To stop the recording, press the STOP button. When the copy processing is completed successfully, the message "Copy was Completed." appears. 68 Copying
-
 1
1 -
2
-
3
-
4
-
5
-
6
-
7
-
8
-
9
-
10
-
11
-
12
-
13
-
14
-
15
-
16
-
17
-
18
-
19
-
20
-
21
-
22
-
23
-
24
-
25
-
26
-
27
-
28
-
29
-
30
-
31
-
32
-
33
-
34
-
35
-
36
-
37
-
38
-
39
-
40
-
41
-
42
-
43
-
44
-
45
-
46
-
47
-
48
-
49
-
50
-
51
-
52
-
53
-
54
-
55
-
56
-
57
-
58
-
59
-
60
-
61
-
62
-
 63
63 -
 64
64 -
 65
65 -
 66
66 -
 67
67 -
 68
68 -
 69
69 -
 70
70 -
 71
71 -
 72
72 -
 73
73 -
74
-
75
-
76
-
77
-
78
-
79
-
80
-
81
-
82
-
83
-
84
-
85
-
86
-
87
-
88
-
89
-
90
-
91
-
92
-
93
-
94
-
95
-
96
-
97
-
98
-
99
-
100
-
101
-
102
-
103
-
104
-
105
-
106
-
107
-
108
-
109
-
110
-
111
-
112
-
113
-
114
-
115
-
116
-
117
-
118
-
119
-
120
-
121
-
122
-
123
-
124
-
125
-
126
-
127
-
128
-
129
-
130
-
131
-
132
-
133
-
134
-
135
-
136
-
137
-
138
-
139
-
140
-
141
-
142
-
143
-
144
-
145
-
146
-
147
-
148
-
149
-
150
-
151
-
152
-
153
-
154
-
155
-
156
-
157
-
158
-
159
-
160
-
161
 |
 |