Sony XDSPD2000 User Manual (XDS-PD1000 and XDS-PD2000 Operation Manual for Fir - Page 53
Recording, Playback and Copying, Recording, Preparations for recording
 |
View all Sony XDSPD2000 manuals
Add to My Manuals
Save this manual to your list of manuals |
Page 53 highlights
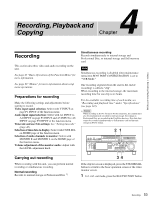
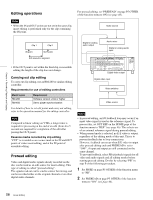
Recording, Playback and Copying 4 Chapter Chapter 4 Recording, Playback and Copying Recording This section describes video and audio recording on the unit. See page 45 "Basic Operations of the Function Menu" for more information. See page 99 "Menus" for more information about setup menu operations. Preparations for recording Make the following settings and adjustments before starting to record. Video input signal selection: Select with V INPUT on page P1 INPUT of the function menu. Audio input signal selection: Select with A1 INPUT to A4 INPUT on page P1 INPUT and A5 INPUT to A8 INPUT on page P2 INPUT of the function menu. Timecode and user bits settings: See "Setting timecode" (page 40). Selection of time data to display: Select with CNTR SEL on HOME page of the function menu. Selection of audio channels to monitor: Select with MONITR R and MONITR L on the HOME page of the function menu. Volume adjustment of the monitor audio: Adjust with the LEVEL adjustment knob. Simultaneous recording Records simultaneously to internal storage and Professional Disc, or internal storage and SxS memory card. Note Simultaneous recording is disabled when maintenance menu item M397 PORT CONFIGURATION is set to "VTR Mode." One recording segment (from the start to the end of recording) is called a "clip". When recording to the internal storage, the maximum recording time for one clip is six hours. For the available recording time of each media, see "Recording and playback time" under "Specifications" (see page 141). 1) PD2000 When recording in XAVC format to Professional Disc, the content must also be simultaneously recorded to internal storage. Recordings to Professional Disc are recorded in the UserData directory. Note that clips cannot be recorded simultaneously to SxS memory card and internal storage in XAVC format. Carrying out recording When recording with this unit, you can perform normal recording or simultaneous recording. Normal recording Records to internal storage or Professional Disc 1). If the clip list screen is displayed, press the THUMBNAIL button to switch to the basic operation screen or the video monitor screen. 1 In 1-in/1-out mode, press the REC/PB2 PORT button. 53 Recording
-
 1
1 -
2
-
3
-
4
-
5
-
6
-
7
-
8
-
9
-
10
-
11
-
12
-
13
-
14
-
15
-
16
-
17
-
18
-
19
-
20
-
21
-
22
-
23
-
24
-
25
-
26
-
27
-
28
-
29
-
30
-
31
-
32
-
33
-
34
-
35
-
36
-
37
-
38
-
39
-
40
-
41
-
42
-
43
-
44
-
45
-
46
-
47
-
 48
48 -
 49
49 -
 50
50 -
 51
51 -
 52
52 -
 53
53 -
 54
54 -
 55
55 -
 56
56 -
 57
57 -
 58
58 -
59
-
60
-
61
-
62
-
63
-
64
-
65
-
66
-
67
-
68
-
69
-
70
-
71
-
72
-
73
-
74
-
75
-
76
-
77
-
78
-
79
-
80
-
81
-
82
-
83
-
84
-
85
-
86
-
87
-
88
-
89
-
90
-
91
-
92
-
93
-
94
-
95
-
96
-
97
-
98
-
99
-
100
-
101
-
102
-
103
-
104
-
105
-
106
-
107
-
108
-
109
-
110
-
111
-
112
-
113
-
114
-
115
-
116
-
117
-
118
-
119
-
120
-
121
-
122
-
123
-
124
-
125
-
126
-
127
-
128
-
129
-
130
-
131
-
132
-
133
-
134
-
135
-
136
-
137
-
138
-
139
-
140
-
141
-
142
-
143
-
144
-
145
-
146
-
147
-
148
-
149
-
150
-
151
-
152
-
153
-
154
-
155
-
156
-
157
-
158
-
159
-
160
-
161
 |
 |