Sony XDSPD2000 User Manual (XDS-PD1000 and XDS-PD2000 Operation Manual for Fir - Page 126
Maintenance menu operations, To display the maintenance menu, Meanings of indications on the menu
 |
View all Sony XDSPD2000 manuals
Add to My Manuals
Save this manual to your list of manuals |
Page 126 highlights
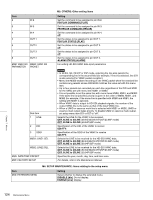
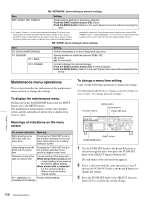
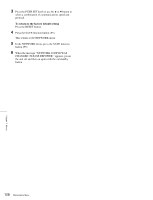
M5: NETWORK: Items relating to network settings Item M5F: RESET NET CONFIG Setting Reset network settings to the factory defaults. Push the SAVE function button (F5): Reset. Push the MENU button: Return to the next highest menu level without executing the reset. a) A "jumbo" frame is a frame larger than the maximum 1514 bytes (not including FCS) of the standard Ethernet frame. Jumbo frames make it possible to deliver larger payloads per packet. Since fewer packets need to be routed, packet processing overhead is lower and network throughput is potentially improved. (Note that this item is enabled only when LINK SPEED is set to "1Gbps FullDuplex". For it to work, all other devices that handle packets on the network must also support jumbo frames.) M6: DRIVE: Items relating to drive settings Item D0: DRIVE MAINTENANCE D1: SSD/HDD D11: RAID D13: FORMAT Setting Perform maintenance on the Professional Disc drive. Specify whether to install the optional XDBK-102. on: Install. off: Do not install. Format (initialize) the internal storage. Push the SAVE function button (F5): Format (initialize). Push the MENU button: Return to the next highest menu level without executing the format. Maintenance menu operations This section describes the indications in the maintenance menu and how to change the settings. To display the maintenance menu Holding down the PAGE/HOME button and the SHIFT button, press the MENU button. The maintenance menu appears on the video monitor screen and the currently-set menu item is displayed in reverse video. Meanings of indications on the menu screen On-screen indication Meaning Right-pointing arrow (c) at the right of a menu item Pressing the PUSH SET knob or the b button switches to the next lower menu level or to a setting selection screen. Left-pointing arrow (C) Pressing the PUSH SET knob or at the left of a menu the B button switches to the item previous (higher) menu level. Character string at the right of a menu item Current setting of the menu item When shown with a colon (:): the current setting is the same as the factory default setting. When shown with a raised dot (.): the current setting is different from the factory default setting. An * (asterisk) in a Factory default setting complete list of settings To change a menu item setting Carry out the following operations to change the setting. For information about how to change network settings see next section "To change network settings". Function buttons MENU button Arrow buttons PUSH SET knob SHIFT button PAGE/HOME button 1 Use the PUSH SET knob or the V and v buttons to select the required item, then press the PUSH SET knob or the SELECT function button (F2). The sub-items of the selected item appears. 2 Select a sub-item with the same operation as step 1, and use the PUSH SET knob or the V and v buttons to change the setting. 3 Press the PUSH SET knob or the SELECT function button (F2) to confirm the setting change. Chapter 7 Menus 126 Maintenance Menu
-
 1
1 -
2
-
3
-
4
-
5
-
6
-
7
-
8
-
9
-
10
-
11
-
12
-
13
-
14
-
15
-
16
-
17
-
18
-
19
-
20
-
21
-
22
-
23
-
24
-
25
-
26
-
27
-
28
-
29
-
30
-
31
-
32
-
33
-
34
-
35
-
36
-
37
-
38
-
39
-
40
-
41
-
42
-
43
-
44
-
45
-
46
-
47
-
48
-
49
-
50
-
51
-
52
-
53
-
54
-
55
-
56
-
57
-
58
-
59
-
60
-
61
-
62
-
63
-
64
-
65
-
66
-
67
-
68
-
69
-
70
-
71
-
72
-
73
-
74
-
75
-
76
-
77
-
78
-
79
-
80
-
81
-
82
-
83
-
84
-
85
-
86
-
87
-
88
-
89
-
90
-
91
-
92
-
93
-
94
-
95
-
96
-
97
-
98
-
99
-
100
-
101
-
102
-
103
-
104
-
105
-
106
-
107
-
108
-
109
-
110
-
111
-
112
-
113
-
114
-
115
-
116
-
117
-
118
-
119
-
120
-
 121
121 -
 122
122 -
 123
123 -
 124
124 -
 125
125 -
 126
126 -
 127
127 -
 128
128 -
 129
129 -
 130
130 -
 131
131 -
132
-
133
-
134
-
135
-
136
-
137
-
138
-
139
-
140
-
141
-
142
-
143
-
144
-
145
-
146
-
147
-
148
-
149
-
150
-
151
-
152
-
153
-
154
-
155
-
156
-
157
-
158
-
159
-
160
-
161
 |
 |