Sony XDSPD2000 User Manual (XDS-PD1000 and XDS-PD2000 Operation Manual for Fir - Page 106
Items in the extended menu, To save the current settings in a menu bank
 |
View all Sony XDSPD2000 manuals
Add to My Manuals
Save this manual to your list of manuals |
Page 106 highlights
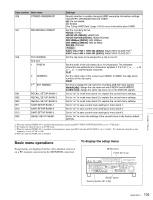
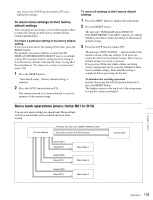
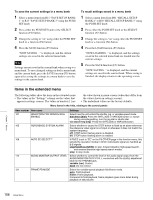
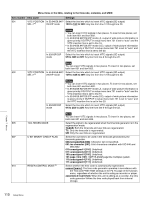
To save the current settings in a menu bank 1 Select a menu item from B11 "SAVE SETUP BANK- 1" to B13 "SAVE SETUP BANK-3" using the PUSH SET knob. 2 Press either the PUSH SET knob or the SELECT function (F2) button. 3 Change the setting to "on" using either the PUSH SET knob or + function (F4) button. 4 Press the SAVE function (F5) button. "NOW SAVING..." is displayed, and the current settings are saved in the selected menu bank. Note Settings are not saved in the current bank when saving to a menu bank. To save changed settings in both a menu bank and the current bank, press the SAVE function (F5) button again after saving the settings in a menu bank to save the settings in the current bank. To recall settings saved in a menu bank 1 Select a menu item from B01 "RECALL SETUP BANK-1" to B03 "RECALL SETUP BANK-3" using the PUSH SET knob. 2 Press either the PUSH SET knob or the SELECT function (F2) button. 3 Change the setting to "on" using either the PUSH SET knob or + function (F4) button. 4 Press the LOAD function (F5) button. "NOW LOADING..." is displayed, and the settings saved in the selected menu bank are loaded into the current settings. 5 Press the SAVE function (F5) button. "NOW SAVING..." is displayed, and the current settings are saved in the current bank. When saving is finished, the display returns to the operating screen. Items in the extended menu The following tables show the items in the extended menu. • The values in the "Settings" column are the values that appear in settings screens. The values in brackets [ ] are the value shown in menu screens (when they differ from the values shown in settings screens). • The underlined values are the factory defaults. Menu items in the 100s, relating to the control panels Item number Item name 101 SELECTION FOR SEARCH DIAL ENABLE 105 REFERENCE SYSTEM ALARM 108 AUTO EE SELECT a) 114 AUDIO MONITOR OUTPUT LEVEL 121 FRAME PB MODE Settings Select how the unit enters the shuttle, jog, or variable-speed mode. dial direct [dial]: Press the SHTL/JOG or VAR/JOG button or, except during recording/editing, turn the jog dial or shuttle dial. via search key [key]: Press the SHTL/JOG or VAR/JOG button. Select whether to cause the STOP button to flash as an alarm whenever the reference video signal is not input or whenever it does not match the system frequency. off: STOP button flashing alarm is disabled. on: STOP button flashing alarm is enabled. If PB/EE is set to "EE" on the P5 OTHER page in the function menu, this selects the operation modes in which video/audio signal are handled as E-E signals. stop/f.fwd/f.rev [S/F/R]: In stop, forward direction high-speed search, and reverse direction high-speed search modes. stop: In stop mode. Select whether to control the level of the audio signal output from the AUDIO MONITOR OUTPUT R, L connectors with the LEVEL adjustment knob for the PHONES jack. variable [var]: Control. fixed: Do not control. Select the variable-speed playback field/frame mode. auto: Field playback frame: Frame playback. Compared to field playback, frame playback gives more detail during playback of still pictures. Chapter 7 Menus 106 Setup Menu
-
 1
1 -
2
-
3
-
4
-
5
-
6
-
7
-
8
-
9
-
10
-
11
-
12
-
13
-
14
-
15
-
16
-
17
-
18
-
19
-
20
-
21
-
22
-
23
-
24
-
25
-
26
-
27
-
28
-
29
-
30
-
31
-
32
-
33
-
34
-
35
-
36
-
37
-
38
-
39
-
40
-
41
-
42
-
43
-
44
-
45
-
46
-
47
-
48
-
49
-
50
-
51
-
52
-
53
-
54
-
55
-
56
-
57
-
58
-
59
-
60
-
61
-
62
-
63
-
64
-
65
-
66
-
67
-
68
-
69
-
70
-
71
-
72
-
73
-
74
-
75
-
76
-
77
-
78
-
79
-
80
-
81
-
82
-
83
-
84
-
85
-
86
-
87
-
88
-
89
-
90
-
91
-
92
-
93
-
94
-
95
-
96
-
97
-
98
-
99
-
100
-
 101
101 -
 102
102 -
 103
103 -
 104
104 -
 105
105 -
 106
106 -
 107
107 -
 108
108 -
 109
109 -
 110
110 -
 111
111 -
112
-
113
-
114
-
115
-
116
-
117
-
118
-
119
-
120
-
121
-
122
-
123
-
124
-
125
-
126
-
127
-
128
-
129
-
130
-
131
-
132
-
133
-
134
-
135
-
136
-
137
-
138
-
139
-
140
-
141
-
142
-
143
-
144
-
145
-
146
-
147
-
148
-
149
-
150
-
151
-
152
-
153
-
154
-
155
-
156
-
157
-
158
-
159
-
160
-
161
 |
 |
