Sony XDSPD2000 User Manual (XDS-PD1000 and XDS-PD2000 Operation Manual for Fir - Page 54
For recording to Professional Disc, and Professional Disc
 |
View all Sony XDSPD2000 manuals
Add to My Manuals
Save this manual to your list of manuals |
Page 54 highlights
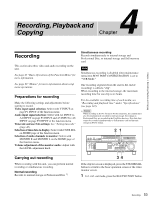
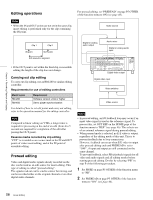
Chapter 4 Recording, Playback and Copying 2 Select the media. For recording to the internal storage: Press the INTERNAL button. For recording to Professional Disc: Press the DISC button. For simultaneously recording to internal storage and Professional Disc: Press the INTERNAL button and the DISC button simultaneously. For simultaneously recording to internal storage and SxS memory card: Press the INTERNAL button and the MEMORY button simultaneously. 3 Hold down the REC button, and press the PLAY button. Recording starts. 4 To stop recording, press the STOP button. This unit enters a stop mode. To stop only the recording to the Professional Disc/ SxS memory card during simultaneous recording Press the COPY button to show the progress of the copying. Press the ABORT function button (F1), and then press the YES (F5) button to abort the copy operation. For the behavior of media in simultaneous recording, see "Professional Disc operation during simultaneous recording" (see page 54) and "SxS memory card operation during simultaneous recording" (see page 55). Notes • The shortest clip that can be recorded is 2 seconds long. Even if the time from the operation to start recording to the operation to stop recording is less than two seconds, the recording continues for two seconds. • Recording may continue without stopping if you rapidly switch from recording t stop t recording. • The maximum recordable number of clips depends on the media, as follows. Media HDD SSD PFD23A PFD50DLA PFD100TLA PFD128QLW SxS memory card XQD memory card Maximum number of clips 3000 3000 300 300 1200 1200 600 600 When the maximum recordable number is reached, no further recording is possible. (The message "MAX # Clips" appears in the status display area.) • This unit can record video input signals that are not synchronized to a reference signal. However, in that case, video breakup and audio noise may occur in E-E playback. • During recording, do not turn off the main power switch on the rear panel or disconnect the power cord. This could cause the clip being recorded to be lost. Note that no recorded clip contents are lost when the on/standby button on the front panel is set to standby during recording, because the unit does not enter standby mode until after the end of recording processing. Professional Disc operation during simultaneous recording • If clips cannot be recorded in the Clip folder on the Professional Disc, they are automatically recorded in the UserData folder. • If the Professional Disc is in an unrecordable state, pressing the REC button and PLAY button simultaneously in step 3 displays a message, and recording to the internal storage only starts. If you replace the disc with a recordable disc after recording to the internal storage starts, you can perform chase copy. For chase copy, see page 68. • When during recording the remaining space of the Professional Disc becomes insufficient, then the recording to the disc stops, and the disc is ejected. The recording to the internal storage continues. If you insert a recordable disc when a message is displayed to confirm whether you wish to replace the disc and continue the recording or to stop the recording, recording to the inserted disc starts from the position where the recording to the previous disc was aborted. If continuing simultaneous recording spanning multiple discs, you can set the overlap between disc media in menu item 160 INTER-MEDIA OVERLAP SELECT. To stop the recording, press the STOP button. • When during recording you press the EJECT button to remove the Professional Disc, then the recording to the disc stops, and the disc is ejected. The recording to the internal storage continues. If you insert a recordable disc when a message is displayed to confirm whether you wish to replace the disc and continue the recording or to stop the recording, recording to the inserted disc starts from the position where the recording to the previous disc was aborted. To stop the recording, press the STOP button. • When recording to the internal storage becomes impossible, the recording to the Professional Disc also stops. 54 Recording
-
 1
1 -
2
-
3
-
4
-
5
-
6
-
7
-
8
-
9
-
10
-
11
-
12
-
13
-
14
-
15
-
16
-
17
-
18
-
19
-
20
-
21
-
22
-
23
-
24
-
25
-
26
-
27
-
28
-
29
-
30
-
31
-
32
-
33
-
34
-
35
-
36
-
37
-
38
-
39
-
40
-
41
-
42
-
43
-
44
-
45
-
46
-
47
-
48
-
 49
49 -
 50
50 -
 51
51 -
 52
52 -
 53
53 -
 54
54 -
 55
55 -
 56
56 -
 57
57 -
 58
58 -
 59
59 -
60
-
61
-
62
-
63
-
64
-
65
-
66
-
67
-
68
-
69
-
70
-
71
-
72
-
73
-
74
-
75
-
76
-
77
-
78
-
79
-
80
-
81
-
82
-
83
-
84
-
85
-
86
-
87
-
88
-
89
-
90
-
91
-
92
-
93
-
94
-
95
-
96
-
97
-
98
-
99
-
100
-
101
-
102
-
103
-
104
-
105
-
106
-
107
-
108
-
109
-
110
-
111
-
112
-
113
-
114
-
115
-
116
-
117
-
118
-
119
-
120
-
121
-
122
-
123
-
124
-
125
-
126
-
127
-
128
-
129
-
130
-
131
-
132
-
133
-
134
-
135
-
136
-
137
-
138
-
139
-
140
-
141
-
142
-
143
-
144
-
145
-
146
-
147
-
148
-
149
-
150
-
151
-
152
-
153
-
154
-
155
-
156
-
157
-
158
-
159
-
160
-
161
 |
 |