Sony XDSPD2000 User Manual (XDS-PD1000 and XDS-PD2000 Operation Manual for Fir - Page 85
Professional Disc operations, Formatting initializing discs, Finalizing discs, Repairing discs
 |
View all Sony XDSPD2000 manuals
Add to My Manuals
Save this manual to your list of manuals |
Page 85 highlights
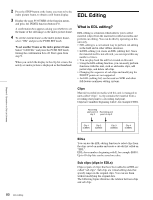
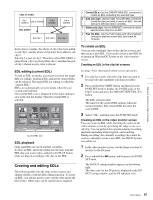
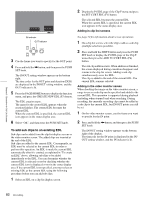
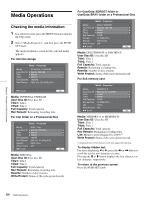
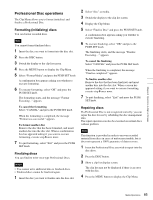
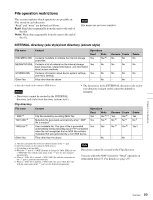
Chapter 5 Operations in Clip List Screens Professional Disc operations The Clip Menu allows you to format (initialize) and finalize a Professional Disc. Formatting (initializing) discs You can format recorded discs. Note You cannot format finalized discs. 1 Insert the disc you want to format into the disc slot. 2 Press the DISC button. 3 Switch the display to the clip list screen. 4 Press the MENU button to display the Clip Menu. 5 Select "Format Media" and press the PUSH SET knob. A confirmation box appears asking you whether to execute formatting. 6 To execute formatting, select "OK" and press the PUSH SET knob. The formatting starts, and the message "Format Executing..." appears. To cancel the formatting Select "CANCEL" and press the PUSH SET knob. When the formatting is completed, the message "Format was successful." appears. To format another disc Remove the disc that has been formatted, and insert another disc into the disc slot. When a confirmation box has appeared asking if you want to execute formatting, execute step 6 once more. 7 To quit formatting, select "Exit" and press the PUSH SET knob. Finalizing discs You can finalize write-once type Professional Discs. Notes • You cannot write additional data to finalized discs. • Finalized discs cannot be finalized again. 1 Insert the disc you want to finalize into the disc slot. 2 Select "disc" as media. 3 Switch the display to the clip list screen. 4 Display the Clip Menu. 5 Select "Finalize Disc" and press the PUSH SET knob. A confirmation box appears asking you whether to execute finalizing. 6 To execute finalizing, select "OK" and press the PUSH SET knob. The finalizing starts, and the message "Finalize Executing...." appears. To cancel the finalizing Select "CANCEL" and press the PUSH SET knob. When the finalizing is completed, the message "Finalize completed." appears. To finalize another disc Remove the disc that has been finalized, and insert another disc into the disc slot. When a screen has appeared asking if you want to execute formatting, execute step 6 once more. 7 To quit finalizing, select "Exit" and press the PUSH SET knob. Repairing discs If a Professional Disc is not recognized correctly, you can repair the disc for use by rebuilding the disc management data. The repair operation can also be executed on normal discs without problem. Note This function is provided in order to recover recorded material from discs in cases of unforeseen trouble, but it does not represent a 100% guarantee of data recovery. 1 Insert the Professional Disc you wish to repair into the disc drive. 2 Press the DISC button. 3 Show a clip list display screen. The clip list may not be displayed if there is an error with the disc. 4 Press the MENU button to display the Clip Menu. 85 Media Operations
-
 1
1 -
2
-
3
-
4
-
5
-
6
-
7
-
8
-
9
-
10
-
11
-
12
-
13
-
14
-
15
-
16
-
17
-
18
-
19
-
20
-
21
-
22
-
23
-
24
-
25
-
26
-
27
-
28
-
29
-
30
-
31
-
32
-
33
-
34
-
35
-
36
-
37
-
38
-
39
-
40
-
41
-
42
-
43
-
44
-
45
-
46
-
47
-
48
-
49
-
50
-
51
-
52
-
53
-
54
-
55
-
56
-
57
-
58
-
59
-
60
-
61
-
62
-
63
-
64
-
65
-
66
-
67
-
68
-
69
-
70
-
71
-
72
-
73
-
74
-
75
-
76
-
77
-
78
-
79
-
 80
80 -
 81
81 -
 82
82 -
 83
83 -
 84
84 -
 85
85 -
 86
86 -
 87
87 -
 88
88 -
 89
89 -
 90
90 -
91
-
92
-
93
-
94
-
95
-
96
-
97
-
98
-
99
-
100
-
101
-
102
-
103
-
104
-
105
-
106
-
107
-
108
-
109
-
110
-
111
-
112
-
113
-
114
-
115
-
116
-
117
-
118
-
119
-
120
-
121
-
122
-
123
-
124
-
125
-
126
-
127
-
128
-
129
-
130
-
131
-
132
-
133
-
134
-
135
-
136
-
137
-
138
-
139
-
140
-
141
-
142
-
143
-
144
-
145
-
146
-
147
-
148
-
149
-
150
-
151
-
152
-
153
-
154
-
155
-
156
-
157
-
158
-
159
-
160
-
161
 |
 |