Sony XDSPD2000 User Manual (XDS-PD1000 and XDS-PD2000 Operation Manual for Fir - Page 42
Setting user bits, Superimposed Text Information
 |
View all Sony XDSPD2000 manuals
Add to My Manuals
Save this manual to your list of manuals |
Page 42 highlights
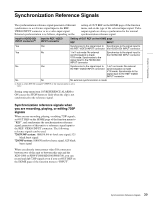
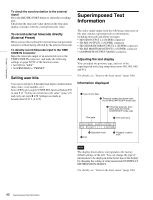
Chapter 3 Preparations To check the synchronization to the external signal Press the REC/PB2 PORT button to select the recording port. Check that the timecode value shown in the time data display coincides with the external timecode value. To record external timecode directly (External Preset) When you use this method, the internal timecode generator advances without being affected by the external timecode. To directly record timecode input to the TIME CODE IN connector Input the timecode output of an external device to the TIME CODE IN connector, and make the following settings on page P4 TC of the function menu. • Set TCG to "EXT". • Set PRST/RGN to "PRESET". Setting user bits You can record up to 8 hexadecimal digits of information (date, time, event number, etc.). Select UB by pressing the CNTR SEL function button (F2) in step 1 of "Setting an initial timecode value" (page 41) and carry out steps 2 to 5. Settings are made in hexadecimal (0 to 9, A to F). Superimposed Text Information The video signal output from the following connectors on this unit contains superimposed text information, including timecode and alarm messages. • HD-SDI OUTPUT1 2 (SUPER) connector • SD-SDI OUTPUT1 2 (SUPER) connector • HD-SDI MONITOR/OUTPUT2 2 (SUPER) connector • SD-SDI MONITOR/OUTPUT2 2 (SUPER) connector • COMPOSITE OUTPUT MONI/2 connector Adjusting the text display You can adjust the position, type, and size of the superimposed text using setup menu items 002, 003, 005, and 011. For details, see "Items in the basic menu" (page 100). Information displayed 1 Type of time data 2 Timecode reader drop-frame mark (for 59.94i/59.94P/29.97P mode only) 3 Timecode generator dropframe mark (for 59.94i/ 59.94P/29.97P mode only) Time data 4 VITC field mark 6 Operation mode 5 Port 7 Playback condition mark Note The display shown above corresponds to the factory default settings of the unit. You can change the type of information to be displayed in the lower line of the display by changing the setting of setup menu item 005 DISPLAY INFORMATION SELECT. For details, see "Items in the basic menu" (page 100). 42 Superimposed Text Information
-
 1
1 -
2
-
3
-
4
-
5
-
6
-
7
-
8
-
9
-
10
-
11
-
12
-
13
-
14
-
15
-
16
-
17
-
18
-
19
-
20
-
21
-
22
-
23
-
24
-
25
-
26
-
27
-
28
-
29
-
30
-
31
-
32
-
33
-
34
-
35
-
36
-
 37
37 -
 38
38 -
 39
39 -
 40
40 -
 41
41 -
 42
42 -
 43
43 -
 44
44 -
 45
45 -
 46
46 -
 47
47 -
48
-
49
-
50
-
51
-
52
-
53
-
54
-
55
-
56
-
57
-
58
-
59
-
60
-
61
-
62
-
63
-
64
-
65
-
66
-
67
-
68
-
69
-
70
-
71
-
72
-
73
-
74
-
75
-
76
-
77
-
78
-
79
-
80
-
81
-
82
-
83
-
84
-
85
-
86
-
87
-
88
-
89
-
90
-
91
-
92
-
93
-
94
-
95
-
96
-
97
-
98
-
99
-
100
-
101
-
102
-
103
-
104
-
105
-
106
-
107
-
108
-
109
-
110
-
111
-
112
-
113
-
114
-
115
-
116
-
117
-
118
-
119
-
120
-
121
-
122
-
123
-
124
-
125
-
126
-
127
-
128
-
129
-
130
-
131
-
132
-
133
-
134
-
135
-
136
-
137
-
138
-
139
-
140
-
141
-
142
-
143
-
144
-
145
-
146
-
147
-
148
-
149
-
150
-
151
-
152
-
153
-
154
-
155
-
156
-
157
-
158
-
159
-
160
-
161
 |
 |