Sony XDSPD2000 User Manual (XDS-PD1000 and XDS-PD2000 Operation Manual for Fir - Page 93
FTP File Operations, Making FTP connections, Command list
 |
View all Sony XDSPD2000 manuals
Add to My Manuals
Save this manual to your list of manuals |
Page 93 highlights
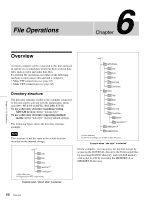
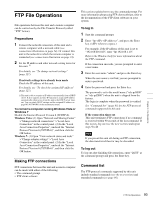
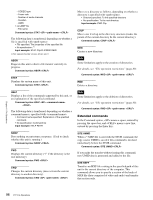
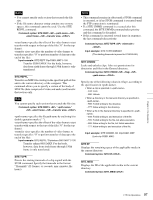
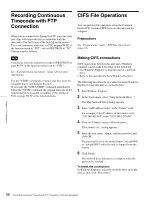
FTP File Operations File operations between this unit and a remote computer can be carried out by the File Transfer Protocol (called "FTP" below). Preparations 1 Connect the network connectors of this unit and a remote computer with a network cable (see connections illustration on page 34). Or connect this unit to the network to which the remote computer is connected (see connections illustration on page 34). 2 Set the IP address and other network setting items for this unit. 1) For details, see "To change network settings" (page 127). If network settings have already been made Check the IP address of this unit. For details, see "To check the assigned IP address" (page 127). 1) This unit is able to acquire an IP address automatically from a DHCP server. It also supports an Auto-IP function to assign an IP address automatically when access from this unit to the DHCP server times out. You can check DHCP settings and the assigned IP address on page M5:NETWORK of the maintenance menu. To connect a computer running Windows Vista or Windows 7 Disable the Internet Protocol Version 6 (TCP/IPv6). Windows Vista: (1) Open "Network and Sharing Center" >"Manage network connections" >"Local Area Connection" in the control panel. (2) In the "Local Area Connection Properties", uncheck the "Internet Protocol Version 6 (TCP/IPv6)", and then click the OK button. Windows 7: (1) Open "View network status and tasks" >"Change adapter settings" >"Local Area Connection" in the control panel. (2) In the "Local Area Connection Properties", uncheck the "Internet Protocol Version 6 (TCP/IPv6)", and then click the OK button. Making FTP connections FTP connections between this unit and a remote computer can be made with either of the following. • The command prompt • FTP client software This section explains how to use the command prompt. For more information about using FTP client software, refer to the documentation of the FTP client software on your system. To log in 1 Start the command prompt. 2 Enter "ftp ", and press the Enter key. ( refers to a space.) For example, if the IP address of this unit is set to "192.168.001.010", enter "ftp 192.168.1.10". Refer to the Windows help for more information about the FTP command. If the connection succeeds, you are prompted to enter a user name. 3 Enter the user name "admin" and press the Enter key. When the user name is verified, you are prompted to enter a password. 4 Enter the password and press the Enter key. The password is set to the model name ("xds-pd1000" or "xds-pd2000") when the unit is shipped from the factory. The login is complete when the password is verified. See "Command list" (page 93) for the FTP protocol commands supported by this unit. If the connection times out This unit terminates FTP connections if no command is received within 90 seconds of the last command. If this occurs, log out (see the next section) and repeat steps 1 to 3. Note If you power this unit off during an FTP connection, the data transferred thus far may be discarded. To log out To log out after finishing file operations, enter "QUIT" at the command prompt and press the Enter key. Command list The FTP protocol commands supported by this unit include standard commands (see the next section) and extended commands (see page 96). Chapter 6 File Operations 93 FTP File Operations
-
 1
1 -
2
-
3
-
4
-
5
-
6
-
7
-
8
-
9
-
10
-
11
-
12
-
13
-
14
-
15
-
16
-
17
-
18
-
19
-
20
-
21
-
22
-
23
-
24
-
25
-
26
-
27
-
28
-
29
-
30
-
31
-
32
-
33
-
34
-
35
-
36
-
37
-
38
-
39
-
40
-
41
-
42
-
43
-
44
-
45
-
46
-
47
-
48
-
49
-
50
-
51
-
52
-
53
-
54
-
55
-
56
-
57
-
58
-
59
-
60
-
61
-
62
-
63
-
64
-
65
-
66
-
67
-
68
-
69
-
70
-
71
-
72
-
73
-
74
-
75
-
76
-
77
-
78
-
79
-
80
-
81
-
82
-
83
-
84
-
85
-
86
-
87
-
 88
88 -
 89
89 -
 90
90 -
 91
91 -
 92
92 -
 93
93 -
 94
94 -
 95
95 -
 96
96 -
 97
97 -
 98
98 -
99
-
100
-
101
-
102
-
103
-
104
-
105
-
106
-
107
-
108
-
109
-
110
-
111
-
112
-
113
-
114
-
115
-
116
-
117
-
118
-
119
-
120
-
121
-
122
-
123
-
124
-
125
-
126
-
127
-
128
-
129
-
130
-
131
-
132
-
133
-
134
-
135
-
136
-
137
-
138
-
139
-
140
-
141
-
142
-
143
-
144
-
145
-
146
-
147
-
148
-
149
-
150
-
151
-
152
-
153
-
154
-
155
-
156
-
157
-
158
-
159
-
160
-
161
 |
 |