Sony XDSPD2000 User Manual (XDS-PD1000 and XDS-PD2000 Operation Manual for Fir - Page 47
P3 AUDIO P4 TC P5 OTHER Setting, 200 to 0, to +200, 12 dB, PRESET, FREE RUN, 24F TC
 |
View all Sony XDSPD2000 manuals
Add to My Manuals
Save this manual to your list of manuals |
Page 47 highlights
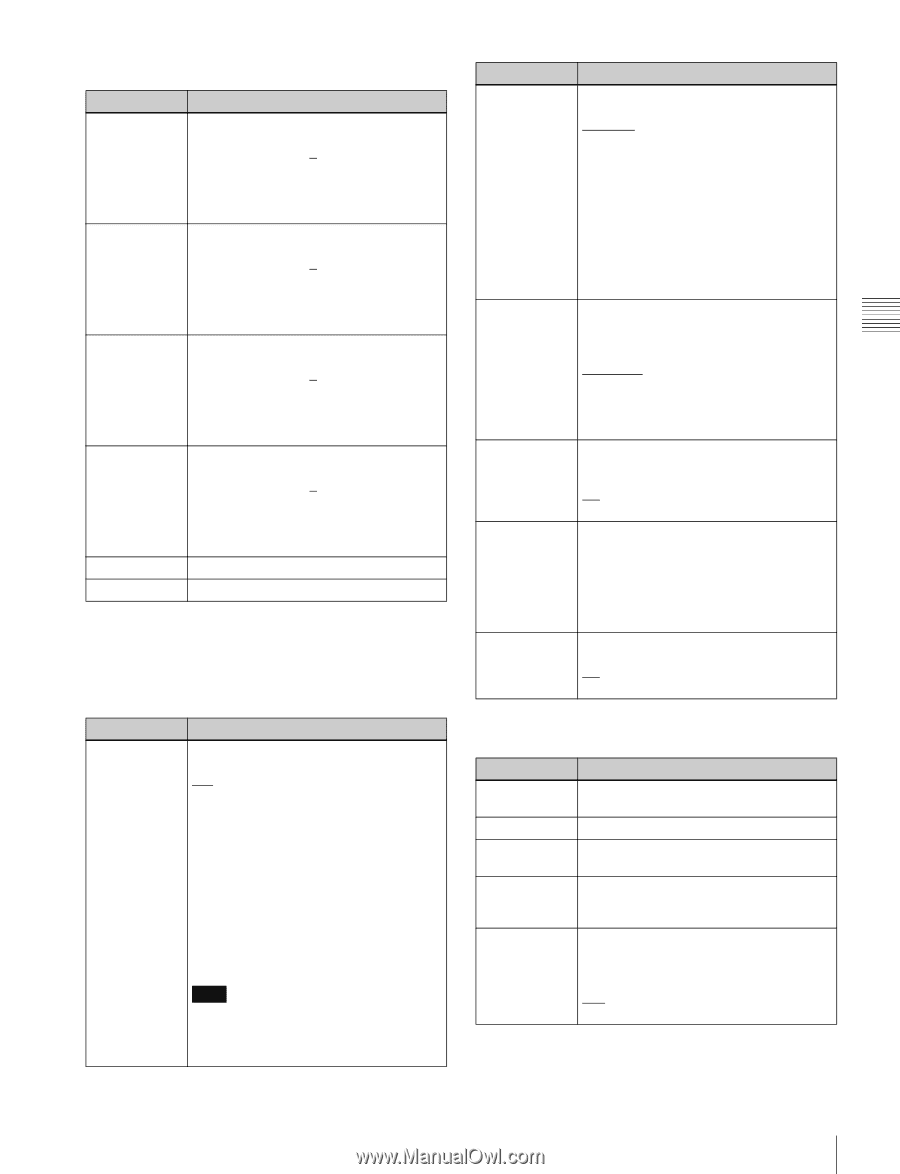
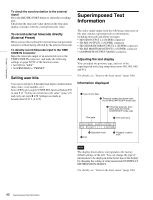
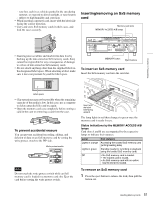
Chapter 3 Preparations P3 AUDIO page Item F1: A5 VOL F2: A6 VOL F3: A7 VOL F4: A8 VOL F5: - F6: - Setting Sets the volume of audio channel 5. a) The volume can be adjusted within the range from -200 to 0 to +200 (-∞ to +12 dB) by turning the PUSH SET knob. The volume changes in steps of ±10 if you hold the SHIFT button down while you turn the knob. Sets the volume of audio channel 6. a) The volume can be adjusted within the range from -200 to 0 to +200 (-∞ to +12 dB) by turning the PUSH SET knob. The volume changes in steps of ±10 if you hold the SHIFT button down while you turn the knob. Sets the volume of audio channel 7. a) The volume can be adjusted within the range from -200 to 0 to +200 (-∞ to +12 dB) by turning the PUSH SET knob. The volume changes in steps of ±10 if you hold the SHIFT button down while you turn the knob. Sets the volume of audio channel 8. a) The volume can be adjusted within the range from -200 to 0 to +200 (-∞ to +12 dB) by turning the PUSH SET knob. The volume changes in steps of ±10 if you hold the SHIFT button down while you turn the knob. (Unassigned function button) (Unassigned function button) a) To enable this setting, the following settings are also required, in the same way as for volume operations for channels 1 to 4. • Set the VARIABLE switch of the front panel to "REC" or "PB". • Set setup menu item 131 AUDIO VOLUME to "each". P4 TC page Item F1: TCG Setting Selects the timecode signal to which the internal timecode generator synchronizes. INT: Follow the initial value set from the front panel or remotely from the device connected to a REMOTE (9P) connector. EXT: Synchronize to external timecode signal input to the TIME CODE IN connector. SYS: Synchronize to standard reference timecode signal of a broadcasting station input to the SYSTEM TC INPUT connector. SDI: Synchronize to timecode embedded into HD-SDI or SD-SDI signal input to the HD/SD-SDI INPUT connector. Note If you select "EXT" or "SDI" when a DVBASI TS signal is input, the internal timecode generator synchronizes to timecode data contained in the TS signal. Item Setting F2: PRST/RGN Selects the following for the internal timecode generator. PRESET: Presets an initial value for the timecode generated by the internal timecode generator, as specified from the front panel or remotely from the device connected to a REMOTE (9P) connector. TC: Generate timecode synchronized to timecode read by the internal timecode reader. VITC: Generate timecode synchronized to VITC read by the internal timecode reader. F3: RUN MODE Selects the timecode run mode. FREE RUN: Timecode advances as long as the unit is powered on, regardless of the unit's operating state. REC RUN: Timecode advances only during recording. When you select this item, also set F1: TCG on this page to "INT" and set F2: PRST/RGN to "PRESET". F4: DF/NDF Selects the frame count mode for the internal timecode generator and the counter in 59.94i/59.94P/29.97P mode. DF: Drop-frame mode NDF: Non-drop-frame mode F5: PDPSET When the system frequency is set to 1080/ 59.94i, 1080/29.97P, or 720/59.94P, presets the timecode of the A frame of the pulldown sequence. 24F TC: Reference timecode for A frame 30F TC: Timecode after pulldown conversion from 24-frame timecode F6: TCR Selects the type of timecode to display in the time data display area. TC: Display TC. VITC: Display VITC. P5 OTHER page Item F1: INDEX F2: ERR LOG F3: CREATE NEW EDL F4: ADD TO CURRENT EDL F5: PB/EE a) Setting Sets the index picture (thumbnail) of a clip being played back (see page 79). Displays the error log screen. Creates a new EDL (see page 81). Adds a sub clip to the current EDL (see page 82). Selects the video and audio signals that are output in stop, forward direction highspeed search, and reverse direction highspeed search modes b). PB: Playback signal EE: EE mode signal 47 Basic Operations of the Function Menu
-
 1
1 -
2
-
3
-
4
-
5
-
6
-
7
-
8
-
9
-
10
-
11
-
12
-
13
-
14
-
15
-
16
-
17
-
18
-
19
-
20
-
21
-
22
-
23
-
24
-
25
-
26
-
27
-
28
-
29
-
30
-
31
-
32
-
33
-
34
-
35
-
36
-
37
-
38
-
39
-
40
-
41
-
 42
42 -
 43
43 -
 44
44 -
 45
45 -
 46
46 -
 47
47 -
 48
48 -
 49
49 -
 50
50 -
 51
51 -
 52
52 -
53
-
54
-
55
-
56
-
57
-
58
-
59
-
60
-
61
-
62
-
63
-
64
-
65
-
66
-
67
-
68
-
69
-
70
-
71
-
72
-
73
-
74
-
75
-
76
-
77
-
78
-
79
-
80
-
81
-
82
-
83
-
84
-
85
-
86
-
87
-
88
-
89
-
90
-
91
-
92
-
93
-
94
-
95
-
96
-
97
-
98
-
99
-
100
-
101
-
102
-
103
-
104
-
105
-
106
-
107
-
108
-
109
-
110
-
111
-
112
-
113
-
114
-
115
-
116
-
117
-
118
-
119
-
120
-
121
-
122
-
123
-
124
-
125
-
126
-
127
-
128
-
129
-
130
-
131
-
132
-
133
-
134
-
135
-
136
-
137
-
138
-
139
-
140
-
141
-
142
-
143
-
144
-
145
-
146
-
147
-
148
-
149
-
150
-
151
-
152
-
153
-
154
-
155
-
156
-
157
-
158
-
159
-
160
-
161
 |
 |