Sony XDSPD2000 User Manual (XDS-PD1000 and XDS-PD2000 Operation Manual for Fir - Page 69
Transcode copy
 |
View all Sony XDSPD2000 manuals
Add to My Manuals
Save this manual to your list of manuals |
Page 69 highlights
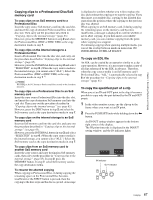
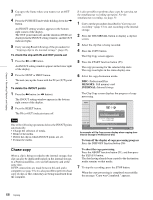
Chapter 4 Recording, Playback and Copying Transcode copy You can duplicate or copy a clip on copy source media by changing the video/audio format of the clip. During the transcode copy operation, playback of the copy source clip and recording of the copy are performed simultaneously. It is possible to perform transcode copy of only the specified part of a clip in the same way as the normal copy operation. Since transcode copy is performed at the normal playback speed, you can reduce the copy time by copying only the necessary parts. Notes • Only internal storage or Professional Disc can be selected for the copy destination for transcode copy. Transcode copy is not supported to SxS memory cards. • Transcode copy allows HD/SD format clips to be converted to HD format clips. But it cannot be used for format conversion to SD. • If a clip is being recorded or played back, you cannot perform transcode copy. Stop the recording or playback before performing transcode copy. • When transcode copying from MPEG to XAVC, the copy destination is internal storage only. 1 In setup menu item 031 RECORDING FORMAT, select the video format after conversion. 2 Insert a Professional Disc/SxS memory card and carry out steps 1 to 7 of "Copying clips to the internal storage" (page 65). If INTERNAL or MEMORY is pressed in step 2, then select DISC or INTERNAL in step 7. If DISC is pressed in step 2, select INTERNAL in step 7. 3 Press the TRANSCOD function button (F3) to change the indication to ON. 4 Carry out steps 8 and 9 of "Copying clips to the internal storage" (page 65). Handling of Internal Storage/Professional Disc When Recording Does Not End Normally (Salvage Function) The processing for recording to internal storage/ Professional Disc does not end normally if, for example, the main power switch on the rear panel is turned off during recording, or if the power cord is disconnected during recording. Because the file system is not updated, video and audio data recorded in real time may not be recognized as files. However, this unit has a salvage function which can hold losses to the minimum by automatically reconstructing clips on the internal storage next time the unit is started. Note that no recorded clip contents are lost when the on/ standby button on the front panel is set to standby during recording, because the unit does not enter standby mode until after the end of recording processing. Notes • Even after recording finishes, do not set the main power switch on the rear panel to off until the INTERNAL ACCESS indicator has gone out. • This function salvages as much recorded material as possible after an unforeseen accident, but 100% restoration cannot be guaranteed. • Even when this function is used, it is not possible to recover data from immediately before the interruption of recording. The amount of data lost is about several tens of seconds. • If attempting to use media that requires salvaging as a result of a recording operation on another device, a message is displayed to salvage the card on the recording device and the card is not mounted. 69 Handling of Internal Storage/Professional Disc When Recording Does Not End Normally (Salvage Function)
-
 1
1 -
2
-
3
-
4
-
5
-
6
-
7
-
8
-
9
-
10
-
11
-
12
-
13
-
14
-
15
-
16
-
17
-
18
-
19
-
20
-
21
-
22
-
23
-
24
-
25
-
26
-
27
-
28
-
29
-
30
-
31
-
32
-
33
-
34
-
35
-
36
-
37
-
38
-
39
-
40
-
41
-
42
-
43
-
44
-
45
-
46
-
47
-
48
-
49
-
50
-
51
-
52
-
53
-
54
-
55
-
56
-
57
-
58
-
59
-
60
-
61
-
62
-
63
-
 64
64 -
 65
65 -
 66
66 -
 67
67 -
 68
68 -
 69
69 -
 70
70 -
 71
71 -
 72
72 -
 73
73 -
 74
74 -
75
-
76
-
77
-
78
-
79
-
80
-
81
-
82
-
83
-
84
-
85
-
86
-
87
-
88
-
89
-
90
-
91
-
92
-
93
-
94
-
95
-
96
-
97
-
98
-
99
-
100
-
101
-
102
-
103
-
104
-
105
-
106
-
107
-
108
-
109
-
110
-
111
-
112
-
113
-
114
-
115
-
116
-
117
-
118
-
119
-
120
-
121
-
122
-
123
-
124
-
125
-
126
-
127
-
128
-
129
-
130
-
131
-
132
-
133
-
134
-
135
-
136
-
137
-
138
-
139
-
140
-
141
-
142
-
143
-
144
-
145
-
146
-
147
-
148
-
149
-
150
-
151
-
152
-
153
-
154
-
155
-
156
-
157
-
158
-
159
-
160
-
161
 |
 |