HP 40gs HP 39gs_40gs_Mastering The Graphing Calculator_English_E_F2224-90010.p - Page 225
Simple Animations, Capturing the PLOT screen, key and then press
 |
UPC - 882780045217
View all HP 40gs manuals
Add to My Manuals
Save this manual to your list of manuals |
Page 225 highlights
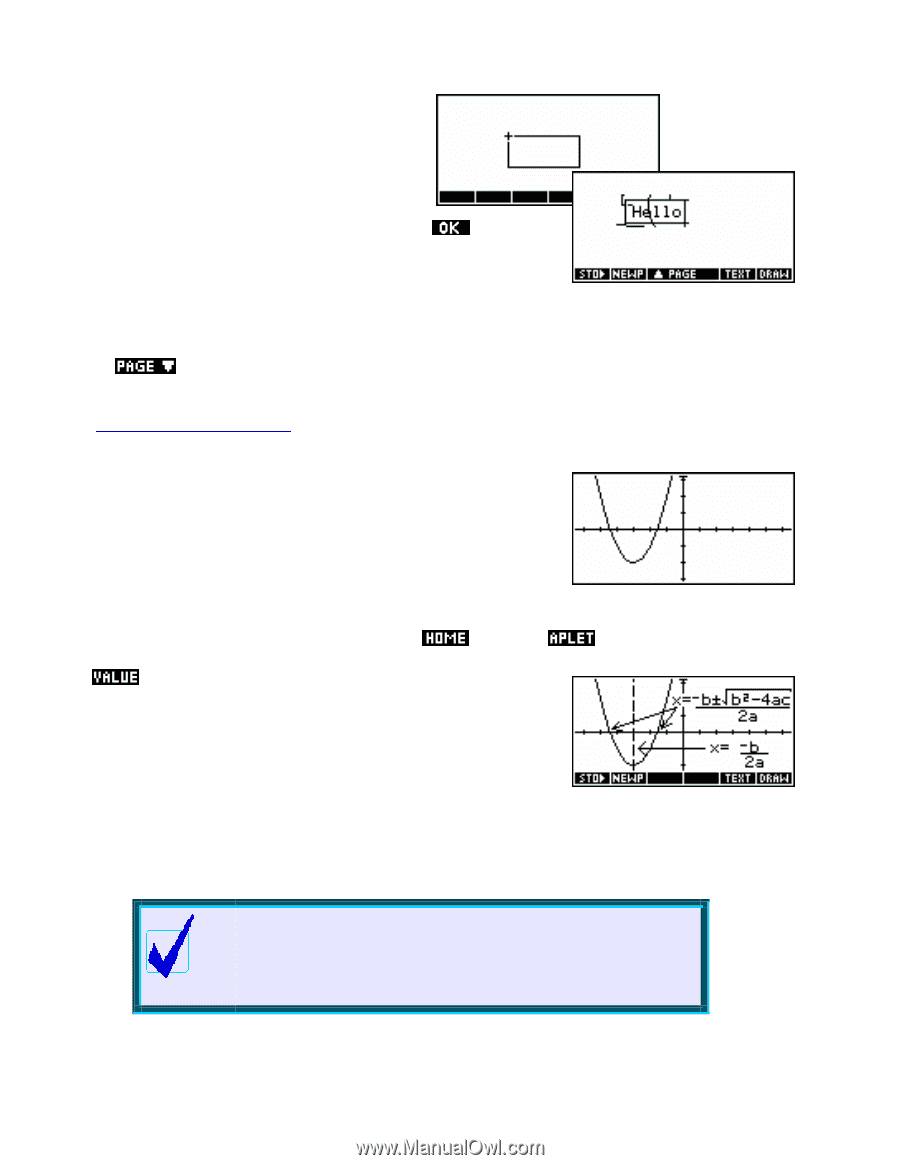
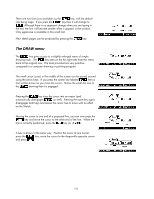
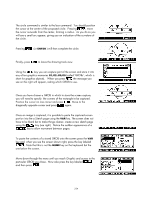
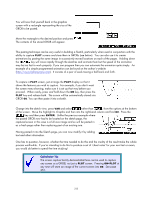
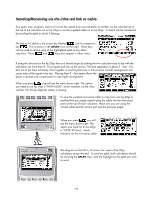
You will now find yourself back in the graphics screen with a rectangle representing the size of the GROB to be pasted. Move the rectangle to the desired position and press . The contents of the stored GROB will appear. Simple Animations This pasting technique can be very useful in building a Sketch, particularly when used in conjunction with the ability to capture PLOT screens and store them in GROBs (see below). You can also use it to create animations by pasting the same image in successively moved locations on each of the pages. Holding down the key will move rapidly through the sketches and animate them but the speed of the animation may be too fast to work properly. If you can program then you can automate the animation quite simply. An example of a simple programmed animation can be found on the author's website (http://www.hphomeview.com). It consists of a pair of seals tossing a ball back and forth. Capturing the PLOT screen To capture a PLOT screen, just arrange the PLOT display so that it shows the features you wish to capture. For example, if you don't want the screen menu showing, make sure it is set up that way before you proceed. When ready, press and hold down the ON key, then press the PLOT key and release both. The screen will be automatically stored into GROB G0. You can then paste it into a sketch. Change into the sketch view, press VAR and select rather than , from the options at the bottom of the screen. Move the highlight to Graphic and then into the right-hand column and find G0. Press the key and then press ENTER. Unlike the previous example where the pasted GROB now had to be located on the sketch page, the captured screen in this case is a full size image and so will be pasted in as a fresh page rather than replacing part of an existing one. Having pasted it into the Sketch page, you can now modify it by adding text and other information. One has to question, however, whether the time needed to do this and the crudity of the result make the whole process worthwhile. If you're intending to do this to produce a set of 'cheat notes' for your next test or exam, you would do better to spend the time studying! Calculator Tip The screen capture facility demonstrated here can be used to capture any screen as a GROB, not just a PLOT screen. Pressing ON+PLOT at any time will store an image of the current screen into G0. See page 251. 225
-
 1
1 -
2
-
3
-
4
-
5
-
6
-
7
-
8
-
9
-
10
-
11
-
12
-
13
-
14
-
15
-
16
-
17
-
18
-
19
-
20
-
21
-
22
-
23
-
24
-
25
-
26
-
27
-
28
-
29
-
30
-
31
-
32
-
33
-
34
-
35
-
36
-
37
-
38
-
39
-
40
-
41
-
42
-
43
-
44
-
45
-
46
-
47
-
48
-
49
-
50
-
51
-
52
-
53
-
54
-
55
-
56
-
57
-
58
-
59
-
60
-
61
-
62
-
63
-
64
-
65
-
66
-
67
-
68
-
69
-
70
-
71
-
72
-
73
-
74
-
75
-
76
-
77
-
78
-
79
-
80
-
81
-
82
-
83
-
84
-
85
-
86
-
87
-
88
-
89
-
90
-
91
-
92
-
93
-
94
-
95
-
96
-
97
-
98
-
99
-
100
-
101
-
102
-
103
-
104
-
105
-
106
-
107
-
108
-
109
-
110
-
111
-
112
-
113
-
114
-
115
-
116
-
117
-
118
-
119
-
120
-
121
-
122
-
123
-
124
-
125
-
126
-
127
-
128
-
129
-
130
-
131
-
132
-
133
-
134
-
135
-
136
-
137
-
138
-
139
-
140
-
141
-
142
-
143
-
144
-
145
-
146
-
147
-
148
-
149
-
150
-
151
-
152
-
153
-
154
-
155
-
156
-
157
-
158
-
159
-
160
-
161
-
162
-
163
-
164
-
165
-
166
-
167
-
168
-
169
-
170
-
171
-
172
-
173
-
174
-
175
-
176
-
177
-
178
-
179
-
180
-
181
-
182
-
183
-
184
-
185
-
186
-
187
-
188
-
189
-
190
-
191
-
192
-
193
-
194
-
195
-
196
-
197
-
198
-
199
-
200
-
201
-
202
-
203
-
204
-
205
-
206
-
207
-
208
-
209
-
210
-
211
-
212
-
213
-
214
-
215
-
216
-
217
-
218
-
219
-
 220
220 -
 221
221 -
 222
222 -
 223
223 -
 224
224 -
 225
225 -
 226
226 -
 227
227 -
 228
228 -
 229
229 -
 230
230 -
231
-
232
-
233
-
234
-
235
-
236
-
237
-
238
-
239
-
240
-
241
-
242
-
243
-
244
-
245
-
246
-
247
-
248
-
249
-
250
-
251
-
252
-
253
-
254
-
255
-
256
-
257
-
258
-
259
-
260
-
261
-
262
-
263
-
264
-
265
-
266
-
267
-
268
-
269
-
270
-
271
-
272
-
273
-
274
-
275
-
276
-
277
-
278
-
279
-
280
-
281
-
282
-
283
-
284
-
285
-
286
-
287
-
288
-
289
-
290
-
291
-
292
-
293
-
294
-
295
-
296
-
297
-
298
-
299
-
300
-
301
-
302
-
303
-
304
-
305
-
306
-
307
-
308
-
309
-
310
-
311
-
312
-
313
-
314
-
315
-
316
-
317
-
318
-
319
-
320
-
321
-
322
-
323
-
324
-
325
-
326
-
327
-
328
-
329
-
330
-
331
-
332
-
333
-
334
-
335
-
336
-
337
-
338
-
339
-
340
-
341
-
342
-
343
-
344
-
345
-
346
-
347
-
348
-
349
-
350
-
351
-
352
-
353
-
354
-
355
-
356
-
357
-
358
-
359
-
360
-
361
-
362
-
363
-
364
-
365
-
366
 |
 |