HP 40gs HP 39gs_40gs_Mastering The Graphing Calculator_English_E_F2224-90010.p - Page 276
Analysing the aplet
 |
UPC - 882780045217
View all HP 40gs manuals
Add to My Manuals
Save this manual to your list of manuals |
Page 276 highlights
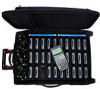
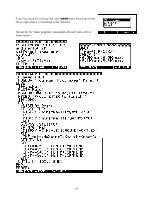
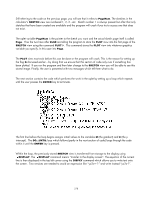
It will probably be easier to understand how the aplet works if you see it in action first so you may wish to download the aplet from The HP HOME View and try it. Alternatively, simply read the summary below. The first option on the VIEWS menu plots a set of axes and must be chosen first. Once this is chosen the user can then choose the second option on the VIEWS menu to explore the equation of a line. As you press the up/down arrows the line moves vertically by changing the value of 'c' in y = mx + c. Pressing the left/right arrows twists the line by changing the gradient 'm'. On the pages following we will examine the code in detail, as it illustrates many highly important techniques. Analysing the aplet Since it is the first program run we will look first at the program .LINEXPL.S. Because the VIEWS menu entry for this is 'Start' it will be run automatically when the user presses in the APLET view. This is crucial because we can use this to set the initial values of various variables. Including a Start option on your VIEWS menu is a very good idea. The single most important feature of this particular entry is the fact that the Exit View was set to 7 (the VIEWS menu). This means that when the user presses the first thing they will see after this code executes is the VIEWS menu. The variable G is being used here as a flag. A 'flag' is a programming term for a variable that is used to tell whether or not some task has been done or some setting has been set correctly. Often the flag is set to 1 to indicate true or 0 to indicate false. Before the 'Explore' option can be used we must be sure that the axes have been plotted, and this will be done by checking the value of G. Zero will mean 'unready' and one will mean 'ready'. When the 'Plot axes' option is run the value of G will be set to 1 and this will be checked before allowing the user to run the 'Explore' option. By setting it to zero in the program which is run when the user presses , we ensure that the correct value is going to be in G initially. If this check is not done then the code used later in .LINEXPL.EX will cause the program to crash, which is obviously not something we want. The axes are also set back to the default settings in case the user has changed them. It is possible to change them once the aplet is running but initially we want them set to particular values that we know will work well. 276
-
 1
1 -
2
-
3
-
4
-
5
-
6
-
7
-
8
-
9
-
10
-
11
-
12
-
13
-
14
-
15
-
16
-
17
-
18
-
19
-
20
-
21
-
22
-
23
-
24
-
25
-
26
-
27
-
28
-
29
-
30
-
31
-
32
-
33
-
34
-
35
-
36
-
37
-
38
-
39
-
40
-
41
-
42
-
43
-
44
-
45
-
46
-
47
-
48
-
49
-
50
-
51
-
52
-
53
-
54
-
55
-
56
-
57
-
58
-
59
-
60
-
61
-
62
-
63
-
64
-
65
-
66
-
67
-
68
-
69
-
70
-
71
-
72
-
73
-
74
-
75
-
76
-
77
-
78
-
79
-
80
-
81
-
82
-
83
-
84
-
85
-
86
-
87
-
88
-
89
-
90
-
91
-
92
-
93
-
94
-
95
-
96
-
97
-
98
-
99
-
100
-
101
-
102
-
103
-
104
-
105
-
106
-
107
-
108
-
109
-
110
-
111
-
112
-
113
-
114
-
115
-
116
-
117
-
118
-
119
-
120
-
121
-
122
-
123
-
124
-
125
-
126
-
127
-
128
-
129
-
130
-
131
-
132
-
133
-
134
-
135
-
136
-
137
-
138
-
139
-
140
-
141
-
142
-
143
-
144
-
145
-
146
-
147
-
148
-
149
-
150
-
151
-
152
-
153
-
154
-
155
-
156
-
157
-
158
-
159
-
160
-
161
-
162
-
163
-
164
-
165
-
166
-
167
-
168
-
169
-
170
-
171
-
172
-
173
-
174
-
175
-
176
-
177
-
178
-
179
-
180
-
181
-
182
-
183
-
184
-
185
-
186
-
187
-
188
-
189
-
190
-
191
-
192
-
193
-
194
-
195
-
196
-
197
-
198
-
199
-
200
-
201
-
202
-
203
-
204
-
205
-
206
-
207
-
208
-
209
-
210
-
211
-
212
-
213
-
214
-
215
-
216
-
217
-
218
-
219
-
220
-
221
-
222
-
223
-
224
-
225
-
226
-
227
-
228
-
229
-
230
-
231
-
232
-
233
-
234
-
235
-
236
-
237
-
238
-
239
-
240
-
241
-
242
-
243
-
244
-
245
-
246
-
247
-
248
-
249
-
250
-
251
-
252
-
253
-
254
-
255
-
256
-
257
-
258
-
259
-
260
-
261
-
262
-
263
-
264
-
265
-
266
-
267
-
268
-
269
-
270
-
 271
271 -
 272
272 -
 273
273 -
 274
274 -
 275
275 -
 276
276 -
 277
277 -
 278
278 -
 279
279 -
 280
280 -
 281
281 -
282
-
283
-
284
-
285
-
286
-
287
-
288
-
289
-
290
-
291
-
292
-
293
-
294
-
295
-
296
-
297
-
298
-
299
-
300
-
301
-
302
-
303
-
304
-
305
-
306
-
307
-
308
-
309
-
310
-
311
-
312
-
313
-
314
-
315
-
316
-
317
-
318
-
319
-
320
-
321
-
322
-
323
-
324
-
325
-
326
-
327
-
328
-
329
-
330
-
331
-
332
-
333
-
334
-
335
-
336
-
337
-
338
-
339
-
340
-
341
-
342
-
343
-
344
-
345
-
346
-
347
-
348
-
349
-
350
-
351
-
352
-
353
-
354
-
355
-
356
-
357
-
358
-
359
-
360
-
361
-
362
-
363
-
364
-
365
-
366
 |
 |