HP Designjet T2300 HP Designjet T2300e MFP - User's Guide: English - Page 139
Check the printhead status, Remove a printhead - carriage
 |
View all HP Designjet T2300 manuals
Add to My Manuals
Save this manual to your list of manuals |
Page 139 highlights
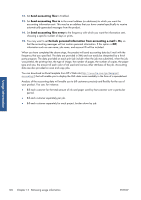
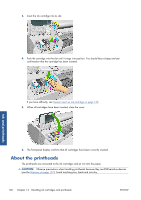
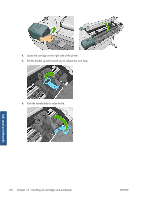
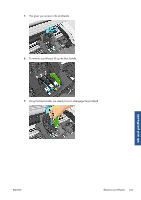
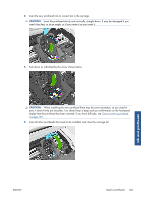
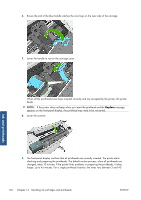
Check the printhead status The product automatically checks and services the printheads after each print. Follow the steps below to get more information on your printheads. 1. From the front panel, press then , then the printhead on which you want information. 2. The front panel displays: ● Colors ● Product name ● Product number ● Serial number ● Status, see Front-panel error messages on page 185 ● Volume of ink it has used ● Warranty status You can also get most of this information from the HP Utility. For an explanation of the printhead status messages, see Printhead status messages on page 175. If the warranty status is See warranty note, this indicates that non-HP ink is being used. See the HP Legal Information document provided with your product for details of the warranty implications. Remove a printhead CAUTION: Make sure the product wheels are locked (the brake lever is pressed down) to prevent the product from moving. Ink and printheads CAUTION: Printhead replacement must be performed with the product powered on. 1. From the front panel, press , then , then Replace printheads. Alternatively, press , then , then Ink > Replace printheads. 2. The printer moves the carriage into the correct position. CAUTION: If the carriage is left in the removal position for more than three minutes without inserting or removing any printheads, it tries to move back to its normal position in the right-hand end. 3. When the carriage has stopped moving, the front-panel display asks you to lift the scanner. ENWW Check the printhead status 131
-
 1
1 -
2
-
3
-
4
-
5
-
6
-
7
-
8
-
9
-
10
-
11
-
12
-
13
-
14
-
15
-
16
-
17
-
18
-
19
-
20
-
21
-
22
-
23
-
24
-
25
-
26
-
27
-
28
-
29
-
30
-
31
-
32
-
33
-
34
-
35
-
36
-
37
-
38
-
39
-
40
-
41
-
42
-
43
-
44
-
45
-
46
-
47
-
48
-
49
-
50
-
51
-
52
-
53
-
54
-
55
-
56
-
57
-
58
-
59
-
60
-
61
-
62
-
63
-
64
-
65
-
66
-
67
-
68
-
69
-
70
-
71
-
72
-
73
-
74
-
75
-
76
-
77
-
78
-
79
-
80
-
81
-
82
-
83
-
84
-
85
-
86
-
87
-
88
-
89
-
90
-
91
-
92
-
93
-
94
-
95
-
96
-
97
-
98
-
99
-
100
-
101
-
102
-
103
-
104
-
105
-
106
-
107
-
108
-
109
-
110
-
111
-
112
-
113
-
114
-
115
-
116
-
117
-
118
-
119
-
120
-
121
-
122
-
123
-
124
-
125
-
126
-
127
-
128
-
129
-
130
-
131
-
132
-
133
-
 134
134 -
 135
135 -
 136
136 -
 137
137 -
 138
138 -
 139
139 -
 140
140 -
 141
141 -
 142
142 -
 143
143 -
 144
144 -
145
-
146
-
147
-
148
-
149
-
150
-
151
-
152
-
153
-
154
-
155
-
156
-
157
-
158
-
159
-
160
-
161
-
162
-
163
-
164
-
165
-
166
-
167
-
168
-
169
-
170
-
171
-
172
-
173
-
174
-
175
-
176
-
177
-
178
-
179
-
180
-
181
-
182
-
183
-
184
-
185
-
186
-
187
-
188
-
189
-
190
-
191
-
192
-
193
-
194
-
195
-
196
-
197
-
198
-
199
-
200
-
201
-
202
-
203
-
204
-
205
-
206
-
207
-
208
-
209
-
210
 |
 |