HP Designjet T2300 HP Designjet T2300e MFP - User's Guide: English - Page 37
Setup, Scan to network, Add folder details, Modify, Apply, Verify, When you click
 |
View all HP Designjet T2300 manuals
Add to My Manuals
Save this manual to your list of manuals |
Page 37 highlights
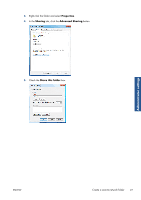
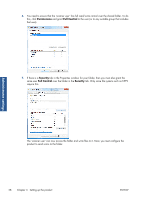
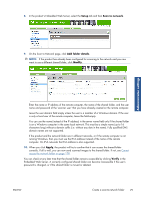
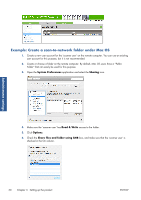
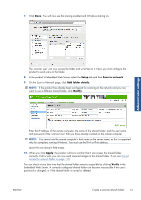
8. In the product's Embedded Web Server, select the Setup tab and then Scan to network. 9. On the Scan to Network page, click Add folder details. NOTE: If the product has already been configured for scanning to the network and you now want to use a different shared folder, click Modify. Administrator settings Enter the name or IP address of the remote computer, the name of the shared folder, and the user name and password of the 'scanner user' that you have already created on the remote computer. Leave the user domain field empty unless the user is a member of a Windows domain. If the user is only a local user of the remote computer, leave the field empty. You can use the name (instead of the IP address) in the server name field only if the shared folder is on a Windows computer in the same local network. This must be a simple name (up to 16 characters long) without a domain suffix (i.e. without any dots in the name). Fully qualified DNS domain names are not supported. If the product and the network folder are in different networks, or if the remote computer is not running Windows, then you must use the IPv4 address instead of the name of the remote computer. On IPv6 networks the IPv6 address is also supported. 10. When you click Apply, the product will try to confirm that it can access the shared folder correctly. If all is well, you can now send scanned images to the shared folder. If not, see Cannot access the network folder on page 178. You can check at any later time that the shared folder remains accessible by clicking Verify in the Embedded Web Server. A correctly configured shared folder can become inaccessible if the user's password is changed, or if the shared folder is moved or deleted. ENWW Create a scan-to-network folder 29
-
 1
1 -
2
-
3
-
4
-
5
-
6
-
7
-
8
-
9
-
10
-
11
-
12
-
13
-
14
-
15
-
16
-
17
-
18
-
19
-
20
-
21
-
22
-
23
-
24
-
25
-
26
-
27
-
28
-
29
-
30
-
31
-
 32
32 -
 33
33 -
 34
34 -
 35
35 -
 36
36 -
 37
37 -
 38
38 -
 39
39 -
 40
40 -
 41
41 -
 42
42 -
43
-
44
-
45
-
46
-
47
-
48
-
49
-
50
-
51
-
52
-
53
-
54
-
55
-
56
-
57
-
58
-
59
-
60
-
61
-
62
-
63
-
64
-
65
-
66
-
67
-
68
-
69
-
70
-
71
-
72
-
73
-
74
-
75
-
76
-
77
-
78
-
79
-
80
-
81
-
82
-
83
-
84
-
85
-
86
-
87
-
88
-
89
-
90
-
91
-
92
-
93
-
94
-
95
-
96
-
97
-
98
-
99
-
100
-
101
-
102
-
103
-
104
-
105
-
106
-
107
-
108
-
109
-
110
-
111
-
112
-
113
-
114
-
115
-
116
-
117
-
118
-
119
-
120
-
121
-
122
-
123
-
124
-
125
-
126
-
127
-
128
-
129
-
130
-
131
-
132
-
133
-
134
-
135
-
136
-
137
-
138
-
139
-
140
-
141
-
142
-
143
-
144
-
145
-
146
-
147
-
148
-
149
-
150
-
151
-
152
-
153
-
154
-
155
-
156
-
157
-
158
-
159
-
160
-
161
-
162
-
163
-
164
-
165
-
166
-
167
-
168
-
169
-
170
-
171
-
172
-
173
-
174
-
175
-
176
-
177
-
178
-
179
-
180
-
181
-
182
-
183
-
184
-
185
-
186
-
187
-
188
-
189
-
190
-
191
-
192
-
193
-
194
-
195
-
196
-
197
-
198
-
199
-
200
-
201
-
202
-
203
-
204
-
205
-
206
-
207
-
208
-
209
-
210
 |
 |