HP Designjet T2300 HP Designjet T2300e MFP - User's Guide: English - Page 147
Check product status, Clean the exterior of the product, Maintain the ink cartridges
 |
View all HP Designjet T2300 manuals
Add to My Manuals
Save this manual to your list of manuals |
Page 147 highlights
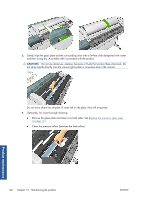
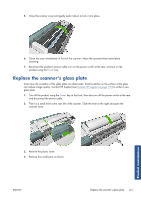
Check product status You can check the current status of the product in various ways: ● If you start the HP Utility and select your product, you see a page of information describing the status of the product and its paper and ink supplies. ● If you access the Embedded Web Server, you see information about the general status of the product. The Supplies page in the Main tab describes the status of the paper and ink supplies. ● At the front panel, you can press for information about paper, ink levels, ink cartridges, and printheads. If there is a current problem, you are taken automatically to the area with the most urgent problem. If there are any current alerts, the upper row of the home screen shows the top-priority alert. Press the alert message to see a list of all current alerts. Clean the exterior of the product Clean the outside of the product and all other parts of the product that you regularly touch as part of normal operation with a damp sponge or a soft cloth and a mild household cleaner such as nonabrasive liquid soap. WARNING! To avoid an electric shock, make sure that the product is turned off and unplugged before you clean it. Do not let water get inside the product. CAUTION: Do not use abrasive cleaners on the product. Maintain the ink cartridges During the normal lifetime of a cartridge, no specific maintenance is required. However, in order to maintain the best print quality, replace a cartridge when it reaches its expiration date. The front panel notifies you when any cartridge reaches its expiration date. You can also check a cartridge's expiration date at any time: see Check product status on page 139. See also Handling ink cartridges and printheads on page 127. Clean the scanner's glass plate You are recommended to clean the scanner's glass plate periodically, depending on how often you use the scanner. 1. Turn off the product using the Power key at the front, then also turn off the power switch at the rear and disconnect the power cable. 2. There is a small lever at the rear left of the scanner. Slide the lever to the right and open the scanner cover. Product maintenance ENWW Check product status 139
-
 1
1 -
2
-
3
-
4
-
5
-
6
-
7
-
8
-
9
-
10
-
11
-
12
-
13
-
14
-
15
-
16
-
17
-
18
-
19
-
20
-
21
-
22
-
23
-
24
-
25
-
26
-
27
-
28
-
29
-
30
-
31
-
32
-
33
-
34
-
35
-
36
-
37
-
38
-
39
-
40
-
41
-
42
-
43
-
44
-
45
-
46
-
47
-
48
-
49
-
50
-
51
-
52
-
53
-
54
-
55
-
56
-
57
-
58
-
59
-
60
-
61
-
62
-
63
-
64
-
65
-
66
-
67
-
68
-
69
-
70
-
71
-
72
-
73
-
74
-
75
-
76
-
77
-
78
-
79
-
80
-
81
-
82
-
83
-
84
-
85
-
86
-
87
-
88
-
89
-
90
-
91
-
92
-
93
-
94
-
95
-
96
-
97
-
98
-
99
-
100
-
101
-
102
-
103
-
104
-
105
-
106
-
107
-
108
-
109
-
110
-
111
-
112
-
113
-
114
-
115
-
116
-
117
-
118
-
119
-
120
-
121
-
122
-
123
-
124
-
125
-
126
-
127
-
128
-
129
-
130
-
131
-
132
-
133
-
134
-
135
-
136
-
137
-
138
-
139
-
140
-
141
-
 142
142 -
 143
143 -
 144
144 -
 145
145 -
 146
146 -
 147
147 -
 148
148 -
 149
149 -
 150
150 -
 151
151 -
 152
152 -
153
-
154
-
155
-
156
-
157
-
158
-
159
-
160
-
161
-
162
-
163
-
164
-
165
-
166
-
167
-
168
-
169
-
170
-
171
-
172
-
173
-
174
-
175
-
176
-
177
-
178
-
179
-
180
-
181
-
182
-
183
-
184
-
185
-
186
-
187
-
188
-
189
-
190
-
191
-
192
-
193
-
194
-
195
-
196
-
197
-
198
-
199
-
200
-
201
-
202
-
203
-
204
-
205
-
206
-
207
-
208
-
209
-
210
 |
 |