Kyocera ECOSYS FS-C8650DN FS-C8650DN Operation Guide - Page 109
Procedure for printing using Job Box, Operation panel display, Quick Copy (Using Quick Copy), Job Box
 |
View all Kyocera ECOSYS FS-C8650DN manuals
Add to My Manuals
Save this manual to your list of manuals |
Page 109 highlights
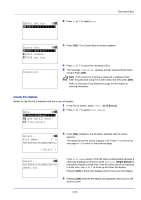
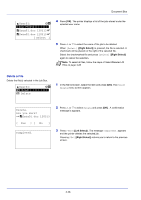
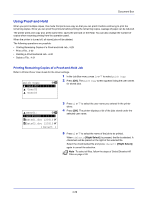
Document Box Procedure for printing using Job Box Follow the work flow below when using Job Box. Specifying the Custom Box from a computer and sending the print job (page 3-2) ▼ Using the operation panel to specify a file within a Box and printing it • Quick Copy (page 4-25) • Proof-and-Hold (page 4-29) • Private Print (page 4-31) • Stored Job (page 4-31) Operation panel display Job Box: a b *1**J*o*b**B*o*x**S*e*t*t**i*n*g*s*- [ Exit ] 1 Press [Document Box]. Either the Custom Box list screen or the Job Box menu screen is displayed. Note After pressing [Document Box], it is possible to display either the Custom Box list screen or the Job Box menu screen or to set them. Refer to Def. Screen(Box) (Document Box default screen settings.) on page 6-60. If the Job Box menu screen is displayed, follow the procedure below to display the Custom Box list screen. 1 Press [Back]. 2 Press U or V to select Job Box. 3 Press [OK]. Job Box menu screen appears. The options available in Job Box are as follows: • Quick Copy (Using Quick Copy)...4-25 • Using Proof-and-Hold...4-29 • Private/Stored (Printing a Private Print/Stored Job)...4-31 • Job Box Settings (Job Box Configuration)...4-35 Quick Copy is only displayed if there are any jobs that were saved to the HDD in Quick Copy mode. Private/Stored is only displayed if there are any jobs that were saved to the HDD. Quick Copy (Using Quick Copy) This mode enables you to print the requested number of copies of a job, simultaneously storing the job on the HDD. When additional copies are required, you can reprint the required number of copies from the printer operation panel. To print a job as a quick copy job, refer to Printer Driver User Guide. The default number of print jobs that can be stored on the HDD is 32. This value can be increased to up to 300. For details, refer to Job Box Settings (Job Box Configuration) on page 4-35. When the number of jobs reaches the limit, the oldest job will be overwritten by the new one. When the printer is turned off, all stored jobs will be deleted. Note Refer to the Printer Driver User Guide for the driver settings. 4-25
-
 1
1 -
2
-
3
-
4
-
5
-
6
-
7
-
8
-
9
-
10
-
11
-
12
-
13
-
14
-
15
-
16
-
17
-
18
-
19
-
20
-
21
-
22
-
23
-
24
-
25
-
26
-
27
-
28
-
29
-
30
-
31
-
32
-
33
-
34
-
35
-
36
-
37
-
38
-
39
-
40
-
41
-
42
-
43
-
44
-
45
-
46
-
47
-
48
-
49
-
50
-
51
-
52
-
53
-
54
-
55
-
56
-
57
-
58
-
59
-
60
-
61
-
62
-
63
-
64
-
65
-
66
-
67
-
68
-
69
-
70
-
71
-
72
-
73
-
74
-
75
-
76
-
77
-
78
-
79
-
80
-
81
-
82
-
83
-
84
-
85
-
86
-
87
-
88
-
89
-
90
-
91
-
92
-
93
-
94
-
95
-
96
-
97
-
98
-
99
-
100
-
101
-
102
-
103
-
 104
104 -
 105
105 -
 106
106 -
 107
107 -
 108
108 -
 109
109 -
 110
110 -
 111
111 -
 112
112 -
 113
113 -
 114
114 -
115
-
116
-
117
-
118
-
119
-
120
-
121
-
122
-
123
-
124
-
125
-
126
-
127
-
128
-
129
-
130
-
131
-
132
-
133
-
134
-
135
-
136
-
137
-
138
-
139
-
140
-
141
-
142
-
143
-
144
-
145
-
146
-
147
-
148
-
149
-
150
-
151
-
152
-
153
-
154
-
155
-
156
-
157
-
158
-
159
-
160
-
161
-
162
-
163
-
164
-
165
-
166
-
167
-
168
-
169
-
170
-
171
-
172
-
173
-
174
-
175
-
176
-
177
-
178
-
179
-
180
-
181
-
182
-
183
-
184
-
185
-
186
-
187
-
188
-
189
-
190
-
191
-
192
-
193
-
194
-
195
-
196
-
197
-
198
-
199
-
200
-
201
-
202
-
203
-
204
-
205
-
206
-
207
-
208
-
209
-
210
-
211
-
212
-
213
-
214
-
215
-
216
-
217
-
218
-
219
-
220
-
221
-
222
-
223
-
224
-
225
-
226
-
227
-
228
-
229
-
230
-
231
-
232
-
233
-
234
-
235
-
236
-
237
-
238
-
239
-
240
-
241
-
242
-
243
-
244
-
245
-
246
-
247
-
248
-
249
-
250
-
251
-
252
-
253
-
254
-
255
-
256
-
257
-
258
-
259
-
260
-
261
-
262
-
263
-
264
-
265
-
266
-
267
-
268
-
269
-
270
-
271
-
272
-
273
-
274
-
275
-
276
-
277
-
278
-
279
-
280
-
281
-
282
-
283
-
284
-
285
-
286
-
287
-
288
-
289
-
290
-
291
-
292
-
293
-
294
-
295
-
296
-
297
-
298
-
299
-
300
-
301
-
302
-
303
-
304
-
305
-
306
-
307
-
308
-
309
-
310
-
311
-
312
-
313
-
314
-
315
-
316
-
317
-
318
-
319
-
320
-
321
-
322
-
323
-
324
-
325
-
326
-
327
-
328
-
329
-
330
-
331
-
332
-
333
-
334
-
335
-
336
-
337
-
338
-
339
-
340
-
341
-
342
-
343
-
344
-
345
-
346
-
347
-
348
-
349
-
350
-
351
-
352
-
353
-
354
-
355
-
356
-
357
-
358
-
359
-
360
-
361
-
362
-
363
-
364
 |
 |