Kyocera ECOSYS FS-C8650DN FS-C8650DN Operation Guide - Page 87
Custom Box, Procedure for printing using Custom Box, Operation panel display, Menu ] [ Add ]
 |
View all Kyocera ECOSYS FS-C8650DN manuals
Add to My Manuals
Save this manual to your list of manuals |
Page 87 highlights
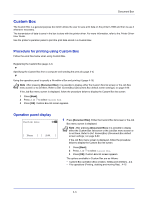
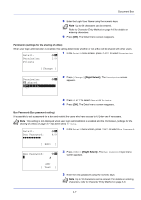
Document Box Custom Box The Custom Box is a general-purpose box which allows the user to save print data on the printer's HDD and then re-use it whenever necessary. The transmission of data to save in the box is done with the printer driver. For more information, refer to the Printer Driver User Guide. Use the printer's operation panel to print the print data stored in a Custom Box. Procedure for printing using Custom Box Follow the work flow below when using Custom Box. Registering the Custom Box (page 4-4) ▼ Specifying the Custom Box from a computer and sending the print job (page 3-2) ▼ Using the operation panel to specify a file within a Box and printing it (page 4-15) Note After pressing [Document Box], it is possible to display either the Custom Box list screen or the Job Box menu screen or to set them. Refer to Def. Screen(Box) (Document Box default screen settings.) on page 6-60. If the Job Box menu screen is displayed, follow the procedure below to display the Custom Box list screen. 1 Press [Back]. 2 Press U or V to select Custom Box. 3 Press [OK]. Custom Box list screen appears. Operation panel display Custom Box: a b [ Menu ] [ Add ] 1 Press [Document Box]. Either the Custom Box list screen or the Job Box menu screen is displayed. Note After pressing [Document Box], it is possible to display either the Custom Box list screen or the Job Box menu screen or to set them. Refer to Def. Screen(Box) (Document Box default screen settings.) on page 6-60. If the Job Box menu screen is displayed, follow the procedure below to display the Custom Box list screen. 1 Press [Back]. 2 Press U or V to select Custom Box. 3 Press [OK]. Custom Box list screen appears. The options available in Custom Box are as follows: • Custom Box operation (Box creation, editing and deletion)...4-4 • File operations (Printing, deleting and moving files)...4-15 4-3
-
 1
1 -
2
-
3
-
4
-
5
-
6
-
7
-
8
-
9
-
10
-
11
-
12
-
13
-
14
-
15
-
16
-
17
-
18
-
19
-
20
-
21
-
22
-
23
-
24
-
25
-
26
-
27
-
28
-
29
-
30
-
31
-
32
-
33
-
34
-
35
-
36
-
37
-
38
-
39
-
40
-
41
-
42
-
43
-
44
-
45
-
46
-
47
-
48
-
49
-
50
-
51
-
52
-
53
-
54
-
55
-
56
-
57
-
58
-
59
-
60
-
61
-
62
-
63
-
64
-
65
-
66
-
67
-
68
-
69
-
70
-
71
-
72
-
73
-
74
-
75
-
76
-
77
-
78
-
79
-
80
-
81
-
 82
82 -
 83
83 -
 84
84 -
 85
85 -
 86
86 -
 87
87 -
 88
88 -
 89
89 -
 90
90 -
 91
91 -
 92
92 -
93
-
94
-
95
-
96
-
97
-
98
-
99
-
100
-
101
-
102
-
103
-
104
-
105
-
106
-
107
-
108
-
109
-
110
-
111
-
112
-
113
-
114
-
115
-
116
-
117
-
118
-
119
-
120
-
121
-
122
-
123
-
124
-
125
-
126
-
127
-
128
-
129
-
130
-
131
-
132
-
133
-
134
-
135
-
136
-
137
-
138
-
139
-
140
-
141
-
142
-
143
-
144
-
145
-
146
-
147
-
148
-
149
-
150
-
151
-
152
-
153
-
154
-
155
-
156
-
157
-
158
-
159
-
160
-
161
-
162
-
163
-
164
-
165
-
166
-
167
-
168
-
169
-
170
-
171
-
172
-
173
-
174
-
175
-
176
-
177
-
178
-
179
-
180
-
181
-
182
-
183
-
184
-
185
-
186
-
187
-
188
-
189
-
190
-
191
-
192
-
193
-
194
-
195
-
196
-
197
-
198
-
199
-
200
-
201
-
202
-
203
-
204
-
205
-
206
-
207
-
208
-
209
-
210
-
211
-
212
-
213
-
214
-
215
-
216
-
217
-
218
-
219
-
220
-
221
-
222
-
223
-
224
-
225
-
226
-
227
-
228
-
229
-
230
-
231
-
232
-
233
-
234
-
235
-
236
-
237
-
238
-
239
-
240
-
241
-
242
-
243
-
244
-
245
-
246
-
247
-
248
-
249
-
250
-
251
-
252
-
253
-
254
-
255
-
256
-
257
-
258
-
259
-
260
-
261
-
262
-
263
-
264
-
265
-
266
-
267
-
268
-
269
-
270
-
271
-
272
-
273
-
274
-
275
-
276
-
277
-
278
-
279
-
280
-
281
-
282
-
283
-
284
-
285
-
286
-
287
-
288
-
289
-
290
-
291
-
292
-
293
-
294
-
295
-
296
-
297
-
298
-
299
-
300
-
301
-
302
-
303
-
304
-
305
-
306
-
307
-
308
-
309
-
310
-
311
-
312
-
313
-
314
-
315
-
316
-
317
-
318
-
319
-
320
-
321
-
322
-
323
-
324
-
325
-
326
-
327
-
328
-
329
-
330
-
331
-
332
-
333
-
334
-
335
-
336
-
337
-
338
-
339
-
340
-
341
-
342
-
343
-
344
-
345
-
346
-
347
-
348
-
349
-
350
-
351
-
352
-
353
-
354
-
355
-
356
-
357
-
358
-
359
-
360
-
361
-
362
-
363
-
364
 |
 |