Kyocera ECOSYS FS-C8650DN FS-C8650DN Operation Guide - Page 178
Custom Setup Detailed settings for the wireless LAN, Quick Setup, Connection Mode, Channel, Exit ]
 |
View all Kyocera ECOSYS FS-C8650DN manuals
Add to My Manuals
Save this manual to your list of manuals |
Page 178 highlights
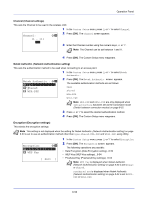
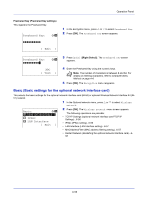
Operation Panel 3 Enter the PIN Code using the numeric keys. Note Up to 8 characters can be entered. For details on entering characters, refer to Character Entry Method on page A-6. 4 Press [OK]. The message Connecting... appears and the connection with the access point starts. Custom Setup (Detailed settings for the wireless LAN) It is possible to change the detailed settings of the wireless LAN. Quick Setup: a b *1**N*e*t*w*k**N*a**m*e*(*S*S*I*D*)*- 2 Connection Mode 3 Channel [ Exit ] 1 In the Wireless network menu, press U or V to select Custom Setup. 2 Press [OK]. The Custom Setup menu screen appears. The following operations are possible: • Netwk Name (SSID) (Registration of the access point's SSID) • Connection mode (Switch between connection modes) • Channel (Channel settings) • Netwk Authentic. (Network Authentication setting) • Encryption (Encryption settings) Netwk Name (SSID) (Registration of the access point's SSID) This sets the SSID (Service Set Identifier) for the wireless LAN access point the machine will be connected to. 1 In the Custom Setup menu, press U or V to select Netwk Name(SSID). Netwk Name(SSID): a b AAA ABC [ Text ] 2 Press [OK]. The Netwk Name(SSID) entry screen appears. 3 The Netwk Name(SSID) entry screen appears. Note Up to 32 characters can be entered. For details on entering characters, refer to Character Entry Method on page A-6. 4 Press [OK]. The Custom Setup menu reappears. Connection mode (Switch between connection modes) This selects the method for connecting to the wireless LAN. Set Ad Hoc when machines will be connected directly with each other, without going through an access point. 1 In the Custom Setup menu, press U or V to select Connection Mode. Connection Mode: a b *1**A*d**H*o*c************2 *Infrastructure 2 Press [OK]. The Connection Mode screen appears. The available Connection Mode are as follows: Ad Hoc (Connect without going through access points) Infrastructure (Connect via an access point) 3 Press U or V to select the connection mode. 4 Press [OK]. The Custom Setup menu reappears. 6-52
-
 1
1 -
2
-
3
-
4
-
5
-
6
-
7
-
8
-
9
-
10
-
11
-
12
-
13
-
14
-
15
-
16
-
17
-
18
-
19
-
20
-
21
-
22
-
23
-
24
-
25
-
26
-
27
-
28
-
29
-
30
-
31
-
32
-
33
-
34
-
35
-
36
-
37
-
38
-
39
-
40
-
41
-
42
-
43
-
44
-
45
-
46
-
47
-
48
-
49
-
50
-
51
-
52
-
53
-
54
-
55
-
56
-
57
-
58
-
59
-
60
-
61
-
62
-
63
-
64
-
65
-
66
-
67
-
68
-
69
-
70
-
71
-
72
-
73
-
74
-
75
-
76
-
77
-
78
-
79
-
80
-
81
-
82
-
83
-
84
-
85
-
86
-
87
-
88
-
89
-
90
-
91
-
92
-
93
-
94
-
95
-
96
-
97
-
98
-
99
-
100
-
101
-
102
-
103
-
104
-
105
-
106
-
107
-
108
-
109
-
110
-
111
-
112
-
113
-
114
-
115
-
116
-
117
-
118
-
119
-
120
-
121
-
122
-
123
-
124
-
125
-
126
-
127
-
128
-
129
-
130
-
131
-
132
-
133
-
134
-
135
-
136
-
137
-
138
-
139
-
140
-
141
-
142
-
143
-
144
-
145
-
146
-
147
-
148
-
149
-
150
-
151
-
152
-
153
-
154
-
155
-
156
-
157
-
158
-
159
-
160
-
161
-
162
-
163
-
164
-
165
-
166
-
167
-
168
-
169
-
170
-
171
-
172
-
 173
173 -
 174
174 -
 175
175 -
 176
176 -
 177
177 -
 178
178 -
 179
179 -
 180
180 -
 181
181 -
 182
182 -
 183
183 -
184
-
185
-
186
-
187
-
188
-
189
-
190
-
191
-
192
-
193
-
194
-
195
-
196
-
197
-
198
-
199
-
200
-
201
-
202
-
203
-
204
-
205
-
206
-
207
-
208
-
209
-
210
-
211
-
212
-
213
-
214
-
215
-
216
-
217
-
218
-
219
-
220
-
221
-
222
-
223
-
224
-
225
-
226
-
227
-
228
-
229
-
230
-
231
-
232
-
233
-
234
-
235
-
236
-
237
-
238
-
239
-
240
-
241
-
242
-
243
-
244
-
245
-
246
-
247
-
248
-
249
-
250
-
251
-
252
-
253
-
254
-
255
-
256
-
257
-
258
-
259
-
260
-
261
-
262
-
263
-
264
-
265
-
266
-
267
-
268
-
269
-
270
-
271
-
272
-
273
-
274
-
275
-
276
-
277
-
278
-
279
-
280
-
281
-
282
-
283
-
284
-
285
-
286
-
287
-
288
-
289
-
290
-
291
-
292
-
293
-
294
-
295
-
296
-
297
-
298
-
299
-
300
-
301
-
302
-
303
-
304
-
305
-
306
-
307
-
308
-
309
-
310
-
311
-
312
-
313
-
314
-
315
-
316
-
317
-
318
-
319
-
320
-
321
-
322
-
323
-
324
-
325
-
326
-
327
-
328
-
329
-
330
-
331
-
332
-
333
-
334
-
335
-
336
-
337
-
338
-
339
-
340
-
341
-
342
-
343
-
344
-
345
-
346
-
347
-
348
-
349
-
350
-
351
-
352
-
353
-
354
-
355
-
356
-
357
-
358
-
359
-
360
-
361
-
362
-
363
-
364
 |
 |