Kyocera ECOSYS FS-C8650DN FS-C8650DN Operation Guide - Page 174
Optional network (Optional Network settings), Login User Name, Login Password, Login, Admin
 |
View all Kyocera ECOSYS FS-C8650DN manuals
Add to My Manuals
Save this manual to your list of manuals |
Page 174 highlights
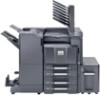
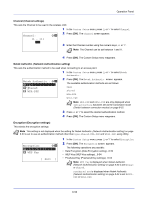
Operation Panel Optional network (Optional Network settings) This selects the settings for the optional Network Interface Kit (IB-50) or Wireless Network Interface Kit (IB-51). Note This is only displayed when a Network Interface Kit (IB-50) or Wireless Network Interface Kit (IB-51) is installed as an option. The options available in the Optional Network settings are as follows: • Wireless Network (Wireless network settings)...6-49 • Basic (Basic settings for the optional network interface card)...6-55 • Communication (Select the network interface to use)...6-58 Note Check with your network administrator when selecting the network setting. After all network related settings have been done, restart the network. Refer to Restart Network (Restarting the network card) on page 6-47. This is mandatory to make the settings effective! When Command Center RX is used, network parameters and security settings can be conveniently changed and checked from your PC. For more information, refer to the Command Center RX User Guide. 1 Press [Menu] . 2 Press U or V to select Optional network. Login User Name: O b Login Password: [ Login ] 3 Press [OK]. The Login screen appears. Note When user login administration is set: • When logged in as an administrator, the log in screen is not displayed and the Optional Network menu screen is displayed. • The setting is not possible when logged in as anyone other than an administrator. Log in again as an administrator. Login User Name: a b * 4 With the Login User Name entry field selected, press [OK]. The Login User Name entry screen is displayed. ABC [ Text ] Login User Name: O b Admin Login Password: Login ] 5 Enter the Login User Name using the numeric keys then press [OK]. The log in screen reappears. Note The initial setting for the administrator's Login User Name is "Admin". For details on entering characters, refer to Character Entry Method on page A-6. 6 Press U or V to select the Login Password entry field. 6-48
-
 1
1 -
2
-
3
-
4
-
5
-
6
-
7
-
8
-
9
-
10
-
11
-
12
-
13
-
14
-
15
-
16
-
17
-
18
-
19
-
20
-
21
-
22
-
23
-
24
-
25
-
26
-
27
-
28
-
29
-
30
-
31
-
32
-
33
-
34
-
35
-
36
-
37
-
38
-
39
-
40
-
41
-
42
-
43
-
44
-
45
-
46
-
47
-
48
-
49
-
50
-
51
-
52
-
53
-
54
-
55
-
56
-
57
-
58
-
59
-
60
-
61
-
62
-
63
-
64
-
65
-
66
-
67
-
68
-
69
-
70
-
71
-
72
-
73
-
74
-
75
-
76
-
77
-
78
-
79
-
80
-
81
-
82
-
83
-
84
-
85
-
86
-
87
-
88
-
89
-
90
-
91
-
92
-
93
-
94
-
95
-
96
-
97
-
98
-
99
-
100
-
101
-
102
-
103
-
104
-
105
-
106
-
107
-
108
-
109
-
110
-
111
-
112
-
113
-
114
-
115
-
116
-
117
-
118
-
119
-
120
-
121
-
122
-
123
-
124
-
125
-
126
-
127
-
128
-
129
-
130
-
131
-
132
-
133
-
134
-
135
-
136
-
137
-
138
-
139
-
140
-
141
-
142
-
143
-
144
-
145
-
146
-
147
-
148
-
149
-
150
-
151
-
152
-
153
-
154
-
155
-
156
-
157
-
158
-
159
-
160
-
161
-
162
-
163
-
164
-
165
-
166
-
167
-
168
-
 169
169 -
 170
170 -
 171
171 -
 172
172 -
 173
173 -
 174
174 -
 175
175 -
 176
176 -
 177
177 -
 178
178 -
 179
179 -
180
-
181
-
182
-
183
-
184
-
185
-
186
-
187
-
188
-
189
-
190
-
191
-
192
-
193
-
194
-
195
-
196
-
197
-
198
-
199
-
200
-
201
-
202
-
203
-
204
-
205
-
206
-
207
-
208
-
209
-
210
-
211
-
212
-
213
-
214
-
215
-
216
-
217
-
218
-
219
-
220
-
221
-
222
-
223
-
224
-
225
-
226
-
227
-
228
-
229
-
230
-
231
-
232
-
233
-
234
-
235
-
236
-
237
-
238
-
239
-
240
-
241
-
242
-
243
-
244
-
245
-
246
-
247
-
248
-
249
-
250
-
251
-
252
-
253
-
254
-
255
-
256
-
257
-
258
-
259
-
260
-
261
-
262
-
263
-
264
-
265
-
266
-
267
-
268
-
269
-
270
-
271
-
272
-
273
-
274
-
275
-
276
-
277
-
278
-
279
-
280
-
281
-
282
-
283
-
284
-
285
-
286
-
287
-
288
-
289
-
290
-
291
-
292
-
293
-
294
-
295
-
296
-
297
-
298
-
299
-
300
-
301
-
302
-
303
-
304
-
305
-
306
-
307
-
308
-
309
-
310
-
311
-
312
-
313
-
314
-
315
-
316
-
317
-
318
-
319
-
320
-
321
-
322
-
323
-
324
-
325
-
326
-
327
-
328
-
329
-
330
-
331
-
332
-
333
-
334
-
335
-
336
-
337
-
338
-
339
-
340
-
341
-
342
-
343
-
344
-
345
-
346
-
347
-
348
-
349
-
350
-
351
-
352
-
353
-
354
-
355
-
356
-
357
-
358
-
359
-
360
-
361
-
362
-
363
-
364
 |
 |