Kyocera ECOSYS FS-C8650DN FS-C8650DN Operation Guide - Page 333
Mailbox, Folding Unit, Banner Tray, Network Interface Kit, Data Security Kit, ThinPrint Option
 |
View all Kyocera ECOSYS FS-C8650DN manuals
Add to My Manuals
Save this manual to your list of manuals |
Page 333 highlights
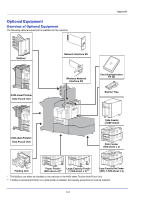
Appendix Mailbox Makes it easy to sort output into separate trays. Installing this option adds 7 output trays. When multiple computer users share the printer, each user can print to a specified tray. This can be installed on the machine or the 4,000-sheet Finisher. Note To deliver output to the mail box, change the Paper Output selection on the operation panel or in the printer driver, or change in the default settings. (For details, refer to Paper Output (Selecting the Paper Output Location) on page 6-31.) Folding Unit Folds printed output at the center or in tri-fold to enable the creation of simple booklets. Installs on the 4,000-sheet finisher. Banner Tray This tray enables continuous feeding of banner paper. Up to 10 sheets of banner paper can be loaded. To attach the tray and load paper, refer to Using the Banner Tray (Option) on page 3-10. Network Interface Kit The Network Interface Kit provides a high-speed connection for the Gigabit-per-second interface. Since the kit was designed to work with TCP/IP and NetBEUI protocols, it fulfills the network printing demands on Windows, Macintosh, and UNIX environments. This expansion kit is also compatible with ThinPrint. Wireless Network Interface Kit This is a wireless LAN interface card which supports the wireless LAN specifications IEEE802.11n (Max 300 Mbps) and 11 g/b. With the utilities supplied, settings are possible for a variety of OS and network protocols. Data Security Kit The Data Security Kit overwrites all unnecessary data in the storage area of the hard disk so that it cannot be retrieved. The Data Security Kit encrypts data before storing it in the hard disk. It guarantees higher security because no data cannot be decoded by ordinary output or operations. ThinPrint Option This application allows print data to be printed directly without a print driver. Emulation Option Enables emulation whereby the machine operates using commands for other printers. Installing this option enables IBM Proprinter, DIABLO 630, and EPSON LQ-850 emulation. Card Authentication Kit (B) It is possible to perform user authentication with an IC card. To perform authentication with an IC card, it is necessary to first register the IC card information in the list of registered users. For the method for registration, refer to the Card Authentication Kit (B) Operation Guide. USB Keyboard A USB keyboard can be used to enter information into the text fields on the operation panel. A special mount is also available to install the keyboard on the MFP. Please contact your dealer or service representative for information on keyboards that are compatible with your MFP before you purchase one. A-5
-
 1
1 -
2
-
3
-
4
-
5
-
6
-
7
-
8
-
9
-
10
-
11
-
12
-
13
-
14
-
15
-
16
-
17
-
18
-
19
-
20
-
21
-
22
-
23
-
24
-
25
-
26
-
27
-
28
-
29
-
30
-
31
-
32
-
33
-
34
-
35
-
36
-
37
-
38
-
39
-
40
-
41
-
42
-
43
-
44
-
45
-
46
-
47
-
48
-
49
-
50
-
51
-
52
-
53
-
54
-
55
-
56
-
57
-
58
-
59
-
60
-
61
-
62
-
63
-
64
-
65
-
66
-
67
-
68
-
69
-
70
-
71
-
72
-
73
-
74
-
75
-
76
-
77
-
78
-
79
-
80
-
81
-
82
-
83
-
84
-
85
-
86
-
87
-
88
-
89
-
90
-
91
-
92
-
93
-
94
-
95
-
96
-
97
-
98
-
99
-
100
-
101
-
102
-
103
-
104
-
105
-
106
-
107
-
108
-
109
-
110
-
111
-
112
-
113
-
114
-
115
-
116
-
117
-
118
-
119
-
120
-
121
-
122
-
123
-
124
-
125
-
126
-
127
-
128
-
129
-
130
-
131
-
132
-
133
-
134
-
135
-
136
-
137
-
138
-
139
-
140
-
141
-
142
-
143
-
144
-
145
-
146
-
147
-
148
-
149
-
150
-
151
-
152
-
153
-
154
-
155
-
156
-
157
-
158
-
159
-
160
-
161
-
162
-
163
-
164
-
165
-
166
-
167
-
168
-
169
-
170
-
171
-
172
-
173
-
174
-
175
-
176
-
177
-
178
-
179
-
180
-
181
-
182
-
183
-
184
-
185
-
186
-
187
-
188
-
189
-
190
-
191
-
192
-
193
-
194
-
195
-
196
-
197
-
198
-
199
-
200
-
201
-
202
-
203
-
204
-
205
-
206
-
207
-
208
-
209
-
210
-
211
-
212
-
213
-
214
-
215
-
216
-
217
-
218
-
219
-
220
-
221
-
222
-
223
-
224
-
225
-
226
-
227
-
228
-
229
-
230
-
231
-
232
-
233
-
234
-
235
-
236
-
237
-
238
-
239
-
240
-
241
-
242
-
243
-
244
-
245
-
246
-
247
-
248
-
249
-
250
-
251
-
252
-
253
-
254
-
255
-
256
-
257
-
258
-
259
-
260
-
261
-
262
-
263
-
264
-
265
-
266
-
267
-
268
-
269
-
270
-
271
-
272
-
273
-
274
-
275
-
276
-
277
-
278
-
279
-
280
-
281
-
282
-
283
-
284
-
285
-
286
-
287
-
288
-
289
-
290
-
291
-
292
-
293
-
294
-
295
-
296
-
297
-
298
-
299
-
300
-
301
-
302
-
303
-
304
-
305
-
306
-
307
-
308
-
309
-
310
-
311
-
312
-
313
-
314
-
315
-
316
-
317
-
318
-
319
-
320
-
321
-
322
-
323
-
324
-
325
-
326
-
327
-
 328
328 -
 329
329 -
 330
330 -
 331
331 -
 332
332 -
 333
333 -
 334
334 -
 335
335 -
 336
336 -
 337
337 -
 338
338 -
339
-
340
-
341
-
342
-
343
-
344
-
345
-
346
-
347
-
348
-
349
-
350
-
351
-
352
-
353
-
354
-
355
-
356
-
357
-
358
-
359
-
360
-
361
-
362
-
363
-
364
 |
 |
