Yamaha AW2400 Owner's Manual - Page 102
Patching for Mixed Recording, Input Select
 |
View all Yamaha AW2400 manuals
Add to My Manuals
Save this manual to your list of manuals |
Page 102 highlights
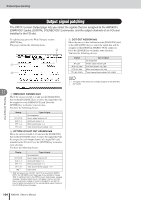
Input signal patching Similarly if you specify input channels 9-16 as the recording-source, input channels 9-16 will be connected to tracks 1-8. If you specify any one of tracks 9-16 (or 17-24) as the recording destination, the specified input channels will be connected to tracks 9-16 (or 17-24). Patching for Mixed Recording This section explains patching when you're using the Mixed Recording method. 1 Call the RECORD screen Mixed page by either pressing the Quick Navigate section [RECORD] key as many times as necessary, or by pressing the [F2] key after pressing the [RECORD] key. The RECORD screen Mixed page lets you send the signals of the input channels via two stereo buses (bus 1 and bus 2) to one to four tracks you specify. This page contains the following items. E F 11 A B Patching and signal flow C D G H 1 Input Select Here you can select the inputs that will be patched to input channels 1-8 or 9-16. You can choose from the same inputs as in the RECORD screen Direct page. B Input channels This area indicates the connection status of input channels 1-16. C Tracks This area indicates the connection status of tracks 1- 24. You can switch track muting on/off by moving the cursor to the track number and pressing the [ENTER] key. D REMAIN This indicates the remaining recordable time. E DIGITAL IN Here you can assign the [DIGITAL STEREO IN] connector to an input channel. The available choices and operations are the same as in the RECORD screen Direct page. 102 AW2400 Owner's Manual F Bus 1, Bus 2 These four lines indicate the bus 1 L/R and bus 2 L/R signal routes. This shows the recording-source input channels whose signals are being sent to bus 1/bus 2, and the recording-destination tracks to which the bus 1/bus 2 signal are being sent. G MUTE CLEAR button This button clears the mute status of all tracks. However depending on the bit depth of the song and on the number of tracks that are enabled for recording, there may be cases in which some tracks cannot be unmuted. If so, tracks will be muted consecutively starting with the last-numbered track. H SAFE button When you move the cursor to this button and press the [ENTER] key, all input channel and track channel assignments will be cancelled. This will also execute the MUTE CLEAR (G) operation. HINT • Pressing the [F1] key while holding the Display section [SHIFT] key has the same effect as the SAFE button. 2 Move the cursor to the Input Select area, and use the [DATA/JOG] dial or the [INC]/ [DEC] keys to select an input that you want to patch to an input channel. 3 Move the cursor to the symbol for the desired recording-source input channel, and press the [ENTER] key. The symbol will be highlighted, and the corresponding input channel will be connected to bus 1. 4 Press the [ENTER] key repeatedly at the same cursor location as in step 3 to select the send-destination for the signal of that input channel. Each time you press the [ENTER] key, the screen will change as follows. AOff EBus 2 L/R On BBus 1 L/R On FBus 2 L On CBus 1 L On DBus 1 R On GBus 2 R On To A
-
 1
1 -
2
-
3
-
4
-
5
-
6
-
7
-
8
-
9
-
10
-
11
-
12
-
13
-
14
-
15
-
16
-
17
-
18
-
19
-
20
-
21
-
22
-
23
-
24
-
25
-
26
-
27
-
28
-
29
-
30
-
31
-
32
-
33
-
34
-
35
-
36
-
37
-
38
-
39
-
40
-
41
-
42
-
43
-
44
-
45
-
46
-
47
-
48
-
49
-
50
-
51
-
52
-
53
-
54
-
55
-
56
-
57
-
58
-
59
-
60
-
61
-
62
-
63
-
64
-
65
-
66
-
67
-
68
-
69
-
70
-
71
-
72
-
73
-
74
-
75
-
76
-
77
-
78
-
79
-
80
-
81
-
82
-
83
-
84
-
85
-
86
-
87
-
88
-
89
-
90
-
91
-
92
-
93
-
94
-
95
-
96
-
 97
97 -
 98
98 -
 99
99 -
 100
100 -
 101
101 -
 102
102 -
 103
103 -
 104
104 -
 105
105 -
 106
106 -
 107
107 -
108
-
109
-
110
-
111
-
112
-
113
-
114
-
115
-
116
-
117
-
118
-
119
-
120
-
121
-
122
-
123
-
124
-
125
-
126
-
127
-
128
-
129
-
130
-
131
-
132
-
133
-
134
-
135
-
136
-
137
-
138
-
139
-
140
-
141
-
142
-
143
-
144
-
145
-
146
-
147
-
148
-
149
-
150
-
151
-
152
-
153
-
154
-
155
-
156
-
157
-
158
-
159
-
160
-
161
-
162
-
163
-
164
-
165
-
166
-
167
-
168
-
169
-
170
-
171
-
172
-
173
-
174
-
175
-
176
-
177
-
178
-
179
-
180
-
181
-
182
-
183
-
184
-
185
-
186
-
187
-
188
-
189
-
190
-
191
-
192
-
193
-
194
-
195
-
196
-
197
-
198
-
199
-
200
-
201
-
202
-
203
-
204
-
205
-
206
-
207
-
208
-
209
-
210
-
211
-
212
-
213
-
214
-
215
-
216
-
217
-
218
-
219
-
220
-
221
-
222
-
223
-
224
-
225
-
226
-
227
-
228
-
229
-
230
-
231
-
232
-
233
-
234
-
235
-
236
-
237
-
238
-
239
-
240
-
241
-
242
-
243
-
244
-
245
-
246
-
247
-
248
-
249
-
250
-
251
-
252
-
253
-
254
-
255
-
256
-
257
-
258
-
259
-
260
-
261
-
262
-
263
-
264
-
265
-
266
-
267
-
268
-
269
-
270
-
271
-
272
-
273
-
274
-
275
-
276
-
277
-
278
-
279
-
280
-
281
-
282
-
283
-
284
-
285
-
286
-
287
-
288
 |
 |
