Yamaha AW2400 Owner's Manual - Page 189
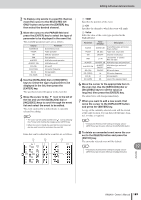
the even list. Use the [DATA/JOG] dial or, Move the cursor to the appropriate item
 |
View all Yamaha AW2400 manuals
Add to My Manuals
Save this manual to your list of manuals |
Page 189 highlights
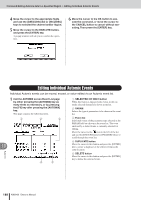
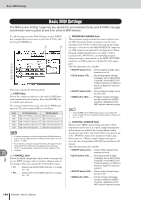
Editing Individual Automix Events 2 To display only events in a specific channel, move the cursor to the SELECTED CH ONLY button and press the [ENTER] key, then select the desired channel. 3 Move the cursor to the PARAM field and press the [ENTER] key to select the type of parameter to be displayed in the event list. The available parameter types are as follows. Display SCENE/LIB FADER ON PAN AUX/EFF AUX/EFF ON EQ (ON) EQ (FREQ) EQ (Q) EQ (GAIN) Parameter Scene/library recall Fader operation [ON] key operation Pan operation AUX/effect send operation AUX/effect on/off EQ on/off EQ center frequency EQ bandwidth EQ gain 4 Use the [DATA/JOG] dial or [INC]/[DEC] keys to select the type of parameter to be displayed in the list, then press the [ENTER] key. The specified events will appear in the event list. 5 Move the cursor to the icon to the left of the list and use the [DATA/JOG] dial or [INC]/[DEC] keys to scroll through the event list and select the event to be edited. The event enclosed by a dotted frame is currently selected for editing. HINT • The cursor can be quickly moved to the icon by pressing the [F1] key while holding the Display section [SHIFT] key. • When the cursor is inside the event list the cursor keys can also be used to scroll up and down the event list. Items that can be edited in the event list are as follows. A B C 1 TIME Specifies the position of the event. B CH Specifies the channel to which the event will apply. C Value Edits the value of the event type specified in the PARAM field. Parameter SCENE FADER ON PAN AUX/EFF AUX/EFF ON EQ (ON) EQ (FREQ) EQ (Q) EQ (GAIN) Value (Display) Description SCENE/LIB Scene/library type and scene/ library number dB, SEC Fader level, return time ON/OFF Channel on/off status L-C-R L63 (full left)-C (center)- R63 (full right) AUX/EFF, dB AUX/effect type and send level AUX/EFF, AUX/effect type and on/off ON/OFF status ON/OFF EQ on/off status Hz EQ center frequency Q EQ bandwidth dB Level of the operated band 6 Move the cursor to the appropriate item in the even list. Use the [DATA/JOG] dial or [INC]/[DEC] keys to set the value as required, then press the [ENTER] key. The edited data will change immediately. 7 When you want to add a new event, first move the cursor to the DUPLICATE button and press the [ENTER] key. A copy of the currently selected event will be created at the same location. You can then edit the time, channel, or value as required. HINT • Pressing the [F2] key while holding the Display section [SHIFT] key has the same effect as the DUPLICATE button. 8 To delete an unneeded event move the cursor to the DELETE button and press the [ENTER] key. The currently selected event will be deleted. HINT • Pressing the [F3] key while holding the Display section [SHIFT] key has the same effect as the DELETE button. 19 Automix AW2400 Owner's Manual 189
-
 1
1 -
2
-
3
-
4
-
5
-
6
-
7
-
8
-
9
-
10
-
11
-
12
-
13
-
14
-
15
-
16
-
17
-
18
-
19
-
20
-
21
-
22
-
23
-
24
-
25
-
26
-
27
-
28
-
29
-
30
-
31
-
32
-
33
-
34
-
35
-
36
-
37
-
38
-
39
-
40
-
41
-
42
-
43
-
44
-
45
-
46
-
47
-
48
-
49
-
50
-
51
-
52
-
53
-
54
-
55
-
56
-
57
-
58
-
59
-
60
-
61
-
62
-
63
-
64
-
65
-
66
-
67
-
68
-
69
-
70
-
71
-
72
-
73
-
74
-
75
-
76
-
77
-
78
-
79
-
80
-
81
-
82
-
83
-
84
-
85
-
86
-
87
-
88
-
89
-
90
-
91
-
92
-
93
-
94
-
95
-
96
-
97
-
98
-
99
-
100
-
101
-
102
-
103
-
104
-
105
-
106
-
107
-
108
-
109
-
110
-
111
-
112
-
113
-
114
-
115
-
116
-
117
-
118
-
119
-
120
-
121
-
122
-
123
-
124
-
125
-
126
-
127
-
128
-
129
-
130
-
131
-
132
-
133
-
134
-
135
-
136
-
137
-
138
-
139
-
140
-
141
-
142
-
143
-
144
-
145
-
146
-
147
-
148
-
149
-
150
-
151
-
152
-
153
-
154
-
155
-
156
-
157
-
158
-
159
-
160
-
161
-
162
-
163
-
164
-
165
-
166
-
167
-
168
-
169
-
170
-
171
-
172
-
173
-
174
-
175
-
176
-
177
-
178
-
179
-
180
-
181
-
182
-
183
-
 184
184 -
 185
185 -
 186
186 -
 187
187 -
 188
188 -
 189
189 -
 190
190 -
 191
191 -
 192
192 -
 193
193 -
 194
194 -
195
-
196
-
197
-
198
-
199
-
200
-
201
-
202
-
203
-
204
-
205
-
206
-
207
-
208
-
209
-
210
-
211
-
212
-
213
-
214
-
215
-
216
-
217
-
218
-
219
-
220
-
221
-
222
-
223
-
224
-
225
-
226
-
227
-
228
-
229
-
230
-
231
-
232
-
233
-
234
-
235
-
236
-
237
-
238
-
239
-
240
-
241
-
242
-
243
-
244
-
245
-
246
-
247
-
248
-
249
-
250
-
251
-
252
-
253
-
254
-
255
-
256
-
257
-
258
-
259
-
260
-
261
-
262
-
263
-
264
-
265
-
266
-
267
-
268
-
269
-
270
-
271
-
272
-
273
-
274
-
275
-
276
-
277
-
278
-
279
-
280
-
281
-
282
-
283
-
284
-
285
-
286
-
287
-
288
 |
 |
