Yamaha AW2400 Owner's Manual - Page 185
Automix Playback, Punch In and Out of Automix, Return Time Operation
 |
View all Yamaha AW2400 manuals
Add to My Manuals
Save this manual to your list of manuals |
Page 185 highlights
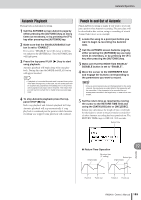
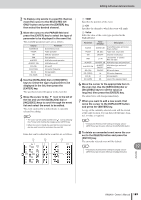
Automix Operation Automix Playback Playing back an Automix recording. 1 Call the AUTOMIX screen Automix page by either pressing the [AUTOMIX] key as many times as necessary, or by pressing the [F1] key after pressing the [AUTOMIX] key. 2 Make sure that the ENABLE/DISABLE button is set to "ENABLE". If it is set to "DISABLE" move the cursor to the button and press the [ENTER] key. The [AUTOMIX] key will light green. 3 Press the top-panel PLAY [ ] key to start song playback. Automix playback will begin along with song playback. During this time the MODE field PLAY button will appear inverted. HINT • If playback of a recorded Automix track is started from a point other than the beginning of the track, the mix at that point will be recalled (the parameters immediately prior to the point at which playback was begun will be recalled). This means that you will hear the correct mix no matter where you start playback. 4 To stop Automix playback press the toppanel STOP [■] key. Both song playback and Automix playback will stop. Automix playback will stop automatically if song playback is continued past the point at which Automix recording was stopped (song playback will continue). Punch In and Out of Automix Punch-In/Out recording is handy if you want to re-record just a portion of an Automix recording. The procedure will be described in this section, using re-recording of a track channel fader move as an example. 1 Locate the song to a point just before you want to begin re-recording the Automix data. 2 Call the AUTOMIX screen Automix page by either pressing the [AUTOMIX] key as many times as necessary, or by pressing the [F1] key after pressing the [AUTOMIX] key. 3 Make sure that the MODE field ENABLE/ DISABLE button is set to "ENABLE". 4 Move the cursor to the OVERWRITE field and engage the buttons corresponding to the parameters you want to record. NOTE • If you re-record a previously-recorded parameter to the same channel, the previously recorded data for that parameter will be overwritten. If the parameter to be recorded has not already been recorded in the target track, no data will be overwritten. 5 Set the return time as required by moving the cursor to the RETURN TIME field and using the [DATA/JOG] dial or [INC]/[DEC]. Return time determines the length of time it will take for the faders to return to the previously-recorded levels after Automix recording has been punched out. The RETURN TIME range is OFF, 0.0-30.0 seconds. Return Time 19 ● Return Time Operation Automix Original data No return time ("0" setting). Return time Original data Punch in Punch out Punch in Punch out AW2400 Owner's Manual 185
-
 1
1 -
2
-
3
-
4
-
5
-
6
-
7
-
8
-
9
-
10
-
11
-
12
-
13
-
14
-
15
-
16
-
17
-
18
-
19
-
20
-
21
-
22
-
23
-
24
-
25
-
26
-
27
-
28
-
29
-
30
-
31
-
32
-
33
-
34
-
35
-
36
-
37
-
38
-
39
-
40
-
41
-
42
-
43
-
44
-
45
-
46
-
47
-
48
-
49
-
50
-
51
-
52
-
53
-
54
-
55
-
56
-
57
-
58
-
59
-
60
-
61
-
62
-
63
-
64
-
65
-
66
-
67
-
68
-
69
-
70
-
71
-
72
-
73
-
74
-
75
-
76
-
77
-
78
-
79
-
80
-
81
-
82
-
83
-
84
-
85
-
86
-
87
-
88
-
89
-
90
-
91
-
92
-
93
-
94
-
95
-
96
-
97
-
98
-
99
-
100
-
101
-
102
-
103
-
104
-
105
-
106
-
107
-
108
-
109
-
110
-
111
-
112
-
113
-
114
-
115
-
116
-
117
-
118
-
119
-
120
-
121
-
122
-
123
-
124
-
125
-
126
-
127
-
128
-
129
-
130
-
131
-
132
-
133
-
134
-
135
-
136
-
137
-
138
-
139
-
140
-
141
-
142
-
143
-
144
-
145
-
146
-
147
-
148
-
149
-
150
-
151
-
152
-
153
-
154
-
155
-
156
-
157
-
158
-
159
-
160
-
161
-
162
-
163
-
164
-
165
-
166
-
167
-
168
-
169
-
170
-
171
-
172
-
173
-
174
-
175
-
176
-
177
-
178
-
179
-
 180
180 -
 181
181 -
 182
182 -
 183
183 -
 184
184 -
 185
185 -
 186
186 -
 187
187 -
 188
188 -
 189
189 -
 190
190 -
191
-
192
-
193
-
194
-
195
-
196
-
197
-
198
-
199
-
200
-
201
-
202
-
203
-
204
-
205
-
206
-
207
-
208
-
209
-
210
-
211
-
212
-
213
-
214
-
215
-
216
-
217
-
218
-
219
-
220
-
221
-
222
-
223
-
224
-
225
-
226
-
227
-
228
-
229
-
230
-
231
-
232
-
233
-
234
-
235
-
236
-
237
-
238
-
239
-
240
-
241
-
242
-
243
-
244
-
245
-
246
-
247
-
248
-
249
-
250
-
251
-
252
-
253
-
254
-
255
-
256
-
257
-
258
-
259
-
260
-
261
-
262
-
263
-
264
-
265
-
266
-
267
-
268
-
269
-
270
-
271
-
272
-
273
-
274
-
275
-
276
-
277
-
278
-
279
-
280
-
281
-
282
-
283
-
284
-
285
-
286
-
287
-
288
 |
 |
