Yamaha AW2400 Owner's Manual - Page 54
Assigning input signals to tracks (Mixed recording), RECORD] key as many times as necessary
 |
View all Yamaha AW2400 manuals
Add to My Manuals
Save this manual to your list of manuals |
Page 54 highlights
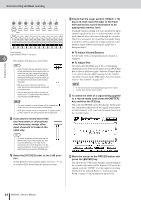
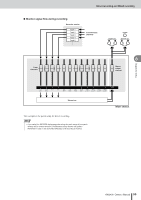
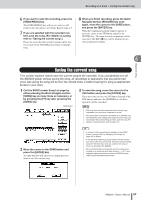
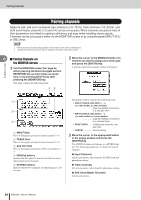
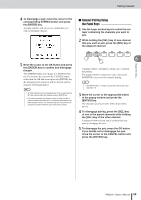
Direct recording and Mixed recording Assigning input signals to tracks (Mixed recording) Use the following procedure to set up the patching so you can mix and record the signals from multiple instruments/ mics connected to [MIC/LINE INPUT] jacks 1-8 to one or more tracks. HINT • Refer to page 102 for more details on patching for mixed recording. 6 1 Lower the [STEREO] fader to the -∞ position. 2 Referring to "Connection and Setup" on page 37, connect your instruments and/or microphones and set up the input levels. Track recording 3 Call the RECORD screen Mixed page by either pressing the Quick Navigate section [RECORD] key as many times as necessary, or by pressing the [F2] key after pressing the [RECORD] key. Via the RECORD screen Mixed page you can patch multiple input channels to either of the AW2400's stereo buses (Bus1 and Bus2), allowing mixed signals to be assigned to up to four tracks. Input channels Input select 5 Press the [INPUT SEL] key for the input channel to which your instrument/microphone is connected. The currently selected [INPUT SEL] key will light orange, and that input channel will be selected for operation. The symbol for the corresponding input channel will be highlighted in the screen, and a line will appear indicating that this channel is connected to the bus. 6 Repeatedly press the same [INPUT SEL] key to select the bus to which you want to send the signal from that input channel. Each time you press the [INPUT SEL] key the screen will change as follows. AOff EBus 2 L/R On BBus 1 L/R On FBus 2 L On CBus 1 L On GBus 2 R On DBus 1 R On To A Tracks 4 Check that "AD1-8" appears in the input select field on the left side of the page. If a different input source is selected move the cursor to the input select field and use the [DATA/JOG] dial or [INC]/[DEC] keys to select "AD1-8". HINT • Input channels that are patched to Bus1 or Bus2 will be automatically disconnected from the stereo bus and their signal will not be output via the [STEREO OUT] or [MONITOR OUT] jacks (the signals being recorded can be monitored via the track channel being recorded). • When an input is disconnected from Bus1 or Bus2, that input is automatically re-patched to the stereo bus. • You can also switch to Bus1/Bus2 by moving the cursor to the symbol of the desired input channel and pressing the [ENTER] key. 7 Use the same procedure to specify other input channels as recording sources as required. NOTE • To select the [DIGITAL STEREO IN] connector as the record source you will need to assign the [DIGITAL STEREO IN] connector to an adjacent pair of odd- and even-numbered tracks via the DIGITAL IN field (1.2-15.16). See page 102 for details. 54 AW2400 Owner's Manual
-
 1
1 -
2
-
3
-
4
-
5
-
6
-
7
-
8
-
9
-
10
-
11
-
12
-
13
-
14
-
15
-
16
-
17
-
18
-
19
-
20
-
21
-
22
-
23
-
24
-
25
-
26
-
27
-
28
-
29
-
30
-
31
-
32
-
33
-
34
-
35
-
36
-
37
-
38
-
39
-
40
-
41
-
42
-
43
-
44
-
45
-
46
-
47
-
48
-
 49
49 -
 50
50 -
 51
51 -
 52
52 -
 53
53 -
 54
54 -
 55
55 -
 56
56 -
 57
57 -
 58
58 -
 59
59 -
60
-
61
-
62
-
63
-
64
-
65
-
66
-
67
-
68
-
69
-
70
-
71
-
72
-
73
-
74
-
75
-
76
-
77
-
78
-
79
-
80
-
81
-
82
-
83
-
84
-
85
-
86
-
87
-
88
-
89
-
90
-
91
-
92
-
93
-
94
-
95
-
96
-
97
-
98
-
99
-
100
-
101
-
102
-
103
-
104
-
105
-
106
-
107
-
108
-
109
-
110
-
111
-
112
-
113
-
114
-
115
-
116
-
117
-
118
-
119
-
120
-
121
-
122
-
123
-
124
-
125
-
126
-
127
-
128
-
129
-
130
-
131
-
132
-
133
-
134
-
135
-
136
-
137
-
138
-
139
-
140
-
141
-
142
-
143
-
144
-
145
-
146
-
147
-
148
-
149
-
150
-
151
-
152
-
153
-
154
-
155
-
156
-
157
-
158
-
159
-
160
-
161
-
162
-
163
-
164
-
165
-
166
-
167
-
168
-
169
-
170
-
171
-
172
-
173
-
174
-
175
-
176
-
177
-
178
-
179
-
180
-
181
-
182
-
183
-
184
-
185
-
186
-
187
-
188
-
189
-
190
-
191
-
192
-
193
-
194
-
195
-
196
-
197
-
198
-
199
-
200
-
201
-
202
-
203
-
204
-
205
-
206
-
207
-
208
-
209
-
210
-
211
-
212
-
213
-
214
-
215
-
216
-
217
-
218
-
219
-
220
-
221
-
222
-
223
-
224
-
225
-
226
-
227
-
228
-
229
-
230
-
231
-
232
-
233
-
234
-
235
-
236
-
237
-
238
-
239
-
240
-
241
-
242
-
243
-
244
-
245
-
246
-
247
-
248
-
249
-
250
-
251
-
252
-
253
-
254
-
255
-
256
-
257
-
258
-
259
-
260
-
261
-
262
-
263
-
264
-
265
-
266
-
267
-
268
-
269
-
270
-
271
-
272
-
273
-
274
-
275
-
276
-
277
-
278
-
279
-
280
-
281
-
282
-
283
-
284
-
285
-
286
-
287
-
288
 |
 |
