Yamaha AW2400 Owner's Manual - Page 182
Creating a New Automix Recording, times as necessary, or by pressing the [F1]
 |
View all Yamaha AW2400 manuals
Add to My Manuals
Save this manual to your list of manuals |
Page 182 highlights
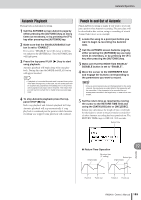
Automix Operation • REC button ..........Turning this button on while the recorder section is stopped engages the Automix record standby mode. When the recorder section is running it is necessary to press the PLAY button after the REC button to engage the Automix record standby mode. This button is automatically disengaged when recording is completed. • AUTOREC button Engages the Automix record standby mode. Unlike the REC button, this button remains engaged after recording is completed and the record standby mode will remain engaged until it is manually turned off. HINT • Pressing the [F1]-[F4] keys while holding the Display section [SHIFT] key has the same effect as the ENABLE/DISABLE ([F1] key), STOP ([F2] key), PLAY ([F3] key), and REC ([F4] key) buttons, respectively. 19 Automix B COMMAND field Allows creation of a new Automix recording, and provides an undo function. • NEW button..........Clears the current Automix data to make way for a new Automix recording. • UNDO button .......Clears the last recorded Automix data, returning to the state immediately before the last Automix recording pass. C OVERWRITE field Selects the parameters to be recorded (or overwritten) by Automix recording. The buttons correspond to the parameters as follows. • CH ON button ......[ON] key operation for each channel • FADER button......Fader operation for each channel • AUX/EFFECT SEND ON button AUX and effect send operation for each channel (mute on/off) • AUX/EFFECT SEND button AUX and effect send level operation for each channel • EQ button EQ operation for each channel • PAN button...........Pan operation for each channel HINT • Using the RETURN TIME field to the right of the FADER button you can specify how long it will take the faders to return to their original positions when Automix recording is stopped or punched out (→ p. 185). • Scene and library recall operations are always recorded, regardless of the OVERWRITE field settings. D FREE Displays the amount of free Automix memory available in kilobytes (KB) and as a percentage. Creating a New Automix Recording A new Automix recording must be created before actual Automix recording can occur. NOTE • The contents of the current Automix recording will be erased when a new Automix recording is created. To save the current Automix data refer to "Automix Library Operation" on page 190. 1 Use the channel faders, pan controls, EQ, etc., to set up the mix at the beginning of the current song, and save the mix as a scene. The saved "initial" scene will serve as the starting point for the Automix recording. To use a different scene as the starting point for the Automix recording, recall the desired scene. Refer to "Scene Memory Operation" on page 159 for details. HINT • When a new Automix recording is created, a "recall event" for the last saved or recalled scene is recorded at the very beginning of the Automix recording. This initial scene can be changed later, as described on page 188. 2 Call the AUTOMIX screen Automix page by either pressing the [AUTOMIX] key as many times as necessary, or by pressing the [F1] key after pressing the [AUTOMIX] key. 3 Move the cursor to the NEW button in the COMMAND field and press the [ENTER] key. A confirmation popup window for the new Automix recording will appear. 4 Move the cursor to the OK button and press the [ENTER] key. The current Automix data will be erased and a new Automix recording will be created. Creation of a new Automix recording can be aborted by moving the cursor to the CANCEL button and pressing the [ENTER] key. 182 AW2400 Owner's Manual
-
 1
1 -
2
-
3
-
4
-
5
-
6
-
7
-
8
-
9
-
10
-
11
-
12
-
13
-
14
-
15
-
16
-
17
-
18
-
19
-
20
-
21
-
22
-
23
-
24
-
25
-
26
-
27
-
28
-
29
-
30
-
31
-
32
-
33
-
34
-
35
-
36
-
37
-
38
-
39
-
40
-
41
-
42
-
43
-
44
-
45
-
46
-
47
-
48
-
49
-
50
-
51
-
52
-
53
-
54
-
55
-
56
-
57
-
58
-
59
-
60
-
61
-
62
-
63
-
64
-
65
-
66
-
67
-
68
-
69
-
70
-
71
-
72
-
73
-
74
-
75
-
76
-
77
-
78
-
79
-
80
-
81
-
82
-
83
-
84
-
85
-
86
-
87
-
88
-
89
-
90
-
91
-
92
-
93
-
94
-
95
-
96
-
97
-
98
-
99
-
100
-
101
-
102
-
103
-
104
-
105
-
106
-
107
-
108
-
109
-
110
-
111
-
112
-
113
-
114
-
115
-
116
-
117
-
118
-
119
-
120
-
121
-
122
-
123
-
124
-
125
-
126
-
127
-
128
-
129
-
130
-
131
-
132
-
133
-
134
-
135
-
136
-
137
-
138
-
139
-
140
-
141
-
142
-
143
-
144
-
145
-
146
-
147
-
148
-
149
-
150
-
151
-
152
-
153
-
154
-
155
-
156
-
157
-
158
-
159
-
160
-
161
-
162
-
163
-
164
-
165
-
166
-
167
-
168
-
169
-
170
-
171
-
172
-
173
-
174
-
175
-
176
-
 177
177 -
 178
178 -
 179
179 -
 180
180 -
 181
181 -
 182
182 -
 183
183 -
 184
184 -
 185
185 -
 186
186 -
 187
187 -
188
-
189
-
190
-
191
-
192
-
193
-
194
-
195
-
196
-
197
-
198
-
199
-
200
-
201
-
202
-
203
-
204
-
205
-
206
-
207
-
208
-
209
-
210
-
211
-
212
-
213
-
214
-
215
-
216
-
217
-
218
-
219
-
220
-
221
-
222
-
223
-
224
-
225
-
226
-
227
-
228
-
229
-
230
-
231
-
232
-
233
-
234
-
235
-
236
-
237
-
238
-
239
-
240
-
241
-
242
-
243
-
244
-
245
-
246
-
247
-
248
-
249
-
250
-
251
-
252
-
253
-
254
-
255
-
256
-
257
-
258
-
259
-
260
-
261
-
262
-
263
-
264
-
265
-
266
-
267
-
268
-
269
-
270
-
271
-
272
-
273
-
274
-
275
-
276
-
277
-
278
-
279
-
280
-
281
-
282
-
283
-
284
-
285
-
286
-
287
-
288
 |
 |
