Yamaha AW2400 Owner's Manual - Page 52
To Adjust Volume/Balance, To Adjust Pan
 |
View all Yamaha AW2400 manuals
Add to My Manuals
Save this manual to your list of manuals |
Page 52 highlights
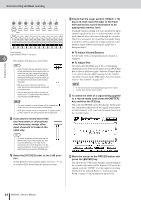
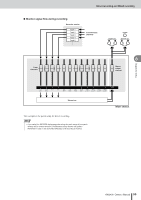
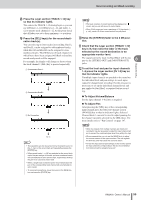
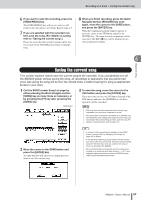
Direct recording and Mixed recording Track recording flash Track channels (Layer section [TRACK 1-12] key lit) 6 The display will appear as shown here. HINT • Input channels that are patched to tracks will be automatically disconnected from the stereo bus and their signal will not be output via the [STEREO OUT] or [MONITOR OUT] jacks (the signals being recorded can be monitored via the track channel being recorded). • When an input is disconnected from a track, that input is automatically re-patched to the stereo bus. • You can also select a track by moving the cursor to the symbol of the desired track and pressing the [ENTER] key. NOTE • The track numbers of muted tracks will be displayed as (mute), but you can still record to muted tracks. • Since 24-bit songs can have a maximum of 12 play tracks (→ p. 165), tracks 13-24 are muted and will not play back. 8 If you want to record more than one instrument or microphone simultaneously, assign other input channels to tracks in the same way. HINT • To cancel a patched connection press the [INPUT SEL] key so that it lights red, then press the [SEL] key of the track that is selected as the record destination. To cancel all connections, move the cursor to the SAFE button and press the [ENTER] key. 9 Raise the [STEREO] fader to the 0 dB position. At this point the track channel faders are set to - ∞, so no sound will be heard from the monitor system. 10 Check that the Layer section [TRACK 1-12] key is lit, then raise the fader of the track selected as the record destination to an appropriate monitor level. Normally when recording you don't monitor the input channel signal before it is recorded, but rather via the track channel after it has passed through the recorder. This lets you monitor the signal that is actually being recorded as well as adjust the volume and tone of the monitor signal without affecting the signal that is being recorded. ● To Adjust Volume/Balance Set the fader of the corresponding track channel as required. ● To Adjust Pan After pressing the [SEL] key of the corresponding channel press the Selected Channel section [PAN/EQ] key so that its indicator lights. Selected Channel knob 1 can now be used to adjust panning for the channel currently selected via the [SEL] keys. For more details refer to "Pan Control" on page 147. NOTE • In the direct-record mode adjusting the pan of the record source input channel has no effect. 11 To check the level of a signal being applied to a record-ready track press the [METER] key and then the [F2] key. This calls the METER screen Track page. In this page you can monitor the levels of the signals at the inputs of track channels 1-24, sent from the input channels to the recorder tracks. 12 Move the cursor to the PRE EQ button and press the [ENTER] key. The input levels of the track channels corresponding to the record-ready tracks will be displayed. If any of the signals reach the "OVER" level the input level setting will need to be reduced. Refer to "Connection and Setup" on page 37 and readjust the input levels. 52 AW2400 Owner's Manual
-
 1
1 -
2
-
3
-
4
-
5
-
6
-
7
-
8
-
9
-
10
-
11
-
12
-
13
-
14
-
15
-
16
-
17
-
18
-
19
-
20
-
21
-
22
-
23
-
24
-
25
-
26
-
27
-
28
-
29
-
30
-
31
-
32
-
33
-
34
-
35
-
36
-
37
-
38
-
39
-
40
-
41
-
42
-
43
-
44
-
45
-
46
-
 47
47 -
 48
48 -
 49
49 -
 50
50 -
 51
51 -
 52
52 -
 53
53 -
 54
54 -
 55
55 -
 56
56 -
 57
57 -
58
-
59
-
60
-
61
-
62
-
63
-
64
-
65
-
66
-
67
-
68
-
69
-
70
-
71
-
72
-
73
-
74
-
75
-
76
-
77
-
78
-
79
-
80
-
81
-
82
-
83
-
84
-
85
-
86
-
87
-
88
-
89
-
90
-
91
-
92
-
93
-
94
-
95
-
96
-
97
-
98
-
99
-
100
-
101
-
102
-
103
-
104
-
105
-
106
-
107
-
108
-
109
-
110
-
111
-
112
-
113
-
114
-
115
-
116
-
117
-
118
-
119
-
120
-
121
-
122
-
123
-
124
-
125
-
126
-
127
-
128
-
129
-
130
-
131
-
132
-
133
-
134
-
135
-
136
-
137
-
138
-
139
-
140
-
141
-
142
-
143
-
144
-
145
-
146
-
147
-
148
-
149
-
150
-
151
-
152
-
153
-
154
-
155
-
156
-
157
-
158
-
159
-
160
-
161
-
162
-
163
-
164
-
165
-
166
-
167
-
168
-
169
-
170
-
171
-
172
-
173
-
174
-
175
-
176
-
177
-
178
-
179
-
180
-
181
-
182
-
183
-
184
-
185
-
186
-
187
-
188
-
189
-
190
-
191
-
192
-
193
-
194
-
195
-
196
-
197
-
198
-
199
-
200
-
201
-
202
-
203
-
204
-
205
-
206
-
207
-
208
-
209
-
210
-
211
-
212
-
213
-
214
-
215
-
216
-
217
-
218
-
219
-
220
-
221
-
222
-
223
-
224
-
225
-
226
-
227
-
228
-
229
-
230
-
231
-
232
-
233
-
234
-
235
-
236
-
237
-
238
-
239
-
240
-
241
-
242
-
243
-
244
-
245
-
246
-
247
-
248
-
249
-
250
-
251
-
252
-
253
-
254
-
255
-
256
-
257
-
258
-
259
-
260
-
261
-
262
-
263
-
264
-
265
-
266
-
267
-
268
-
269
-
270
-
271
-
272
-
273
-
274
-
275
-
276
-
277
-
278
-
279
-
280
-
281
-
282
-
283
-
284
-
285
-
286
-
287
-
288
 |
 |
