Yamaha AW2400 Owner's Manual - Page 232
Exiting the USB Storage Mode, In the case of Mac OSX
 |
View all Yamaha AW2400 manuals
Add to My Manuals
Save this manual to your list of manuals |
Page 232 highlights
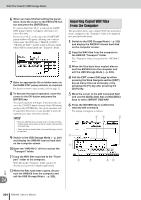
WAV File Transfer (USB Storage Mode) 8 Open the appropriate drive/folder and copy the required WAV files or directly edit the WAV files using a waveform editor application. To access the Transport folder open the "AW2400-2" drive. To directly access WAV files on the AW2400 open the "Song1" folder on the "AW2400-1" drive and the "Song2" folder on the "AW2400-2" drive. These folders contain folders bearing the names of the recorded songs (extension .AWS), and those folders further contain folders labeled "Audio" that contain the actual audio data. To backup a complete song to the computer simply copy the folder bearing the name of the song you want to backup to the computer. Refer to "Song Folder Organization" on page 166 for information on how the folders are organized. HINT • Verification and repair of the internal hard disk can be carried out from the computer. From a Windows computer enter the "chkdsk" command at the command prompt, or from a Macintosh computer running OS X use the Disk Utility First Aid function. NOTE • For 24-bit songs, the audio data contained in the "Audio" folders is stored in 32-bit WAV format. If your waveform editor application cannot handle 32-bit data, first export the WAV file(s) to the "Transport" folder. WAV files imported or exported via the "Transport" folder are automatically converted to 24-bit format that can be edited using most waveform editor software. • Do not change the names of any folders/files other than those in the Transport folder. Any folder/file names that have been added or changed outside the Transport folder from the computer will be automatically deleted. Be especially careful not to change a song folder or song file name. • Files larger than 4 GB cannot be copied. Be sure to carry out the steps outlined in "Exiting the USB Storage Mode" when disconnecting the AW2400 from the computer. Exiting the USB Storage Mode Use the following procedure to exit from the USB Storage Mode. 1 Be sure the "unmount" the AW2400 hard disk from your computer after closing all AW2400 windows. ● In the case of Windows XP: Click the "Safely Remove Hardware" icon in the taskbar and remove the corresponding two "USB mass storage devices". NOTE • If an error message appears, execute "Safely Remove Hardware" one or two more times. You should then be able to remove the device without seeing an error message. ● In the case of Mac OSX: Drag the "AW2400-1" and "AW2400-2" icons from the desktop to the trash. 2 In the AW2400 screen, move the cursor to the CANCEL button and press the [ENTER] key. A popup window confirming whether the AW2400 has been safely removed from the computer will appear. 3 To return to the normal mode move the cursor to the OK button and press the [ENTER] key. USB 24 232 AW2400 Owner's Manual
-
 1
1 -
2
-
3
-
4
-
5
-
6
-
7
-
8
-
9
-
10
-
11
-
12
-
13
-
14
-
15
-
16
-
17
-
18
-
19
-
20
-
21
-
22
-
23
-
24
-
25
-
26
-
27
-
28
-
29
-
30
-
31
-
32
-
33
-
34
-
35
-
36
-
37
-
38
-
39
-
40
-
41
-
42
-
43
-
44
-
45
-
46
-
47
-
48
-
49
-
50
-
51
-
52
-
53
-
54
-
55
-
56
-
57
-
58
-
59
-
60
-
61
-
62
-
63
-
64
-
65
-
66
-
67
-
68
-
69
-
70
-
71
-
72
-
73
-
74
-
75
-
76
-
77
-
78
-
79
-
80
-
81
-
82
-
83
-
84
-
85
-
86
-
87
-
88
-
89
-
90
-
91
-
92
-
93
-
94
-
95
-
96
-
97
-
98
-
99
-
100
-
101
-
102
-
103
-
104
-
105
-
106
-
107
-
108
-
109
-
110
-
111
-
112
-
113
-
114
-
115
-
116
-
117
-
118
-
119
-
120
-
121
-
122
-
123
-
124
-
125
-
126
-
127
-
128
-
129
-
130
-
131
-
132
-
133
-
134
-
135
-
136
-
137
-
138
-
139
-
140
-
141
-
142
-
143
-
144
-
145
-
146
-
147
-
148
-
149
-
150
-
151
-
152
-
153
-
154
-
155
-
156
-
157
-
158
-
159
-
160
-
161
-
162
-
163
-
164
-
165
-
166
-
167
-
168
-
169
-
170
-
171
-
172
-
173
-
174
-
175
-
176
-
177
-
178
-
179
-
180
-
181
-
182
-
183
-
184
-
185
-
186
-
187
-
188
-
189
-
190
-
191
-
192
-
193
-
194
-
195
-
196
-
197
-
198
-
199
-
200
-
201
-
202
-
203
-
204
-
205
-
206
-
207
-
208
-
209
-
210
-
211
-
212
-
213
-
214
-
215
-
216
-
217
-
218
-
219
-
220
-
221
-
222
-
223
-
224
-
225
-
226
-
 227
227 -
 228
228 -
 229
229 -
 230
230 -
 231
231 -
 232
232 -
 233
233 -
 234
234 -
 235
235 -
 236
236 -
 237
237 -
238
-
239
-
240
-
241
-
242
-
243
-
244
-
245
-
246
-
247
-
248
-
249
-
250
-
251
-
252
-
253
-
254
-
255
-
256
-
257
-
258
-
259
-
260
-
261
-
262
-
263
-
264
-
265
-
266
-
267
-
268
-
269
-
270
-
271
-
272
-
273
-
274
-
275
-
276
-
277
-
278
-
279
-
280
-
281
-
282
-
283
-
284
-
285
-
286
-
287
-
288
 |
 |
