Yamaha AW2400 Owner's Manual - Page 215
Basic settings for the CD-RW drive, AUDIO WRITE SPEED
 |
View all Yamaha AW2400 manuals
Add to My Manuals
Save this manual to your list of manuals |
Page 215 highlights
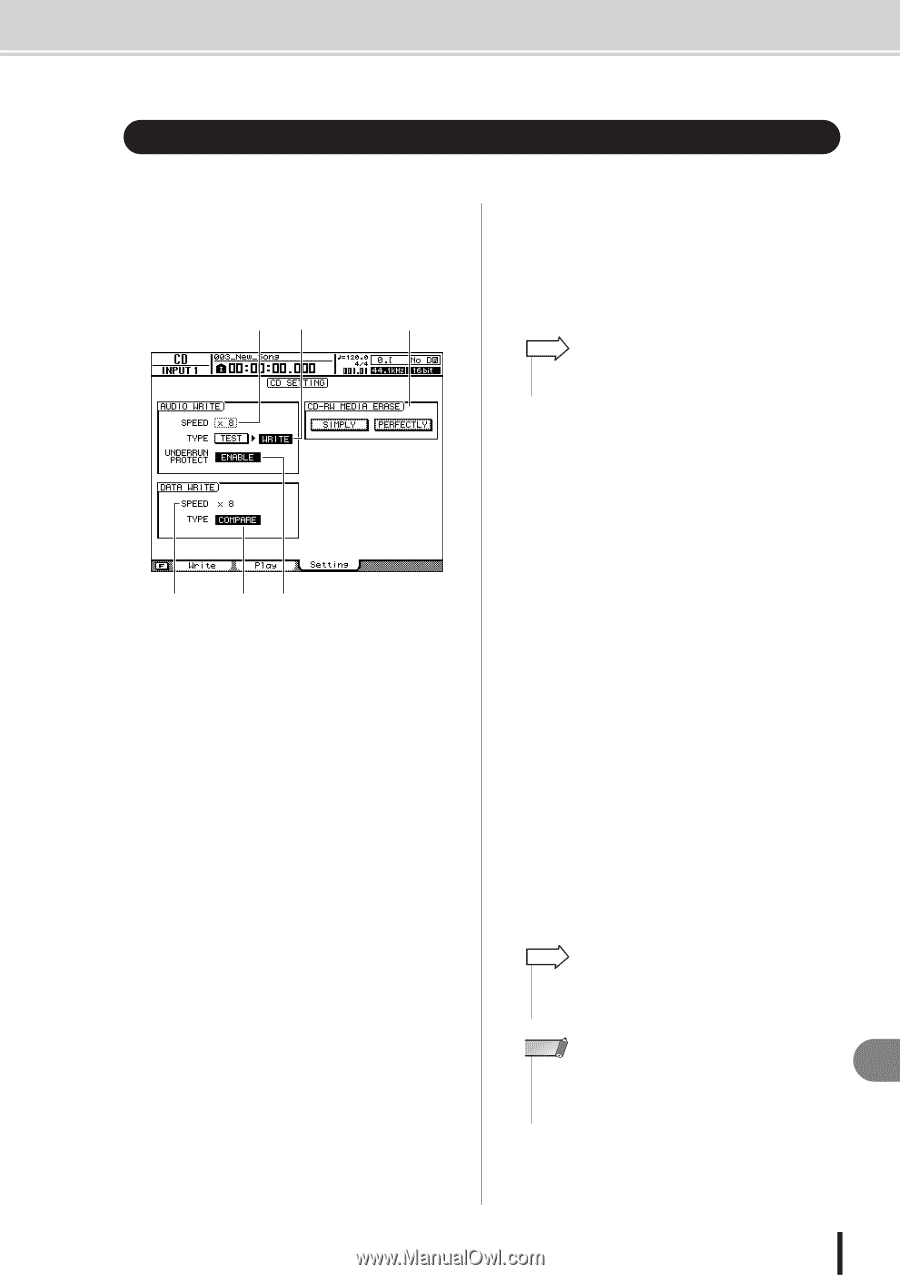
Basic settings for the CD-RW drive Basic settings for the CD-RW drive Before you actually write data to a CD, you will need to make basic settings for the CD-RW drive. 1 Call the Setting page by either pressing the Work Navigate section [CD] key as many times as necessary, or by pressing the [F3] key after pressing the [CD] key. The CD screen Setting page will appear. AB F 2 Move the cursor to the AUDIO WRITE SPEED field, and turn the [DATA/JOG] dial to select the write speed. You can select either x8 (eight times audio playback speed) or x4 (four times audio playback speed). Normally you should use x8, and reduce the speed to x4 only if errors occur during writing. HINT • In addition to the [DATA/JOG] dial, the [INC]/[DEC] keys can be used to make selections. D EC 1 AUDIO WRITE SPEED Selects the speed at which audio data will be written to CD-R/RW media. B AUDIO WRITE TYPE Selects the write method to be used when writing audio data to CD-R/RW media. C UNDERRUN PROTECT button Enables/disables the function that prevents buffer underrun (an error that can occur when data transfer cannot keep up with write speed). D DATA WRITE SPEED This indicates the speed at which data other than CD audio (e.g., backup data or WAV files) is written to CD-R/RW media. Normally this will indicate x8, but may be x4 if the media supports a maximum write speed of x4. This field is for display only, and cannot be edited. E DATA WRITE TYPE Selects the write method to be used when writing backup data to CD-R/RW media. If the COMPARE button is on, the original data will be compared with the backed-up data or the exported WAV file after a backup or export operation, to check whether any errors occurred while writing the data. Refer to "Backing up songs" on page 177 for information on backup procedures. F CD-RW MEDIA ERASE Erases the data that was written to CD-RW media. For details, refer to "Erasing CD-RW media" (→ p. 221). 3 Use the TEST and WRITE buttons of the AUDIO WRITE TYPE field to select the write operation(s). The combination of buttons will determine the operation(s) that will occur, as follows. • Only the TEST button On ...........Only a write test will be performed. • Only the WRITE button On ...........Writing will occur immediately. • Both the WRITE and TEST buttons On ...........First a write test will be performed, and then the actual writing will be performed. Depending on the media and the state of the hard disk, it is possible that an error may occur while the data is being written. (If you are using a CD-R, this will make the media unusable.) You can turn on the TEST button to check whether an error will occur before you actually write the disc. If an error occurs during the test, halt the procedure, and either reduce the write speed or set the UNDERRUN PROTECT button to ENABLE. 4 If desired, set the UNDERRUN PROTECT button to ENABLE. The AW2400 CD-RW drive has a function to prevent "buffer underrun" errors that can occur if data transfer cannot keep up with the write speed. Switch the UNDERRUN PROTECT button to the "ENABLE" setting to prevent buffer underruns. HINT • The CD-RW drive factory settings can be restored from the CD screen CD Setting page by pressing the [F3] key (DEFAULT) while holding the [SHIFT] key. Creating an audio CD NOTE • If the UNDERRUN PROTECT button is set to ENABLE, the TEST button will automatically be turned off. Also, if the TEST button is turned on, the UNDERRUN PROTECT button will automatically be set to DISABLE. 22 AW2400 Owner's Manual 215
-
 1
1 -
2
-
3
-
4
-
5
-
6
-
7
-
8
-
9
-
10
-
11
-
12
-
13
-
14
-
15
-
16
-
17
-
18
-
19
-
20
-
21
-
22
-
23
-
24
-
25
-
26
-
27
-
28
-
29
-
30
-
31
-
32
-
33
-
34
-
35
-
36
-
37
-
38
-
39
-
40
-
41
-
42
-
43
-
44
-
45
-
46
-
47
-
48
-
49
-
50
-
51
-
52
-
53
-
54
-
55
-
56
-
57
-
58
-
59
-
60
-
61
-
62
-
63
-
64
-
65
-
66
-
67
-
68
-
69
-
70
-
71
-
72
-
73
-
74
-
75
-
76
-
77
-
78
-
79
-
80
-
81
-
82
-
83
-
84
-
85
-
86
-
87
-
88
-
89
-
90
-
91
-
92
-
93
-
94
-
95
-
96
-
97
-
98
-
99
-
100
-
101
-
102
-
103
-
104
-
105
-
106
-
107
-
108
-
109
-
110
-
111
-
112
-
113
-
114
-
115
-
116
-
117
-
118
-
119
-
120
-
121
-
122
-
123
-
124
-
125
-
126
-
127
-
128
-
129
-
130
-
131
-
132
-
133
-
134
-
135
-
136
-
137
-
138
-
139
-
140
-
141
-
142
-
143
-
144
-
145
-
146
-
147
-
148
-
149
-
150
-
151
-
152
-
153
-
154
-
155
-
156
-
157
-
158
-
159
-
160
-
161
-
162
-
163
-
164
-
165
-
166
-
167
-
168
-
169
-
170
-
171
-
172
-
173
-
174
-
175
-
176
-
177
-
178
-
179
-
180
-
181
-
182
-
183
-
184
-
185
-
186
-
187
-
188
-
189
-
190
-
191
-
192
-
193
-
194
-
195
-
196
-
197
-
198
-
199
-
200
-
201
-
202
-
203
-
204
-
205
-
206
-
207
-
208
-
209
-
 210
210 -
 211
211 -
 212
212 -
 213
213 -
 214
214 -
 215
215 -
 216
216 -
 217
217 -
 218
218 -
 219
219 -
 220
220 -
221
-
222
-
223
-
224
-
225
-
226
-
227
-
228
-
229
-
230
-
231
-
232
-
233
-
234
-
235
-
236
-
237
-
238
-
239
-
240
-
241
-
242
-
243
-
244
-
245
-
246
-
247
-
248
-
249
-
250
-
251
-
252
-
253
-
254
-
255
-
256
-
257
-
258
-
259
-
260
-
261
-
262
-
263
-
264
-
265
-
266
-
267
-
268
-
269
-
270
-
271
-
272
-
273
-
274
-
275
-
276
-
277
-
278
-
279
-
280
-
281
-
282
-
283
-
284
-
285
-
286
-
287
-
288
 |
 |